|
Wing Commander
VENICE SYSTEM
Venice 1
|
Primary Objectives
|
Fly your assigned patrol.
|
|
Your Ship
|
Rapier
|
|
Wingman
|
Hunter
|
|
Other Friendly Ships
|
None
|
|
Briefing
|
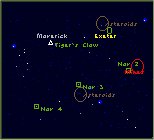
You'll fly a four-point patrol. At the first Nav Point, you'll fly by one of our own Exeters. From there on out, though, you'll be in unknown territory. Now there's a lot of debris floating around out there and we believe that a lot of it is going to be Kilrathi mines. You'll be flying near debris at Navs 1, 2, and 3, so be careful. And I want a report on the locations of any minefields you encounter.
|
NAV 1
Asteroid Field
NAV 2
Mine Field
2 Jalthi
NAV 3
Asteroid Field
BETWEEN NAV 3 AND 4
Mine Field
NAV 4
Wave 1
4 Krant
1 Ralari
Wave 2
4 Gratha
|
|
Notes
- Nav 1 is empty so just hit the Nav point and fly on. Nav 2 is a minefield with a couple of Jalthi. They shouldn't prove too much of a problem providing you be careful of mines. Save your missiles for the next fight. Nav 3 is surrounded by asteroids and mines so be careful flying through there. Hopefully you'll reach Nav 4 in good shape.
- Nav 4 is the real fight. A Ralari and two waves each consisting of 4 fighters. Khajja the Fang is leading the first wave of fighters so take him out first. From then on it's just you, Hunter, and the remaining standard fighters. And, of course, a Ralari. Fire as many missiles as you need to so long as you save one for the second wave. You'll be fine while Hunter is around to cover your back.
Outcome
Success / Failure go to Venice 2.
Venice 2
|
Primary Objectives
|
Locate and destroy Fralthi
|
|
Your Ship
|
Rapier
|
|
Wingman
|
Hunter
|
|
Other Friendly Ships
|
2 Rapiers
|
|
Briefing
|
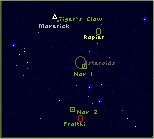
You'll rendezvous with two Rapiers, Foxtrot Wing, from the Kyoto, here. From this point, you'll proceed to Nav 1 skirting the edge of an asteroid field. Then you'll head on to Nav 2, the last reported position of the Fralthi. She can't be far from this point, and she's an awfully big bogey. You shouldn't have any trouble finding her.
|
NAV 1
Asteroid Field
Wave 1
2 Gratha
Wave 2
2 Gratha
NAV 2
Wave 1
4 Salthi
1 Fralthi
Wave 2
4 Krant
|
|
Notes
- Thankfully due to the two Rapiers from the Kyoto, you are never really outnumbered in this mission. The first Nav point is simple enough as long as you are careful of any asteroids. Try to stay in good condition for the fight at Nav 2. While you only ever face four fighters at one time and there are four Rapiers, you still need to be careful since often all three wingmen will go after the same ship which leaves the others to have a shot at you. You also need to be careful when your wingmen decide to target the same ship as you since they'll attempt to fire through you which can hurt. When all fighters have been destroyed, it's time for the Fralthi. Simply use gun fire and your remaining missiles and it will soon go down, especially with your wingmen helping.
Outcome
Success / Failure go to Venice 3.
Venice 3
|
Primary Objectives
|
Patrol the area to the Claw's starboard side
|
|
Your Ship
|
Rapier
|
|
Wingman
|
Hunter
|
|
Other Friendly Ships
|
None
|
|
Briefing
|
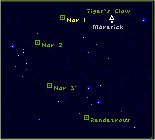
This is essentially a three-point patrol except that you'll rendezvous with the Tiger's Claw at Nav 3 instead of returning to the Claw's original position. Be on the lookout for any enemy vessels in the area. It's safe to assume any Kilrathi you see is headed to attack the Claw so your orders are to immediately engage and destroy all enemy ships.
|
NAV 1
Mine Field
NAV 2
Mine Field
2 Jalthi
NAV 3
2 Dralthi
1 Ralari
CLAW NAV
4 Gratha
|
|
Notes
- Bear in mind that the big fight in this mission is defending the Claw at the last Nav point. Be careful in the minefields, and save your missiles. Fortunately you only face a couple of fighters at each Nav point and that Ralari. By now you should be experienced at taking out everything you face and able to do it with ease. When you reach the Claw, order Hunter to Break & Attack, then afterburn towards the Claw. There will be a group of two Gratha attacking it, so break up that group by firing a FoF missile at them. Just keep firing your missiles and try to take out your target as quickly as possible so you can move on to the next. The Claw can take a fair bit of damage, but it will be destroyed after a while so speed is important.
Outcome
Success / Failure go to Venice 4.
Venice 4
|
Primary Objectives
|
Destroy Kilrathi Starbase
|
|
Your Ship
|
Rapier
|
|
Wingman
|
Hunter
|
|
Other Friendly Ships
|
None
|
|
Briefing
|
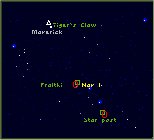
Your first objective is the Fralthi-class light cruiser at Nav 1. She'll have fighter escort as well but you're just to slip past them--don't stick around to dogfight. Then it's on to the Kilrathi base, here at Nav 2. There will be lots of fighters around the base, but try to ignore them. Your main objective is to take out that base.
|
NAV 1
Mine Field
4 Krant
1 Fralthi
NAV 2
Wave 1
4 Gratha
1 Star Post
Wave 2
4 Salthi
Wave 3
4 Jalthi
|
|
Notes
- This is it... the grand finale. Your objectives are to destroy the Fralthi at Nav 1, and the Star Post at Nav 2. Halcyon tells you to ignore the fighters, but if you take out every single fighter you win the Medal of Valor. Once you clear the mine field just before Nav 1, continue flying towards the Nav point (don't autopilot) and you'll have a bit more time when you are attacked by the Krant. Fly straight in towards the Fralthi on your afterburners, and let rip with your guns. Each time the Krant close in to attack, afterburn away to recharge your guns and shields, then fly back in shooting at the Fralthi as you go. This may take time, but it will take down the Fralthi eventually and it's easier than taking on the fighters. When the Fralthi is destroyed, afterburn away from the fighters towards Nav 2. Autopilot when you are able to.
- The tactics for taking out the star post remain the same as for taking out the Fralthi. This time use up your missiles as well as your guns. When the star post is destroyed, afterburn away from the fighters and head for home.
Outcome
Success you win! Failure you lose.
Comment on a mission
Submitted by : Wedge009
Mission : 4
Comments : Once you reach the Venice system, you can't really lose. You could eject in every mission and still see the victory ending!
Submitted by : Loki
Mission : All (SWC)
Comments : Its not entirely true that you could lose all the missions and still win the game, at least not in the 3do WC, win at least half of them to have a good progression on into the secret mission! VP
Submitted by : Cray-Z
Mission : Every one
Comments : You just played out Wing Commander. A great game. I call it al Legend. How did it feel ???
I tink it's one of the best thing's I did in my life.
Submitted by : Bonkus Maximus
Mission : Venice 1 Note
Comments : If you go to the Rostov System, you face Kajja on Rostov 3. If you kill him there, you do not face him in Vanice 1 (Original version.)
Submitted by : starlord
Mission : venice system
Comments : WHERE IS STARKILLER?
I never manage to take him down in mcauliffe,
he's a real coward, but the other flyboys say starkiller will return in venice, what of it?
Submitted by : Nurb
Mission :
Comments : As big a fan I am of the game, it has one of shortest and most unsatisfying endings of the whole series. lost my wingman in venice 3, so they sent me out alone for the final mission and against a cruiser and a starbase with fighter escorts.
Submitted by : Tachyon
Mission :
Comments : Starlord : Bhurak returns in the final mission , at the Nav point where you assault the starbase. If you destroy all the fighters, he shows up with a Salthi wing if I remember correctly.
Submitted by : szaleniec
Mission : Venice 2
Comments : You're in more danger from the other Rapiers than you are from the Gratha themselves.
Submitted by : Dralthi
Mission : Venice #1
Comments : Silver medal is possible only if Khajja appears in this mission, you clear all targets, and your wingman Hunter get himself KIA. The last condition is very surprising and annoying at the same time.
Submitted by : Junta
Mission :
Comments : Wedge009: Eject in the final mission? I suppose that would make you happy, to "win the game" like that. Not surprised to hear that from the one who used the invulnerability cheat in Privateer.
Submitted by : Junta
Mission :
Comments : starlord: The reason why you didn't manage to bring down Starkiller, is simply that you're not good enough.
Submitted by : Junta
Mission :
Comments : Nurb: You're not supposed to lose your wingman. If you do, you haven't been good enough, quite simply. Don't blame the game, blame your lack of skill.
Submitted by : Wirsing
Mission : Venice 4
Comments : Even though everyone tells you that he is around I couldn't find Bhurak either, just 4 ordinary Salthi. He does appear at Hell's Kitchen, though. Perhaps a bug in the Kilrathi Saga version.
Submitted by : VagabonD SerpenT
Date : Tue Jul 10 17:08:50 2012
Mission : Venice 1
Comments : I'm playing KS version and caught a weird bug. If you score all 11 frags yourself on first patrol, you ought to get Silver Star. Well, I get it... But only if Hunter gets wasted as well and I kill 11 cats. If he stays alive, I get sheesh... Weird...
|
