|
Wing Commander
KURASAWA SYSTEM
Kurasawa 1
|
Primary Objectives
|
Destroy any Kilrathi convoys encountered
|
|
Your Ship
|
Rapier
|
|
Wingman
|
Bossman
|
|
Other Friendly Ships
|
None
|
|
Briefing
|
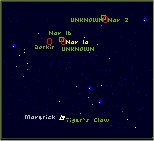
We've detected several Kilrathi fighters circling two nearby jump points. One Dorkir-class transport has already jumped in here, at Nav 1a. You'll intercept and destroy it, then move on to Nav 2 where another squadron of Kilrathi fighters awaits an incoming 'sport. When you've taken care of any 'sports that appear at Nav 2 return to the Tiger's Claw via Nav 1b, in case there are any late arrivals.
|
NAV 1a
5 Dralthi
1 Dorkir
NAV 2
3 Krant
1 Dorkir
NAV 1b
2 Jalthi
1 Dorkir
|
|
Notes
- Your first challenge is the 5 Dralthi at Nav 1a. To even the odds a little, use a couple of missiles against your first two targets to help you take them out. Fortunately Bossman is a skilled pilot and he should do a fair share of the work. Once the odds are in your favor, mop up the remaining Dralthi and use full guns on the Dorkir. It'll soon blow up.
- Nav 2 and Nav 1b are a little more fair. Use your speed advantage to get behind the Krants and Jalthi then let rip with your guns. Use up your missiles when you need to. The Dorkir at Nav 1b arrives after a minute or two, so by the time it turns up you should have been able to take out at least one Jalthi. Providing you aren't too damaged, you'll have no trouble.
Outcome
Success / Failure go to Kurasawa 2.
Kurasawa 2
|
Primary Objectives
|
Escort Ralari back to the Claw
|
|
Your Ship
|
Rapier
|
|
Wingman
|
Bossman
|
|
Other Friendly Ships
|
Ralari at Nav 1
|
|
Briefing
|
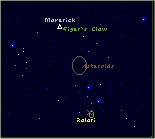
The Ralari entered the system at the jumppoint near Nav 1. There's an asteroid belt along the way. Keep your eyes peeled for trouble. Once you've arrived at the rendezvous point, you'll escort the destroyer back here.
|
BETWEEN CLAW AND NAV 1
Asteroid Field
4 Salthi
NAV 1
4 Gratha
|
|
Notes
- This mission is considered by some to be the most difficult mission of any WC game. Maybe it is, maybe it isn't, however it certainly isn't simple. The Salthi in the asteroid field are simple enough, but don't take any damage and don't use any missiles. Nav 1 is the real challenge. There is no perfect strategy to this, it is mainly down to luck. As soon as you arrive, order Bossman to Break & Attack, and let loose with all of your missiles as quickly as you can. If your missiles hit home, and Bossman does his job well, you might just have a chance at taking out all of the fighters before they destroy the Ralari. But don't bet on it. Expect to have to try this mission several times before getting it right. Good luck.
Outcome
Success / Failure go to Kurasawa 3.
Kurasawa 3
|
Primary Objectives
|
Locate TCS Formidable and escort it to the Claw
|
|
Your Ship
|
Rapier
|
|
Wingman
|
Bossman
|
|
Other Friendly Ships
|
TCS Formidable at Nav 1
|
|
Briefing
|
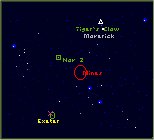
You are to proceed directly to the Formidable, which jumped in at Nav 1. The destroyer has reported a minefield between Nav 1 and the Claw. Once you've arrived at the rendezvous point, you'll escort the destroyer back here. You should return via Nav 2, and avoid the minefield entirely.
|
NAV 1
5 Dralthi
NAV 2
4 Krant
|
|
Notes
- You reach Nav 1 before the Formidable arrives, but that is a good thing since there are 5 Dralthi in the area. Try to work quickly. The more enemies you take out, the fewer you'll have to worry about attacking the Formidable once it arrives. Use a missile or two if it helps, but remember that you still need to face 4 Krants on the way home.
- When you reach the Krants, they'll go for the Formidable. Fire a missile at one of the Krants to keep it busy for a while, then go after another. Your speed advantage really counts here. Be careful not to go too fast and ram something.
Outcome
Success go to Venice 1. Failure go to Rostov.
Comment on a mission
Submitted by : MMN Maniac
Mission : Kurasawa 3
Comments : This is sorta a cheese, but if memory serves me correctly, you can decide to fly towards Nav 2 first, take out the 4 Krants, and then fly towards Nav 1 to pick up the Formidable. On the way back, you'd have less to worry about.
Submitted by : Wulf
Mission : Kurasawa 2
Comments : Something I noticed that may help with this one...position yourself away from the Ralari, and you will reach the Jalthi easier. Otherwise, the Cats get free shots on the Ralari if your close to the ship, and there's nothing you can do about it.
Submitted by : ptk
Mission : Kurasawa 3
Comments : Going to Nav2 first doesnt work, nothing there (KS Version though).
Submitted by : Skanks
Mission : Kurasawa 2
Comments : Goto the Ralari then turn around, afterburn and autopilot back to the claw. Then autopilot back to the Ralari and when you get there it has gone and now appears on your nav map next to the claw safe from harm. Blow up the Kilrathi then go home.
Submitted by : Sycrus
Mission : Kurasawa 2
Comments : Consider ordering Bossman to keep formation in the scrap against the Salthi. This will make him save all of his missiles to the real battle later on.
Submitted by : OSH
Mission : Kurasawa 2
Comments : At NAV1 order Bossman to Break&Attack, then identify who attack Ralari, and go at full speed with afterburn and take him out. Ramming is very accurate method to destroy Gratha, but first you have to take her shields out. You must be VERY quick.
Submitted by : Andrew
Mission : Kurasawa 2
Comments : I believe Origin purposefully made this mission near impossible so that the player would be forced to take the losing path on the mission tree once. Otherwise, a"perfect run" only ends up with 16-17 missions instead of 20 as listed on the
Submitted by : Darth Servo
Date : Sun Jul 25 04:11:17 2010
Mission : Kurasawa 2
Comments : I've flown that mission hundreds of times. I've only managed to save the Ralari once.
Submitted by : Tak
Date : Wed Aug 4 18:35:16 2010
Mission : Kurasawa 2
Comments : Afterburner in and take out one Gratha as quickly as possible (5 Neutron Gun Shots + 1 Missile).
Then engage the Gratha which is not in dogfight.
The concept is to keep ALL Gratha busy in three 1-on-1 dogfight.
2 success out of 7 tries using this tactics
Submitted by : f4greg
Date : Fri Nov 12 13:23:10 2010
Mission : Kurasawa 2
Comments : Download some tool to slow down your game speed , I've tried hundred times and only
passed this mission by this method.
Submitted by : Jay
Date : Wed Jan 4 19:18:23 2012
Mission : Kurasawa 2
Comments : Im reading all the comments about how hard it is, this is my first attempt through the game and I got the Ralari back first try.... Beginners luck maybe??
Submitted by : Wirsing
Date : Fri Apr 6 15:27:03 2012
Mission : Kurasawa 2
Comments : Took me about 10-15 tries to succeed, but after that I never managed to do it again. On the other hand I don't care about that anymore, because at Rostov I can fly my favourite fighter again and get even more medals :-)
Submitted by : VagabonD SerpenT
Date : Tue Jul 10 08:18:57 2012
Mission : Kurasawa 2
Comments : This mission was quite easy to win after I figured out what to do. Grabbed victory on 7th attempt. I first told Bossman to keep formation and shut up (as to not annoy over radio) in asteroids and quickly did those Salthi. Then after clearing 'roids, I dropped speed to 200 (that's the speed of Gratha wing) and afterburned (NOT AUTOPILOT) to Ralari.
Submitted by : VagabonD SerpenT
Date : Tue Jul 10 08:20:59 2012
Mission : Kurasawa 2
Comments : There I told Bossman to attack my target, picked on Gratha that was closest to destroyer and (hence dropping speed) tailed it with matching speeds. 3 full gun packs and it goes up. Move with AB to closest attacker next, drop his shields with full guns, send a dumbfire gift when you move to his tail. The rest two should not give much trouble now.
Submitted by : Toast
Date : Wed May 28 16:47:01 2014
Mission : Kurasawa 1
Comments : I count 6 Dralthi at the first nav point in Kurasawa 1. Can anyone else confirm?
| 