|
Wing Commander Prophecy
G'WRISS SYSTEM
G'wriss 1 : Convoy Rescue
|
Primary Objectives
|
Rendezvous and escort convoy
Defend Midway (added at NAV 7)
|
|
Secondary Objectives
|
Eliminate Alien fighters
|
|
Bonus Objectives
|
None
|
|
Your Ship
|
Tiger Shark
|
|
Wingmen
|
Maestro, Dallas if you talk to him or random diamondback pilot.
|
|
Other Friendly Ships
|
TCS Redeemer, TCS Barkley, TCS Porter at NAV 3. TCS Midway, 4 Panthers at Midway NAV.
|
|
Briefing
|
The Midway has been cut off from her primary supply routes by the enemy fleet in H'rekkah. Before her transmissions were jammed, we contacted a supply convoy destined for the Taliban colony. It has been notified of our situation and will be rerouted to the Midway. Our primary sensors have detected a small attack force closing to within strike range of this convoy.
|
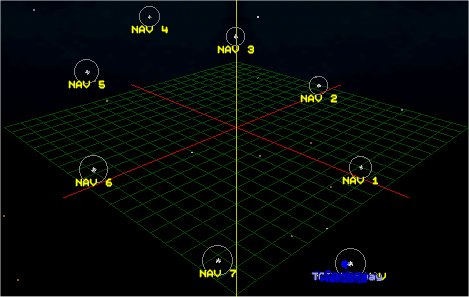
NAV 1-3, 5-7
Random chance of meeting 3 Moray at each NAV.
NAV 4
3 Manta
2 Skate T
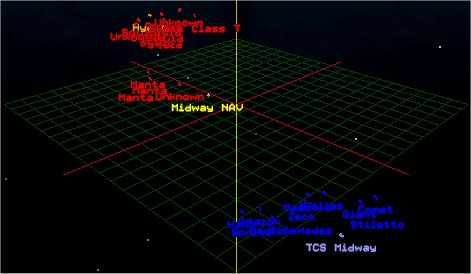
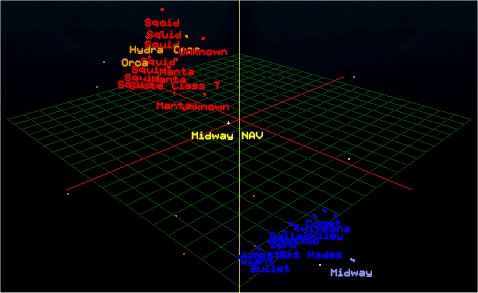
Midway NAV
Wave 1
3 Skate T
7 Manta
Wave 2
3 Squid
|
|
Notes
- During NAV 4, don't be afraid to use your missiles and afterburners as much as you need to. They'll be replenished by the TCS Redeemer providing you manage to save it, but that shouldn't be too difficult.
- No matter what you do, it is impossible to save the two Pelican transports.
- The first ships that you should go after as soon as you return to the Midway should be the Skate Ts. These are the only ships that can damage the Midway's bridge and engines here. If the bridge or engines do get damaged, the following missions will be a whole lot more difficult. Once destroyed, a Skate T will split in to 3 smaller ships. These can be annoying, but can do little damage.
Outcome
G'wriss 2a : Alien Starship Encounter
|
Primary Objectives
|
Ensure Destroyer Elimination
|
|
Secondary Objectives
|
Defend Shrikes
Eliminate 66% of destroyer turrets
Eliminate alien Corvettes
|
|
Bonus Objectives
|
Eliminate 66% of alien fighters
|
|
Your Ship
|
Tiger Shark
|
|
Wingmen
|
Stiletto, Dallas, [Random Diamondback pilot]
|
|
Other Friendly Ships
|
4 Shrikes
|
|
Briefing
|
The comm relay station in the H'hrass system is apparently no longer transmitting. The Midway must reach this system in order to repair the station and send a distress call to Confed. An enemy cruiser group has pursued us through the H'rekkah jump point and will intercept the Midway before we can reach the H'hrass jump point. Due to their assault on the Confed convoy, the cruiser has fallen behind its destroyer escorts. Your Alpha Wing will proceed to NAV 1 and engage the escorts' fighter screen. When you have broken through, eliminate the destroyers' turret and shield defenses so Bravo Wing's bombers can attack the enemy destroyers. Return to the Midway when your mission is complete.
|
NAV 1
1 Barracuda
2 Manta
7 Squid
2 Orca
|
|
Notes
- Here you have a nice easy mission, at least compared to the two you could get if the Midway got damaged in the previous mission. The method is simple : Take out the enemy fighters, take out the capship's shield emitters, and rather than sit around getting bored waiting for the Shrikes to launch their torpedoes, take out some turrets. Focus on the missile turrets first though. You can cycle through turrets, shield emitters, and other targets by pressing R while the capship is targeted.
- One NAV point, one wave of fighters. Nothing to stop you using your missiles freely. Perfect.
- Barracudas are slow, bulky ships which can deal a lot of damage if you get in front of them, but due to their speed, you can get behind them and unload Dragonflies without taking a scratch.
- Your autopilot light will come on as soon as all of the fighters are destroyed. Be sure not to engage autopilot until the Orcas are destroyed, otherwise you'll fail the mission.
Outcome
Success go to G'wriss 3a. Failure go to G'wriss 3b.
G'wriss 2b : Shrike Escort
|
Primary Objectives
|
Ensure Destroyer Elimination
|
|
Secondary Objectives
|
Defend Shrikes
Eliminate 66% of destroyer turrets
Eliminate alien Corvettes
|
|
Bonus Objectives
|
Eliminate 66% of alien fighters
|
|
Your Ship
|
Tiger Shark
|
|
Wingmen
|
Stiletto, Dallas, [Random Diamondback pilot]
|
|
Other Friendly Ships
|
4 Shrikes
|
|
Briefing
|
The comm relay station in the H'hrass system is apparently no longer transmitting. The Midway must reach this system in order to repair the station and send a distress call to Confed. An enemy cruiser group has pursued us through the H'rekkah jump point and will intercept the Midway before we can reach the H'hrass jump point. Due to their assault on the Confed convoy, the cruiser has fallen behind its destroyer escorts. Because of the damage to our bridge, the Midway must heave to for repairs. While we do so, we will launch an attack on the enemy destroyers to buy us some time. The destroyers are currently positioned at NAV 1 and NAV 2. Your Alpha Wing will proceed to each NAV point and provide cover for Bravo Wing's bombers, eliminating fighters, turrets and shield emitters. Return to the Midway when your mission is complete.
|
NAV 1
1 Barracuda
2 Manta
7 Squid
1 Orca
NAV 2
1 Barracuda
2 Manta
7 Squid
1 Orca
|
|
Notes
- You get this mission if the Midway took damage to its bridge in the last mission, so now you have to work a bit harder. The method is simple : Take out the enemy fighters, take out the capship's shield emitters, and rather than sit around getting bored waiting for the Shrikes to launch their torpedoes, take out some turrets. Focus on the missile turrets first though. You can cycle through turrets, shield emitters, and other targets by pressing R while the capship is targeted.
- With all of the extra fighters around, you need to work hard on defending the bombers. You also need to work harder on taking out turrets because if you lose a bomber, the remaining bombers will need every torpedo they have.
- Barracudas are slow, bulky ships which can deal a lot of damage if you get in front of them, but due to their speed, you can get behind them and unload Dragonflies without taking a scratch.
- Your autopilot light will come on as soon as all of the fighters are destroyed. Be sure not to engage autopilot until the Orca in that area is destroyed, otherwise you'll fail the mission.
Outcome
Success go to G'wriss 3a. Failure go to G'wriss 3b.
G'wriss 2c : Enemy Starship Encounter
|
Primary Objectives
|
Ensure Destroyer Elimination
|
|
Secondary Objectives
|
Defend Shrikes
Eliminate 66% of destroyer turrets
Eliminate alien Corvettes
|
|
Bonus Objectives
|
Eliminate 66% of alien fighters
|
|
Your Ship
|
Tiger Shark
|
|
Wingmen
|
Stiletto, Dallas, [Random Diamondback pilot]
|
|
Other Friendly Ships
|
4 Shrikes
|
|
Briefing
|
The comm relay station in the H'hrass system is apparently no longer transmitting. The Midway must reach this system in order to repair the station and send a distress call to Confed. An enemy cruiser group has pursued us through the H'rekkah jump point and will intercept the Midway before we can reach the H'hrass jump point. Due to their assault on the Confed convoy, the cruiser has fallen behind its destroyer escorts. Because of the damage to our engines, the Midway must heave to for repairs. While we do so, we will launch an attack on the enemy destroyers to buy us some time. Intelligence is limited, but a sweep through this NAV route should locate the enemy destroyers. Your Alpha Wing will proceed to each NAV point and provide cover for Bravo Wing's bombers while they attack the enemy destroyers. Return to the Midway when your mission is complete
|
NAV 1
1 Barracuda
2 Manta
7 Squid
1 Orca
NAV 2
1 Barracuda
2 Manta
7 Squid
NAV 3
1 Barracuda
2 Manta
7 Squid
1 Orca
|

|
Notes
- You get this mission if the Midway took damage to its engines in the last mission, so now you have to work a bit harder. The method is simple : Take out the enemy fighters, take out the capship's shield emitters, and rather than sit around getting bored waiting for the Shrikes to launch their torpedoes, take out some turrets. Focus on the missile turrets first though. You can cycle through turrets, shield emitters, and other targets by pressing R while the capship is targeted.
- With all of the extra fighters around, you need to work hard on defending the bombers. You also need to work harder on taking out turrets because if you lose a bomber, the remaining bombers will need every torpedo they have.
- Barracudas are slow, bulky ships which can deal a lot of damage if you get in front of them, but due to their speed, you can get behind them and unload Dragonflies without taking a scratch.
- Your autopilot light will come on as soon as all of the fighters are destroyed. Be sure not to engage autopilot until the Orca in that area is destroyed, otherwise you'll fail the mission.
Outcome
Success go to G'wriss 3a. Failure go to G'wriss 3b.
G'wriss 3a : Cruiser Assault
|
Primary Objectives
|
Ensure Cruiser Elimination
|
|
Secondary Objectives
|
Defend Shrikes
Eliminate 66% of cruiser turrets
Eliminate alien Corvettes
|
|
Bonus Objectives
|
Eliminate 66% of alien fighters
|
|
Your Ship
|
Wasp
|
|
Wingmen
|
Maestro, Dallas, Stiletto
|
|
Other Friendly Ships
|
Bravo Wing : 4 Shrikes (Maniac, 2 Black Widows pilots), Charlie Wing : 4 Panthers (Hawk, 2 Black Widows pilots), TCS Midway.
|
|
Briefing
|
Although our attacks on the escort destroyers were successful, the enemy cruiser is closing on the Midway's position at top speed. Hawk's Charlie Wing will be deployed to act as a fighter screen for the Midway. Meanwhile, your Alpha Wing will provide an escort for Bravo Wing, under Maniac, as they attempt to destroy the approaching cruiser. Upon completion of your objective, you will fall back to assist in Midway's defense if necessary. This force may have been responsible for the destruction of an entire Kilrathi fleet. Success in this mission is imperative.
|
Midway NAV
1 Barracuda
3 Manta
7 Squid
1 Ray
1 Skate T
1 Hydra
|
|
Notes
- Two destroyers down, one cruiser to go. Since you got this far, you already know how to escort bombers on bombing runs. Except this time you're in a Wasp. Start by boosting towards the Skate T and taking it out to make the Midway a bit safer. User your Swarmers to take out the fighters quickly, then set to work on the shield emitters and turrets.
- You meet a Ray cluster in this mission. They are slow bulky things which drift around dropping mines. They also fire guns and missiles at you, but if you get behind one they're no trouble. When one is destroyed, all of the nodes orbiting the Ray split off and start flying around being a pain. They do little damage and the slightest scratch will take them out. Concentrate on the larger fighters first.
- Dallas dies in this mission. There is no way to save him.
Outcome
Success go to H'hrass 1. Failure go to H'hrass Losing Path 1.
G'wriss 3b : Hydra Fleet Assault
|
Primary Objectives
|
Ensure Cruiser Elimination
Ensure Destroyer Elimination
|
|
Secondary Objectives
|
Defend Shrikes
Eliminate 66% of cruiser turrets
Eliminate alien Corvettes
Eliminate 66% of destroyer turrets
|
|
Bonus Objectives
|
Eliminate 66% of alien fighters
|
|
Your Ship
|
Wasp
|
|
Wingmen
|
Maestro, Dallas, Stiletto
|
|
Other Friendly Ships
|
Bravo Wing : 4 Shrikes (Maniac, 2 Black Widows pilots), Charlie Wing : 4 Panthers (Hawk, 2 Black Widows pilots), TCS Midway.
|
|
Briefing
|
The enemy cruiser has regrouped with its escorts and is closing on the Midway's position at top speed. Hawk's Charlie Wing will be deployed to act as a fighter screen for the Midway. Meanwhile, your Alpha Wing will provide an escort for Bravo Wing, under Maniac, as they attempt to destroy the approaching cruiser and its escort. Upon completion of your objective, you will fall back to assist in Midway's defense if necessary. This force may have been responsible for the destruction of an entire Kilrathi fleet. Success in this mission is imperative.
|
Midway NAV
1 Barracuda
3 Manta
7 Squid
1 Ray
1 Skate T
1 Hydra
2 Orca
|
|
Notes
- This mission is a pain. Three capships, four bombers. Make sure the bombers survive, take out the Skate T first, then the other fighters quickly, and set to work on the shield emitters so the bombers can get started. Don't forget to use your booster pack and your Swarmers.
- You meet a Ray cluster in this mission. They are slow bulky things which drift around dropping mines. They also fire guns and missiles at you, but if you get behind one they're no trouble. When one is destroyed, all of the nodes orbiting the Ray split off and start flying around being a pain. They do little damage and the slightest scratch will take them out. Concentrate on the larger fighters first.
- Dallas dies in this mission. There is no way to save him.
Outcome
Comment on a mission
Submitted by : NiteFox
Mission : G'wriss 3a : Cruiser Assault
Comments : Two Hawks flying can be found in Charlie Wing, so if you hear Hawk giving Hawk a status report, dismiss it. Always take out the Skates, and don't forget about the cruiser's Skate cluster. Remoras are easy kills as well.
Submitted by : Benoit Delage
Mission : G'wriss 2a : Alien Starship Encounter
Comments : Dragonflies work pretty well for turrets, too! At 100cm per shot, for the Orca, you need 4 for gun turrets (400cm), 6 for missile turrets (600cm) and 8 for shield emitters (800cm). So with good aiming to can take out several turrets in one pass!
Submitted by : Benoit Delage
Mission : G'wriss 3b : Hydra Fleet Assault
Comments : Without any reason, one of the two Orcas blows up as i get out of the launch platform. It happened the three or four times i did this mission. One less to deal with...
|
