|
Wing Commander Prophecy
H'HRASS SYSTEM
H'hrass Losing Path 1 : Mine the Jump Point
|
Primary Objectives
|
Lay mines within 20,000 klicks of jump-point
Destroy alien fighters
Intercept alien bombers
|
|
Secondary Objectives
|
None
|
|
Bonus Objectives
|
None
|
|
Your Ship
|
Shrike
|
|
Wingmen
|
3 Random pilots
|
|
Other Friendly Ships
|
Bravo Wing: Stiletto, 3 Random pilots (Tiger Sharks).
|
|
Briefing
|
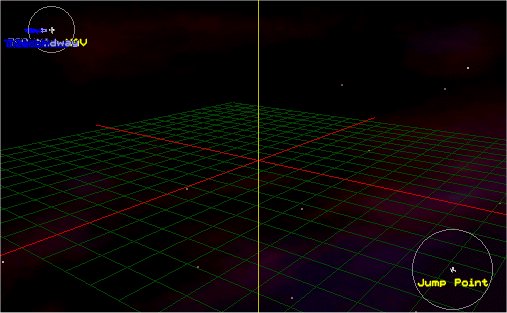
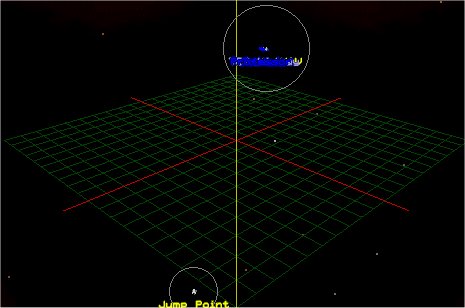
The enemy cruiser and its escorts are in pursuit of the Midway and should arrive through the G'wriss jump point within the hour. In order to slow their pursuit, your Alpha Wing will proceed to NAV 1 and mine the region surrounding the jump point. Stiletto's Bravo Wing will provide escort. In order to limit enemy intelligence about this system, you are to destroy any enemy advance forces which attempt to enter through the jump point. When the jump point is mined, return to the Midway.
|
NAV 1
Wave 1
3 Manta
Wave 2
3 Skate B
|
|
Notes
- This losing path mission is the first opportunity to fly a Shrike bomber. Slow turning, but plenty of fire power. For now just concern yourself with dropping mines and destroying attackers. You have no use for its torpedoes just yet. Press M key until your mines are selected, and hit enter to drop one. Keep pressing enter until you have none left.
- Use your missiles against the Mantas and your guns against the slow Skate clusters. You can either use missiles against the Skate segments or let Bravo wing handle them.
- Wait until you hear "mission accomplished" before autopiloting back to the carrier. If in doubt press Ctrl-O and see which objective hasn't been completed.
Outcome
Success / Failure go to H'hrass Losing Path 2.
H'hrass Losing Path 2 : Cruiser Group Assault
|
Primary Objectives
|
Ensure cruiser elimination
|
|
Secondary Objectives
|
Defend Shrikes
Eliminate 66% of cruiser turrets
Eliminate Alien corvettes
|
|
Bonus Objectives
|
Eliminate 66% of alien fighters
|
|
Your Ship
|
Tiger Shark
|
|
Wingmen
|
3 Random pilots
|
|
Other Friendly Ships
|
Bravo Wing: 4 Random pilots (Shrikes).
|
|
Briefing
|
The alien cruiser and its escorts have broken past the mines surrounding the jump point. At their current speed and trajectory, they will intercept the Midway within the hour. Sensors reveal that they have already launched fighters and bombers for an initial assault. Hawk's Charlie Wing will deploy to provide combat space patrol for the Midway. Meanwhile, your Alpha Wing will escort Maniac's Bravo Wing as they make a direct assault on the cruiser group. When the attack is completed, return at once to the Midway and assist in its defense if necessary. The Midway is the last line of defense before Confederation space. Your mission is critical.
|
NAV 1
5 Squid
2 Barracuda
1 Hydra
|
|
Notes
- This is your last chance to take out that pesky cruiser. If you can't take it out this time, you don't have much hope for completing the rest of the game. Remember : Fighters, then shield emitters, then turrets. Take them out in that order.
- There is very little fighter cover here. Set to work on the Squids first, then set to work on the corvettes.
- If you have taken out everything, just sit back and let the bombers do their thing.
Outcome
Success / Failure go to H'hrass 1.
H'hrass 1 : Relay Station Insertion
|
Primary Objectives
|
Escort and defend Dekker
Defend relay station.
|
|
Secondary Objectives
|
None
|
|
Bonus Objectives
|
None
|
|
Your Ship
|
Tiger Shark
|
|
Wingmen
|
Blair
|
|
Other Friendly Ships
|
Marine LC, TCS Redeemer
|
|
Briefing
|
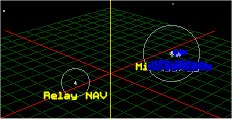
The communication relay station in this system is our only hope of warning Confed HQ about our current situation. Your Alpha Wing will escort a Marine Landing Craft to this station, which is located just outside the perimeter of the H'hrass asteroid field. There, the LC will dock and a shock team led by Colonel Dekker will secure the station. Enemy forces in the area are moderate to strong, and some of the Midway's fighter complement has begun quick hit-and-run strikes to keep them away from the relay station. With the Midway's fighters harassing them and the Midway herself as a decoy, the enemy forces should leave the station alone, making resistance fairly light. When Dekker's team has the station back on line, he will send a message to Confed command via the main relay transmitter, and return to the landing craft. Your team will then escort the Marines back to the Midway.
|
NAV 1
Wave 1
3 Moray
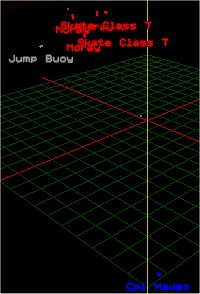
Wave 2
3 Moray
1 Skate T
Wave 3
3 Manta
|
|
Notes
- The first wave is easy enough. Three Morays. Even though they alone are easy, use as many missiles and as much afterburner fuel as you need to if you saved the TCS Redeemer in G'wriss.
- The second wave appears shortly after rearming. Take out the Skate T first otherwise it could destroy the station.
- The third wave appears just after Blair gets captured. You may notice an "Unknown" ship (which is a Devil Ray), but leave it. You can't destroy it. Instead concentrate on the Mantas since they are able to destroy the station with their plasma weapons although they don't usually try to.
Outcome
Success go to H'hrass 2. Failure you lose.
H'hrass 2 : Relay Station Defense
|
Primary Objectives
|
Defend relay station.
|
|
Secondary Objectives
|
None
|
|
Bonus Objectives
|
None
|
|
Your Ship
|
Tiger Shark
|
|
Wingmen
|
None
|
|
Other Friendly Ships
|
After a few minutes - Bravo wing : Maniac + 3 random fighters (Panthers), Midway
|
|
Briefing
|
There is no briefing before this mission. Just talk to Dekker then launch.
|
NAV 1
Wave 1
3 Moray
2 Skate T
Wave 2
1 Manta
1 Red Manta
1 Devil Ray
|
|
Notes
- This mission can be quite a challenge. To start with you need to take out the Skate Ts to save the station. Unfortunately while you do this you'll have Morays trying to take you out.
- The second wave of fighters is even more tricky. The Devil Ray will go straight for you launching missile after missile. Take it out as quickly as you can before moving on to the Red Manta.
- Maniac's wing arrives a few minutes in to the mission, but probably not soon enough to be much help. The Midway arrives after a further few minutes. If you take out everything before it arrives, you'll need to wait.
Outcome
Comment on a mission
Submitted by : Benoit Delage
Mission : H'hrass 2 : Relay Station Defense
Comments : The Tigershark has some real trouble keeping up with the Devil Ray, so i use dragonflies to deplete its shields quickly. When it veers around to come after me staight on, i unload as much dragonflies as i can right in its face.
Submitted by : Benoit Delage
Mission : H'hrass Losing Path 2 : Cruiser Group Assault
Comments : You can also use your Dragonflies for the turrets, but the Hydra's ones are tougher than the Orca's. At 100cm per shot, you need 6 for gun turrets (600cm), 8 for missile turrets (800cm) and a dozen for shield emitters!
|
