|
Wing Commander
PORT HEDLAND SYSTEM
Port Hedland 1
|
Primary Objectives
|
Escort Drayman back to the Claw
|
|
Your Ship
|
Scimitar
|
|
Wingman
|
Knight
|
|
Other Friendly Ships
|
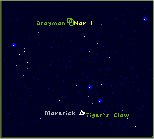
Drayman at Nav 1
|
|
Briefing
|
You'll head straight for Nav 1 -- the Drayman's jump point. Wait for her there, but be careful.. we've had reports of heavy enemy activity in the area. The 'sport has orders to make a beeline for the Tiger's Claw. Stay with her. Simple as that.
|
NAV 1
4 Jalthi
BETWEEN NAV 1 AND CLAW
3 Gratha
|
|
Notes
- When you reach Nav 1, you'll find that the Drayman hasn't arrived yet. This gives you a minute or two to take out the Jalthi waiting for it. Although you should work quickly to take out the Jalthi before the Drayman arrives, you should also try to save missiles for the Gratha. On the way back to the Claw, the Gratha head straight for the Drayman, so afterburn past the group and lock on to an enemy and wear down its rear shields with your guns. When the enemy's shields are down, fire a bit more to do a bit of damage and then finish him off with a Heatseeker missile. Repeat this with the other two, and providing you do this quickly enough, the Drayman will survive. Speed is essential since the Drayman can't take much punishment before blowing up.
Outcome
Success / Failure go to Port Hedland 2.
Port Hedland 2
|
Primary Objectives
|
Escort Drayman back to the Claw
|
|
Your Ship
|
Scimitar
|
|
Wingman
|
Knight
|
|
Other Friendly Ships
|
None
|
|
Briefing
|
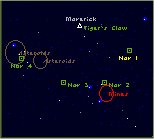
You'll pass through each Nav Point, checking for enemy activity. There's a field of what looks like asteroids around Nav 2 and another at Nav 4.
|
NAV 1
3 Dralthi
NAV 2
Mine Field
NAV 3
3 Gratha
1 Fralthi
NAV 4
Asteroid Field
|
|
Notes
- Nav 1 is nothing to worry about with just three Dralthis. Take your time handling them, don't take unnecessary risks, and help Knight if he gets in trouble. Nav 2 is a minefield so head slowly through there. Once out of the mine field, you probably won't get a chance to autopilot before the forces at Nav 3 show up on your radar. Grathas can be quite tough, but fortunately you have plenty of missiles to handle them with so let rip with them and you'll soon have just the Fralthi left. The Fralthi is just a matter of bashing away with your guns until it blows up. Finally Nav 4 is an asteroid field which you should navigate slowly. You wouldn't want to get killed by a rock after all your hard work getting to that point.
Outcome
Success / Failure go to Port Hedland 3.
Port Hedland 3
|
Primary Objectives
|
Defend the Tiger's Claw, defend Destroyer, eliminate Fralthi.
|
|
Your Ship
|
Scimitar
|
|
Wingman
|
Knight
|
|
Other Friendly Ships
|
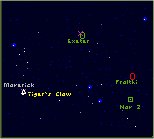
Exeter at Nav 1
|
|
Briefing
|
First, you'll need to assist in the defense of the Tiger's Claw. We'll have two more Scims in space before you but there are four Jalthi closing with the Claw, so it won't be easy. When you've cleaned up the Jalthi, move on to Nav 1 where you'll help defend one of our Exeters against a wing of Gratha. If you're still in good enough shape after turning the Gratha away I want you to fly on to Nav 2, the last known fix on this Fralthi. Take a crack at her, if you can, but try not to get yourself killed.
|
CLAW NAV
4 Jalthi
NAV 1
4 Gratha
NAV 2
4 Krant
1 Fralthi
|
|
Notes
- Simply put, this mission is a bitch. To begin with you have to face a wing of Jalthis lead by Baktosh Redclaw. Just leave Baktosh until last since you'll be able to take out the other Jalthis more quickly and they are all attacking the Claw anyway. Then you have to defend an Exeter against a wing of Grathas. The only thing you can do here is get on the tail of a Gratha and hammer away with your guns until it dies. Then you have a wing of Krant and a Fralthi to deal with. To make matters worse, you only have a couple of minutes before the Fralthi jumps out so you can either attack the Fralthi before taking on the fighters and risk a fighter destroying you, or take out the fighters quickly and try get the Fralthi before it jumps out. Neither way is better. Don't bother saving you missiles since you'll run out before the end whatever happens. This mission is going to make you wish you won back in Brimstone and/or Cheng-Du.
Outcome
Success go to Rostov 1. Failure go to Hubble's Star 1.
Comment on a mission
Submitted by : Light Ninja
Mission : Port Hedland 3
Comments : I'm currently stuck at this mission, it's really tough... If you just had a Raptor in this mission, it would be much easier.
Submitted by : LightNinja
Mission : Port Hedland 3
Comments : Defending the Tiger's Claw is quite easy, just try not to get too much damage and don't use missiles, even if it is tempting sometimes... Also watch after your Wingman, you will need him later in the mission.
Submitted by : Vapor
Mission : Port Hedland 2
Comments : There's no avoiding the asteroids this time. But if you want to cut down the time spent flying through them, go from Nav 4 back to Nav 3 before returning to the Claw.
|
