|
Special Operations I
GHORAH KHAR 2
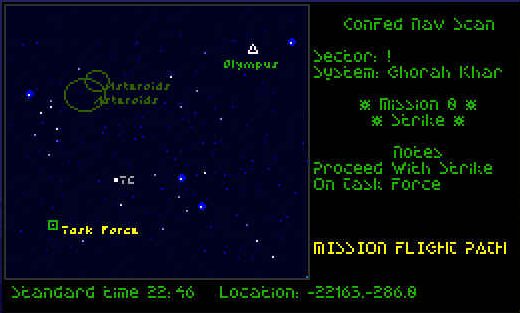
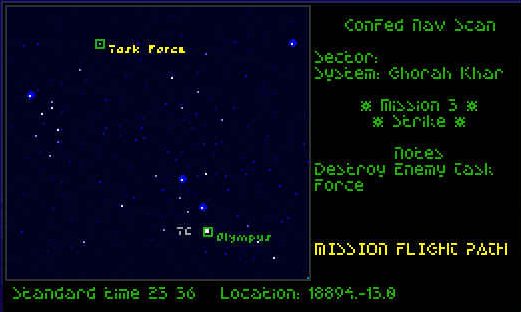
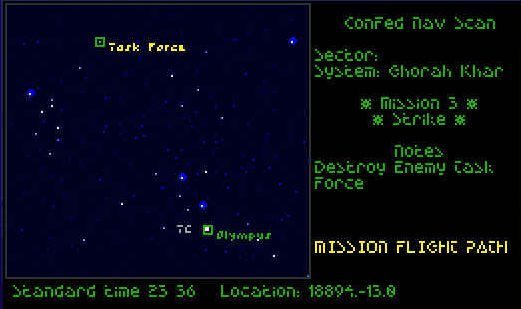
Ghorah Khar 2-A : Strike
|
Primary Objectives
|
Destroy the Kilrathi Strike Force.
|
|
Your Ship
|
Crossbow
|
|
Wingman
|
Hobbes
|
|
Other Friendly Ships
|
None
|
|
Briefing
|
Major Edmond: Colonel Blair, report to the Flight Deck for immediate launch!
Maverick: Assault wing, this is Colonel Blair, do you read?
Landis: Lieutenant Landis checking in, sir. All systems green.
Maverick: Affirmative, Lieutenant. Colonel Ralgha?
Hobbes: Ready to AutoNav on your mark, Maverick...
Maverick: Good. Let's go nail that strike fleet!
|
Olympus → Task Force
3 Drakhri
Task Force
4 Drakhri
2 Fralthra
Task Force → Olympus
1 Drakhri
|
|
Notes
- You may not be able to take out the Fralthra before they jump out. It really doesn't matter as it doesn't affect the outcome of the mission or the series.
- That lone Drakhri is rather odd...
Outcome
Success / Failure go to Ghorah Khar 2-B.
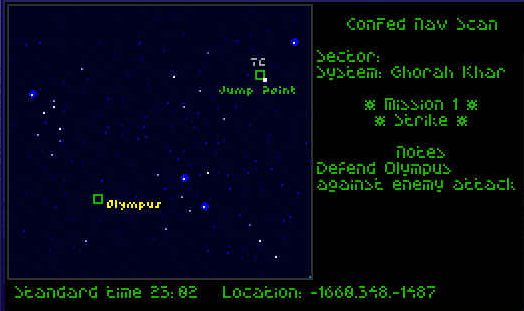
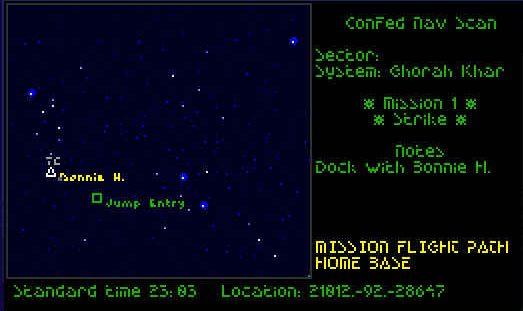
Ghorah Khar 2-B : Strike
|
Primary Objectives
|
Defend Olympus, then protect the Bonnie Heather.
|
|
Your Ship
|
Crossbow
|
|
Wingman
|
Hobbes
|
|
Other Friendly Ships
|
Potter
|
|
Briefing
|
Major Edmond: Colonel Blair, report to the Flight Deck for immediate launch!
Paladin: Maverick, this is Paladin, do you read?
Maverick: James, the Kilrathi are starting their assault on Olympus Station.
Paladin: I know, laddie! These are your new orders --- Defend Olympus Station from the first wave of assault. An' then get o'er here via the jump point as fast as ye can! I've been attacked by a small squadron of Kilrathi.
Maverick: James, are you all right?
Paladin: My powerplant and jump capacitor's been damaged... I can't jump out of here. But they're not attacking me right now. Something strange is happening here... Another Imperial Kilrathi wing arrived here two minutes ago --- an' for some reason they're shooting at the other squadron of kittens, not me. Ye'd better get o'er here fast, laddie.
|
Olympus
3 Grikath
1 Fralthra
Jump Entry
4 Jalkehi
Bonnie Heather
2 Jalkehi
|
|
Notes
- I really wouldn't worry too much about the Bonnie Heather. She can take care of herself.
Outcome
Success / Failure go to Ghorah Khar 2-C.
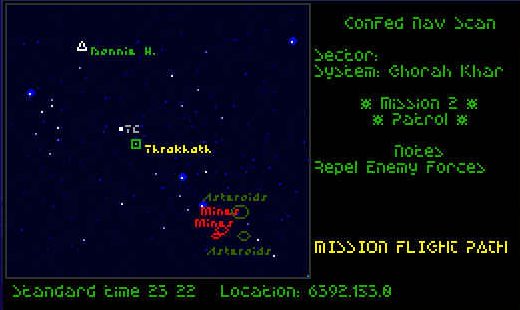
Ghorah Khar 2-C: Patrol
|
Primary Objectives
|
Repel enemy forces. Retrieve the prince.
|
|
Your Ship
|
Crossbow
|
|
Wingmen
|
Thrakhath
|
|
Other Friendly Ships
|
None
|
|
Briefing
|
Maverick: Paladin, I've undocked and am heading to intercept Khasra's squadron. Paladin, do you read? Hobbes, this is Maverick... I'm not getting any response from the Bonnie Heather.
Thrakhath: That is because the freighter has had another power failure, Colonel.
Maverick: Thrakhath!
Thrakhath: They lost power to the brig, just as Ralgha locked me in. I did not hit him too hard. Killing someone from behind is dishonorable... And Ralgha is one of my few relatives who has not tried to kill me. Now I am borrowing Ralgha's ship. I hope you do not mind.
Maverick: You're going to dock immediately or I'll blow you out of space!
Thrakhath: Fortunately, I am already out of range of your missiles. Now I will deal with my treacherous cousin and his Kilra'hra pilots.
Maverick: Thrakhath, you don't stand a chance alone against that squadron!
Thrakhath: This is a matter of honor between Khasra and myself. Even if there is no chance of my survival, I am going to kill Khasra.
Maverick: Paladin, I don't know if you can hear this --- Thrakhath is heading to the jump point. I'm going after him!
|
Thrakhath
6 Gothri (ace: Khasra)
|
|
Notes
- The cutscene before this mission is buggy. Thrakhath appears to many as a different character.
- You cannot stop Thrakhath from escaping. No matter what you do, he jumps away.
Outcome
Success/Failure go to Ghorah Khar 2-D.
Ghorah Khar 2-D: Strike
|
Primary Objectives
|
Destroy the enemy task force.
|
|
Your Ship
|
Sabre
|
|
Wingman
|
Hobbes
Buell
Bear
|
|
Other Friendly Ships
|
None
|
|
Briefing
|
Maverick: Major Edmond, I never had the chance to congratulate you --- on your fine work in detecting the enemy fleet's approach.
Major Edmond: Just doing my job, Sir.
Maverick: But doing it very well. Without you, Olympus would've had no warning of the attack.
Major Edmond: Sir. That's a huge fleet coming in-system. The odds of your surviving ---
Maverick: Breaking the odds is what I do best, Major. Though I'd appreciate it if you can find a way to get a message --- through the communications jamming, and call in for a few reinforcements. Damn. They've sighted the enemy fleet.
Major Edmond: Good luck, sir.
Maverick: Thank you, Major. |
Olympus → Task Force
2 Sartha
Task Force
4 Gothri
2 Fralthra
|
|
Notes
- Watch out for those Fralthra... They really know how you use their Anti-Matter Guns.
- If you feel like risking your life, you can fly between the Fralthra. If you can avoid their fire, it's possible they'll destroy each other.
Outcome
Success results in Victory. Failure go to Ghorah Khar 2-E
Ghorah Khar 2-E: Strike
|
Primary Objectives
|
Attack enemy strike force
|
|
Your Ship
|
Sabre
|
|
Wingman
|
Hobbes
|
|
Other Friendly Ships
|
None
|
|
Briefing
|
Tolwyn: We believe the Imperial Kilrathi forces have broken off their orbital bombardment --- in an attempt to ambush and destroy the Concordia. I'm sending you after one of the Fralthra in the enemy fleet. If you can break that ship away from its fighters, and destroy it --- it'll prevent the Kilrathi from encircling the Concordia. There is no margin for error on this mission, Maverick
Maverick: ...I'll do my best, sir.
Tolwyn: I know you will, Colonel. Dismissed
|
Task Force
9 Gothri
1 Fralthra
|
|
Notes
- This is your last chance to win the campaign.
- Either destroy the Fralthra as soon as possible, or stay out of its gun range while engaging the Gothri. Otherwise you'll quickly be ripped apart.
Outcome
Success results in victory. Failure results in loss.
Comment on a mission
Submitted by : Retrogame
Mission : Ghorah Khar 2-D
Comments : MAN, this mission is HARD. I played it over and over for hours and kept dying in horrible, horrible ways
There's almost no way to avoid getting fried while trying to torpedo the cruisers.
Submitted by : Smokachu
Mission : Ghorah Khar 2.1
Comments : The map on this is wrong. There is no jump involved in this mission. Just a straight shot to a single nav point labled "task force".
Submitted by : Ilanin
Mission : Ghorah Khar 2-D
Comments : In addition to the Fralthra cruisers being dead shots with their anti-matter guns, your wingmen love to shoot through you and are almost as much of a threat as the Gothri are (and far more dangerous than the Sartha)
Submitted by : Ilanin
Mission : Ghorah Khar 2-D
Comments : More usefully, the trick when torpedoing the crusiers is not to fly straight at them. You can lock a torpedo as much as 15k away, do so, fly in at as much of an angle (about 20 degrees or so) as you can without losing lock. When you hear the AMG's fire, swing around to 20 degrees the other side of the crusier and they'll probably miss, then AB in to ~6000km and fire the torp. Repeat.
Submitted by : Crowley
Mission : Ghorah Khar 2-A
Comments : When you want to destroy capital ships quickly, command your wingmen to attack them. For some reason they can fire torpedoes much faster than you.
Submitted by : Guderheinz
Date : Sun Jun 27 15:21:26 2010
Mission : 2-D
Comments : I give up. I've been trying it for an hour and it's just not possible for me. I tried everything, I even aligned myself, so that one cruiser was behind the other one. I even managed to kill one of them once. But the second still got me. Sabre is just an unflyable piece of gar-bitch!!
Submitted by : GBOOM
Date : Thu Mar 1 21:27:11 2012
Mission : Ghorah Khar 2-D
Comments : You can lock on with your torpedoes from much farther out if you select your chaff pods, lock onto a Fralthra, then switch to torpedoes. I got a torpedo lock from 17,000 km out. That way I could make my runs faster, and avoid the AMG fire better
|
