Enigma System - Series 7 - Mission 3
| Enigma System - Series 7 - Mission 3 | |
|---|---|

| |
| Fighter | A-17 Broadsword |
| Wingmen | Jeannette Devereaux |
| Previous | Enigma System - Series 7 - Mission 2 |
| Next | Successfully Gather Jump Data: K'tithrak Mang System - Series 8 - Mission 1 Failure to Gather Jump Data: Gwynedd System - Series 12 - Mission 1 |
Mission Layout
- Jump Point Nav
- Jump Point (Exit) Nav
Images
The Memoirs of Lieutenant Colonel Carl T. LaFong
A Kilrathi strike force was cruising by the edge of the asteroid field where the carrier was hidden. If we could track them back to K'tithrak Mang, we could obtain the tracking data, and might be able to jump in behind enemy lines.
I would fly again with Angel. Our mission was to find the enemy, engage the fighter wing, then allow the Ralatha to jump, and quickly follow in our Broadswords.
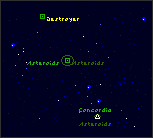
We hit the asteroids right where our nav map indicated they would be. The rocks surrounded us at launch, then a second field appeared about 10,000 kilometers from our objective.
We discovered four Jalkehi protecting the Ralatha at our destination. The pilots were extremely aggressive, bringing the fight to us instead of making us attack. I've always found it more comfortable in a defensive position.
I sent a Pilum into the approaching wing, then ordered Angel to break and attack. We both locked onto our targets, to kick in the ITTS. If they were coming right at us, I wanted to make sure every shot counted against the heavy enemy fighter. I had discovered that the ITTS was most reliable at close range, so I tried to be patient and wait until I was within 1500 meters before unleashing a volley from the three mass drivers in the forward gun ports. My rear and side gunners were continually blazing away with the neutrons. The Jalkehi fought a good fight, but Angel dropped two and I sent two cartwheeling through space. The Ralatha jumped, and so did we.
I knew we had the tracking data, so I didn't hesitate to go after the Ralatha right away. I told Angel to attack as well, and we started classic long-range torpedo runs. Just hit the brakes, select torpedo, lock the target, wait for torpedo lock, then move in and launch. It's the only way to go when you've already taken out the fighter escort. Two torpedoes destroyed the Ralatha.
Author's Note
The Ralatha must be destroyed AFTER jumping if you are to continue on the winning path in the Wing Commander II game.
Next Entry: Between Missions: Enigma - K'tithrak Mang Systems