Kappa Wing (Firekka System)
| Kappa Wing | |
|---|---|

| |
| Fighter | Hornet |
| Wingmen | Michael Casey |
| Previous | Alpha Wing (Firekka System) |
| Next | Epsilon Wing (Firekka System) |
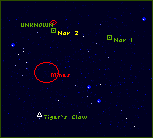
Mission Layout
- Between the Tiger's Claw and Nav 1
- 4 Dralthi
- Nav 1
- 4 Krant
- Nav 2
- Between Nav 2 and the Tiger's Claw
- Minefield
Images
The Memoirs of Lieutenant Colonel Carl T. LaFong
The appearance of the Imperial Guard had us baffled. Good grief, this was the Firekka System! We didn't think the Kilrathi had tracked the Claw here, and we couldn't find any strategic element in the war that would lead our enemy here. We were still searching for the convoy.
Mission Profile:
Fly a two-point patrol in search of the Kilrathi convoy. Attack individual wings, but if the convoy is found, just target the ships to engage the automatic cameras and return to the carrier.
Mission Chronology:
1. Two Drakhai in Dralthi and two more Dralthi attacked 42,406 kilometers from Nav 1. Two ran midway through the battle.
2. Two wings of Krant attacked 14,986 kilometers from Nav 1.
3. Convoy sighted 20,149 kilometers from Nav 2. Nine Drakhai and three Fralthi targeted.
4. Minefield encountered 33,800 kilometers from the carrier.
Post-Mission Analysis:
We didn't realize, when the first wing of Drakhai attacked near Nav 2, that they were an advance fighter wing escorting the convoy. We engaged the enemy fighters until we sighted the Fralthi, then simply concentrated on targeting each enemy to start the automatic cameras.
With nine fighters protecting the convoy, we constantly used our after-burners, followed by hard turns to the left and right to avoid enemy fire. Once we'd targeted every ship, I ordered Iceman to form on my wing, kept the afterburners pinned to maximum, and ran away.
We ran into mines, but skirted the field by keeping our nose to the far right of the nav cursor on the final leg.