Trojan IV Naval Yard Gets Busy (July 12, 2011)

Here's some more pictures of my progress on the TCS Tiger's Claw. As you can see, I'm nearing completion. I just need to add conning towers, launch tubes, engines and turrets. Still not sure how I'm going to do the turrets...suggestions? Pericles might be able to give some tips...
 

Attachments

  • IMG_0755.JPG
    IMG_0755.JPG
    288.6 KB · Views: 174
  • IMG_0757.JPG
    IMG_0757.JPG
    266.8 KB · Views: 183
Second, what about some type of small cap and cut toothpicks for turrets? Maybe cut coffee stirrers?

I'm debating between doing something like that or kitbashing this dreadnought I found online and just building a ton of copies of the turrets. The advantage of these ones are that they look better and actually can swivel, but they might be a bit too tiny for my skill level....

http://www.digitalnavy.com/dreadnought/

I'm still open to suggestions :)
 
tip - interior lighting

go to your local dollar store and buy these items:
- several LED type lights (be it flash lights, closet/magnet lights, whatever. I like the magnetic closet ones since the magnet is strong and they can have as many as 32 LEDS)
- phone or network extension cable
- something to use to hold batteries (any cheap toy, flashlight, whatever)
- small sizzors (make sure small and pointy from crafts area) and/or blade (you probably already have)
- pliers (tools area)

You can see where I'm going with this, right? I did this to make a blinking beacon-light for my paper Dr.Who TARDIS/police-box. Even built me a mini paper TARDIS console (my own design) with light central column and back-lit TREK-like lights and controls/screens.

Using a blade or wire snippers snip the ends off the phone extension cable... then use the fine/small to cut and peal back the outer plastic off the cable. Inside you should find anywhere from 2 to 6 wires (each should have its own colored plastic on it).

Take apart the flashlight ... if needed, un-solder the LED lights off the circuit (some cheap closet lights have anywhere from 4 to 32 white LED's... all usually powered off 3 AAA batteries).
You want to be careful and re-wire these up... be it through holes left in the interior roof or whatever. TEST as you go along to ensure the LEDS come on (wiring one backwards and the rest might not come).

IF you want you can buy a cheap AC/DC adaptor (some even have a +/- polarity switch or voltage control switch for 1.5 / 3 / 4.5 / 6 / 7.5 / 9 volts) from a store like Radio Shack, Circuit City, The Source, or other electronics-parts stores.
..... BE WARNED that an AC/DC adaptor, even when set at the right voltage, pumps out A LOT MORE AMPS than AAA batteries and as such can blow out all your LEDS if you don't put in a strong enough resister.
 
tip - moving / swivel turrets

what you want here is either toothpicks, paperclips, or tiny nuts-&-bolts.

Nuts & bolts works best. You can even use a tiny drop of super-glue to seal the nut to the bolt at just the right tightness ... so that a turret can rotate up/down and/or swivel left/right but won't flop down the moment you let go of it. See attached quick-diagram.

This is the trick I used to make rotating shoulders, booms, guns, turrets, hips, etc, when I built y fully-transformable paper SDF-1 model.
 

Attachments

  • nut-bolt-turret.JPG
    nut-bolt-turret.JPG
    6.1 KB · Views: 171
few pictures of my non-wc fleet

I been paper-modelling ships for some 15 years. (on and off. mind you, when you're on disability welfare and no job and are a 33 year old renting a room off your parents, you do tend to have the massive amounts of time needed to waste).

No insults intended for Malcolm or others here. One highly-cool and detailed Tigers Claw over the course of, what, 2+ months, is respectable (considering school/work/family/GF/life). I'd probably have it done in 1/2 that (or less), but then, as I said, I don't got to worry about a job or the rent or nothing .

I'd be more than happy to share tips and tricks I've picked up over those years.

All of these pictures are from within the past 5 years.

(somewhere I've got pictures of the 5" deep x 10 ft long shelf that I had all my paper Enterprises suspended from... from the 3" NX-01 to the 2+ ft 1701-E)
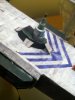
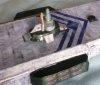
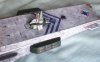
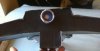
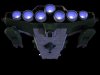
SDF-1
- transformable from cruiser to battloid (via the nut-bolt trick)
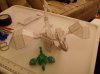
Getter Robo G
- tiny docking jets to go with my 5" pvc's ... and yes, I did them so they can also semi-form Liger and Poseidan too ...
- also have larger more-accurate ones that look close to the Bandai "Soul of Chocogan" $100+ each versions...
- currently making the dome-base based partly on the toy and partly the anime

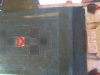
Bakugan Gundalian Invaders "Dharak"
- roughly 3X the size ... fully transformable (though a bit less round)
- somewhere I've got a modified version of Lumagrowl (better tail and front legs than what the lumagrowl bakugan has)
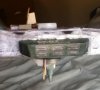
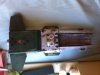
Dark Pirates
(now dead sci-fi trading/pirates/privateer type game)
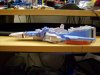
- first pic is really old... talking 2006'ish but you can see I had like half of the 16-ships done and they were relatively to scale to each other
- technically the Oceanus and Conquerer were 4/5th's identical other than the nose (so I built one then built the nose for the other)
- slight pic-order goof ... table pic is about a year older than the white-shelf pic

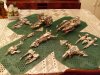
shelf-picture (lower left is start-point, increasing in size/power/cost as you move right, then up to second shelf, left to right, then third shelf, etc). Some names downright stunk. Not built yet are the Lindwyrm and Thanthos - mainly cause they're long and skinny with oddly placed engine boxes that hang off the end of relatively thin wings (structural nightmare).
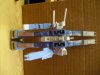
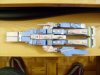
Some look like they were Kilrathi-designed. One does look like someone docked a Star Wars x-wing fighter to a long-thin transport. Yes, the Dreadnaught looks a lot like that badboy "Starfighter" from that old 80's movie, "The Last Starfighter".
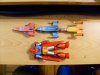
TABLE (2007 or so)
back row - Stardragon, Dreadnaught, Behemoth
mid row - Conquer (nose), Oceanus, Peacemaker
front row - Meteor, Nightshade, Thunderfist

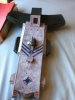
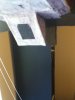
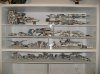
WHITE SHELF - (today)
top row - Dreadnaught and Behemoth
3rd row - Peacemaker, Djinn, Stardragon
2nd row - Paladin, Thunderfist, Oceanus (nose only), Conquerer
bottom row - Meteor, Nightshade, Manticore, Sunfox, Legion

*** want ship details? better pictures? ***
I have the original captures from the web-game, along with full ship details, weapons, etc.
Email me.
I'd be more than happy to help design or convert one of these bad-boys to be WC compatible'ish. (yeah, several of them do have a strong KILRATHI vibe.
 

Attachments

  • S6301179.jpg
    S6301179.jpg
    581.9 KB · Views: 196
  • S6301097.jpg
    S6301097.jpg
    495.2 KB · Views: 202
  • S6300303.JPG
    S6300303.JPG
    1.5 MB · Views: 179
  • S6300243.JPG
    S6300243.JPG
    1.5 MB · Views: 202
  • S6300242.JPG
    S6300242.JPG
    1.5 MB · Views: 181
  • S6300241.JPG
    S6300241.JPG
    1.5 MB · Views: 213
  • S6300240.JPG
    S6300240.JPG
    1.5 MB · Views: 196
  • S6300470.JPG
    S6300470.JPG
    1.5 MB · Views: 214
Hey thanks for the great info/pics Rapierdragon! I'll be adding turrets last probably, but it's good to have so much info. I've thought about lighting this model, but at this point it would be too much of a hassle. I'm not a good enough electrician, and I don't want to set the claw on fire :) I like your models, and I think you should make some WC models. Pericles makes a lot of them but he can't make them all! (although he probably will eventually) I only get about an hour a day to work on the claw, so it's kind of hard to make a lot of quick progress what with job, gf ect. Therefore I command you to make sweet papercraft wing commander ships in your spare time! :)
 
This looks so cool. Keep it up!

Are you going to make a tutorial on how we can build one on our own when its finished? I want to have one too :)
 
Are you going to make a tutorial on how we can build one on our own when its finished? I want to have one too :)

That's kind of a hard question to answer, I've been building this whole thing from scratch, and much of the inner supports are improvised as I go. However, I will consider putting together a kind of tutorial on how to turn Howard Day's blueprints into something usable for model building.

However, I can't offer anything like Pericles models, which come printed off with everything you need to create it. Although, I've posted enough pictures that one can probably walk themselves through the process if they pay close enough attention to them. I'll post some detailed stuff once I've finished the model about how to do it :)

I've been on a brief hiatus, but I'll be starting building again today!
 
I'd also be more than happy to answer any questions that anybody has about how I did stuff. I check the forums a few times a day, so I'll be able to respond pretty quickly most days.
 
TIP -- inner supports, windows, and (semi-hidden) display stand

USAGE -- best done in longer blocks that might bend/twist, or the ship's interior floor (if it's going to sit on a display).

ALT USAGE -- windows... any clear bits or tiny bits that need a cheap glow or see-through look (paint over the plexi with "stained glass window paint" which dries transparent... )

ALT USAGE #2 -- use it to build a clear display stand

-- where to get --
Go to a place like Home Depot and in the area with plexiglass are these thin (talking 1/32") plexiglass that are usually around $10 for a 14"x20" size piece. (there is thicker, harder to bend/snap stuff, but its a lot harder to score it and get a clean break line).

-- how to snap off perfect-sized pieces --

Using a rular and x-acto blade (preferably with a new one that's still super-sharp), score lines to mark off a piece... score it several times, flip the plexi over, and score again along the same lines (this greatly increases the chance that when you go to snap it that it'll give a clean break).

Smaller pieces are easier to snap. For larger ones, you may want a 2x4 or heavy book or something to use to hold the main piece of plexi down and to produce a long supporting/breaking edge (good if you need to break off something like a 1"x12" piece).

-- how to use for internal support--

Apply a layer of tape to the insice of any blocks that will need the plexi... this way when you glue it in the glue won't soak through the paper and be visible from the outside. This trick is best used when you have a large flat block (like if the run-way was a single piece, say, 2"~3" x 6+" or bigger). Also great if you have a long/flat box that is going to have a semi-heavy box right in the middle of it and you don't want it to sag.

-- as a window or detail bit --

easily enough to imagine... cut out the window, carefully tape a frame in, then tape/glue the plexi in place. You can also paint the plexi (after cutting) with stained-glass-window paint and put it inside an engine.

My favorite trick is to cut a square, then cut off the corners (to make either a hexagon or octogon) then paint one side either blue, red, or yellow with transparent paint, then maybe paint the other side with metallic silver. Then fit the piece inside the "engine exhaust" type block... when light is shined in, it'll pick up the color of the tranparent paint and reflect off the silver.
You don't have to paint one side silver... a layer of clear tape can just as easily reflect the light while also letting you have drawn-in details.
This trick can be played around with... do the "warp glow" on Star Trek nacelles, car-headlights, the "air shield" on a shuttle bay, etc.
If you're really good, you can cut-glue something to the plexi and stick it within to make it look like a tiny shuttle bay with a shuttle, in mid-air, floating as its about to land. (there is somethign called "matte plexi" or "matte tape" which lacks the high-gloss high-reflective quality (or covers it) of regular plexi ... and if you can't see the edges of the plexi and it doesn't really have light to reflect, it causes that sort of "invisible" effect which you can use to really make things seem to "float within the given area"

-- as a stand ---

Alternately you can build a box or stand using pieces of plexi... on a model like yours, you could do a pair of 1" x 2" cubes to stick under it... this way the main body will have a support and the entire weight won't be on one tower/block on the underside, or worse, on the side-guns.

Do the supports/stands at the right size and the model will appear to "float" over a table/shelf when viewed at most angles. (cause the plexi is clear, it'll pick up the color as well as the fact it's centered under the model in shadow).

If you need to use the flash and take a side-shot of the ship, make sure the plexi-block isn't perpendicular to the camera but at an angle (so that the light of the flash isn't mirrored right back at you).
If you have a small camera-holder-stand, you can even take 2 identical shots with the plexi in different locations, and then combine the two shots... identify where the plexi was in the 2nd shot, select/copy that area, then paste it over the plexi in the 1st shot to somewhat remove it.
 
It's a shame there wasn't a licensing deal ever worked out for models and such - but its such a competitive sort of thing anyway. I always admire this kind of stuff though! The Tiger's Claw was such a beauty and for me really became the archetype for what a space carrier would look like. Fantastic thinking about a physical 3D representation...

Hey, how did 104 fighters fit on the old girl? ;)
Seriously, though, no real questions, just impressed.
 
Finally, an update:
I have started work on this project again. I haven't had much time to work on it in the last month or so what with starting school again and having a relationship explode in my face but I've finally got back to work on the old girl. In these pics you can see some work I've done on the conning tower as well as the side hangar bay/launch tube things. I'll update more when I get the chance.
IMG_0788.JPG
IMG_0788.JPG
 
Here are some more pics. I have added some green coloring to the side of the ship, a couple of launch tubes and on one side of the Claw, another nameplate. Should I put the nameplate on both sides or does it look good on just one?
IMG_0792.JPG
IMG_0791.JPG
View attachment 4873
IMG_0790.JPG
 
Here is where my design begins to deviate a bit more from Howard Day's original render, though hopefully not too much. I have mostly completed work on the conning tower on the underbelly of the Claw which is quite different from Howard's. Now I am working on biulding the upper conning tower, which is proving to be far more difficult than I had originally thought. I really like Howard's conning tower, and want to make mine as close to his as possible. Here are a couple progress pics.
 

Attachments

  • IMG_0841.JPG
    IMG_0841.JPG
    210.5 KB · Views: 159
  • IMG_0842.JPG
    IMG_0842.JPG
    192.3 KB · Views: 158
  • IMG_0843.JPG
    IMG_0843.JPG
    58 KB · Views: 159
  • IMG_0844.JPG
    IMG_0844.JPG
    50.8 KB · Views: 154
  • IMG_0845.JPG
    IMG_0845.JPG
    39.5 KB · Views: 156
  • IMG_0846.JPG
    IMG_0846.JPG
    45.5 KB · Views: 154
Looking great! Hope you can come up with a real camera to photograph the finished ship. :)
 
Been doing lots of work. Lots of trial and error. Thanks for the positive feedback. Updated pictures tomorrow I promise. I'll see what I can do about getting a better camera! I suppose the iPod touch just doesn't have the best camera on it.

Things to look foward to:

Engines
A cleaner overall model
A Turret (more to come)
No more white places, most of the detail work is done.
Engineering section is finished.
Me scratching my head about doing the wings. I'm not sure how to make an elegant curve with cardboard and paper. That's the part of this design I've been dreading. Suggestions?
 
Here is a series of pictures of some of the work I've finished. You can see that I've added that blocky under-section that I'm going to call the engineering section. That's my best guess about what that is. I've also done a test engine, I'm not really satisfied with how that looks so I'll be going back and figuring something out. I've included a pic of what I'm going for. I think the engines need to be MUCH bigger. I'll probably arrange the engines like they are seen at the end of WC1. I've also done a lot of minor detail work and repairs. As you can probably tell, there needs to be a lot more of that. But the Claw is an old warship, so I don't want it to look brand new. I'm assuming it's had lots of repairs throughout the year and it should look somewhat patched together. I have however, finally sealed up the model and now I just have to add some turrets, the main bridge/CIC and the wings and nacelles. I've also done a test-turret. I think it's too big and it needs more detail work, but I was able to perfect the swiveling turret idea by using little magnets. Thanks for all of the compliments!
 

Attachments

  • IMG_0864.JPG
    IMG_0864.JPG
    215.8 KB · Views: 148
  • IMG_0865.JPG
    IMG_0865.JPG
    31.5 KB · Views: 155
  • IMG_0866.JPG
    IMG_0866.JPG
    231.6 KB · Views: 149
  • IMG_0867.JPG
    IMG_0867.JPG
    241.3 KB · Views: 148
  • IMG_0868.JPG
    IMG_0868.JPG
    182.4 KB · Views: 144
  • IMG_0870.JPG
    IMG_0870.JPG
    177 KB · Views: 149
  • IMG_0872.JPG
    IMG_0872.JPG
    161.2 KB · Views: 142
  • howiebengal15.jpg
    howiebengal15.jpg
    890.5 KB · Views: 166

Me scratching my head about doing the wings. I'm not sure how to make an elegant curve with cardboard and paper. That's the part of this design I've been dreading. Suggestions?
What if you make a leveled/stacked pyramid of boxes as support, then curve the covering cardboard over it?
 
Back
Top