Gratha Model

update

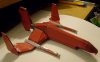
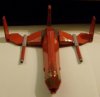
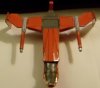
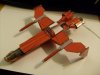
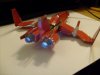
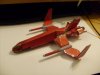
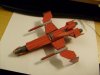
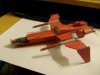
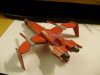
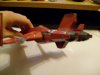
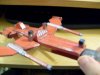
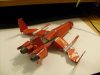
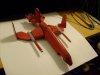
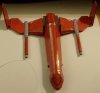
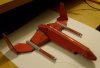
Well, after several off-days (either was too tired or in too much pain) I finally managed an update.

As you can see, the second gun is now on, as well as the cockpit and the curved-gray bit that's under the cockpit-head area. If you look closely you can see the cockpit doesn't perfectly match to the lower-flat bit under it... that's more a bit of a side-effect of several test-builds than poor design/construction. Its easily enough to trim it, but considering I just spent 6 hours on the piece and its now like 4:15 a.m. I think I'll leave it for another day.

This essentially leaves the tail-fin and twin-engine area, and the bulk for the intakes on the underside. I'm hoping it doesn't take me another weak, especially since its not quite the fancy curvature that the nose/cockpit has.
 

Attachments

  • S6300513.jpg
    S6300513.jpg
    17.5 KB · Views: 133
  • S6300514.jpg
    S6300514.jpg
    22.8 KB · Views: 121
  • S6300516.jpg
    S6300516.jpg
    12.9 KB · Views: 107
I love the whole concept of Wing Commander paper models. When I was a little kid I'd biuld my own toy spaceships from WC because they didn't have any. I'd really like to see one based on the Hornet, which is my favorite ship ever, maybe because it was the first one I ever flew.
 
Sweet! At first I thought the latest version looked a bit skinny for a heavy fighter, but looking at the cockpit area it looks pretty damned huge.

I guess it's final with the paper model and all, but I'd love to see what you could do with those missile pods. :)
 
Yeech... rainy/wet/moist/foggy type weather most of the weak... making me feel all sore and old ... don't think I've gotten in more than a handful of minutes on teh project since Monday... at least I managed several hours tonight.

Just realized I totally forgot that darker-red feathering around the cockpit while I was working on the tail tonight. I've added it into the pages for printing, but as to my half-built test model I'll have to see if I can just add an extra top-layer or something.

Next batch of pics hopefully up within 24 hours... gotta sleep before I try to cut these next parts out.
 
finally updated

Did a cover-up layer for the top of the body and the cockpit area so that I could get that dark-red feathering-effect on. Also got that hawkish-beak (tooth like) bit on.

As you can see, the central part of hte tail is built... I just need to work out the sides of it. I've got it sketched out. The round engine exhaust-funnel things are done and waiting building.

Bottom-wise, I need to do the intake and its area. Rough plans already in the works. Just needing to finalize and print and cut-fold.

And in the forth pic you can see that curved gray area under the cockpit. Not exactly sure what its supposed to be... thinned armor for the radar? Perhaps the cockpit lowers down and out (rather than other ships where one needs to climb up a ladder and then have a canopy lowered over you).
 

Attachments

  • 517.jpg
    517.jpg
    23.9 KB · Views: 125
  • 518.jpg
    518.jpg
    13.7 KB · Views: 116
  • 519.jpg
    519.jpg
    15.3 KB · Views: 114
  • 523.jpg
    523.jpg
    12.3 KB · Views: 123
Engines

Engines on.

Top side needs a bit of work to fill in a few gaps.

Reverse-angle ... used a small flash-light (camera's flash made too much glare) to show the 3d-ness of the awesome engine ports... they're almost big enough to stick your pinky-finger in up to the full length of your pinky finger-nail.

Underside... yeah, I got the red/grey bit backwards on the slanted bit running back from the intake, but its just a place-holder while I work out the rest of the cowel/armor back there.

Project got somewhat delayed... had a hardware driver-issue and finally had to make the move from win98se to winXP (my dad went from XP to Vista bout 4 months ago, so I got his XP disk and XP license. Kind of hate XP cause of its lower-security and lack of a real dos mode.

STUPID XP does this thing where if you change your monitor's display resolution settings that some printer programs will then alter the exact dimensions they print at.

Example: in win98se in paint, a 96x96 pixel square prints at exactly 1 inch sq, and it does this whether your monitor is set to 800x600 or 1280x1024. This is because the print-job is done by calculating the actual pixels in the bitmap file created by windows paint.

But in XP in paint, that same image will print anywhere from 1.3w x 1.1h (at low monitor display setting of around 800x600) to 15/16w by 14/16h (at 1280x1024 monitor res)... the higher the monitor display setting, the smaller the resulting print. Many of the resulting monitor display settings result in non-square print-outs. So to get a "proper square" printed you have to set it to a 1:1.333 type setting (like 1280x960)... which results in a 15/16w x 15/16h square printout). Then you got to find the right monitor display setting for your system (otherwise those 6x4 inch photo's might print at 5.5x3.7 or 6.2x4.6 or some other wierd size).

Why? Cause in XP the print-job size isn't calculated by the pixels in the bitmap file, but by the "relative size" of how it is on the screen in windows paint. So the moment you change the monitor display settings it starts fubar'ing the print-job. (in a few cases, I've had print-jobs stop then re-start at a different size just cause I changed my monitor's display settings).
 

Attachments

  • S6300531.JPG
    S6300531.JPG
    32.2 KB · Views: 127
  • S6300530.JPG
    S6300530.JPG
    25 KB · Views: 136
  • S6300526.JPG
    S6300526.JPG
    28.3 KB · Views: 109
  • S6300525.JPG
    S6300525.JPG
    26.6 KB · Views: 118
  • S6300524.JPG
    S6300524.JPG
    36.7 KB · Views: 129
They don't actually glow....

...before cutting parts out I place a layer of this 2-inch wide tape over the parts (helps strengthen the paper and makes it easier to clean since it provides a tiny bit of water-proofing... gives the completed model a nice "plastic-like" sheen too)...

...anyways, since that part folds inward it was hidden in total shadow, so I had made the inside a pinkish-yellowish-off-white (just like you see in teh rear-view of Michelle D's pic) and held up a small flashlight to shine light in (the camera's built-in flash made so much glare you couldn't see any shape/detail) ... but as a nice side-effect the light reflects off the tape and ta-da, instant "engine glow" without any kind of internal LEDS/batteries...
 
Model Done

So okay, maybe the underside isn't 100% identical, but really, how often are you gonna see it when its sitting on a shelf?

The model doesn't sit too well (tends to tilt to one side and rest on a wing)... so tomorrow (before I send anyone the zip) I'll do up a few cheap-n-easy landing blocks (designed to look like extended landing pylons or landing gear/wheels/skids or something).

For those who want a copy of the pages to print, send an email to:

matsho@sympatico.ca.spam
(remove the .spam on the end... its just there to trick email-spam-bots)

I'll be back onto my usual Dark Pirates ship models ... at least until Michelle D uploads front/side/top pics of the lovely Firekan Fighter Michelle did up for WC: Collatoral Damage (I think I spelled that right... I did put a request in on its thread for the pics).
 

Attachments

  • S6300532.JPG
    S6300532.JPG
    28.9 KB · Views: 108
  • S6300533.JPG
    S6300533.JPG
    27 KB · Views: 115
  • S6300534.JPG
    S6300534.JPG
    26.6 KB · Views: 104
  • S6300536.JPG
    S6300536.JPG
    25.7 KB · Views: 113
  • S6300537.JPG
    S6300537.JPG
    27 KB · Views: 111
  • S6300538.JPG
    S6300538.JPG
    13.5 KB · Views: 118
Now with optional landing gear

Did up a tiny set of landing gear (otherwise it sits on its main intake and tends to rock to one side).

If you find that the fighter is a bit off-balance (its back-heavy) you can try taping a penny or something inside the lower front area.

I think its the only flaw to my design... the extra detail in the rear means that it'll sit on the two side landing-legs and then have the rear tail on the ground (leaving the front landing-gear about 1/4" short of being "on the ground".

Now that I look at them, I think they're a bit short. I'll lengthen the gear and add it in to the final zip. Email's should be out within the hour.
 

Attachments

  • S6300540.JPG
    S6300540.JPG
    31.9 KB · Views: 114
I know this design is from cover art but from the front of the fighter with the "beak" it kind of makes me think that it could be a firekkan design. Imagine that after the Kilrathi were pushed out of the system that perhaps they left some equipment behind. This design could be a rework of a captured gratha. (if this was mentioned in the thread I am sorry I haven't perused the entire thread)
 
I'm not sure if that idea was brought up before. I think that's a pretty good idea for a background. To be honest, I'm not quite sure how to reconcile the slight differences in ship design between the two platforms.
 
Back
Top