Gratha Model

I'm also wondering if birds or large ones may be something that Kilrathi fear or make up scary stories about to scare their young, if so then a home based fighter that looks like a large bird is well suited to hunt down other Kilrathi.

Maybe... Eagles and hawks eat housecats all the time... Tiger's not so much.
 
I'll be working more on her and her office, but neither are complete yet. :D


Here is a rough outline of her empty office... well not totally empty, there is one seemingly dead plant in the corner.
office_space1.jpg
 
Aww, poor little plant. ): Oh wait, "seemingly"? So it's not actually dead?

Nice Fralthi silhouette in the orange sky. Will be nice to see the final render, but no rush. Just saying I like it.
 
so lovely I'll make a paper one

I think the red gratha you've done looks extremely beautiful.

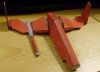
Saved the pictures you posted. I'm thinking I'll do a paper-model of it. I'll post pics (and offer the zip of printable cut'n'fold paper parts) when its done... work will probably be done after I finish my current paper ship project.

I promise it'll be some spectacular paper work. I'm pretty good at taking a few snaps (like your 3d pics) and converting them into actual 3d paper-models.

FYI: been doing paper ships from the web-game, Dark Pirates (a sci-fi trading/piracy game over at www.darkpirates.com). The game has 16 ships (ranged from the small starter ship, Meteor, to the larger ships (several look like they were kilrathi designed... especially the Djinn, Stardragon, and Behemoth. Behemoth looks like a cross between Confed's Behemoth super-gun and the huge 4-pronged Kilrathi dreadnoughts ('cept its sharper points).

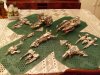
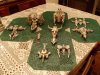
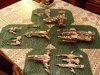
Here's 3 pics... you can see I've got 10 ships (of the 16) done... (well, 9 built... 10 designed, since Oceanus and Conquerer are 95% identical other than the front nose and a small set of top-fins)

left angled pic (for ship names):

back row: Stardragon, Dreadnought, Behemoth
mid row: Oceanus (middle... parts to convert it to Conquerer next to it) and Peacemarker (far right)
front row: Meteor (looks kind of like attack chopper), Nightshade, Thunderfist
 

Attachments

  • S6300470.jpg
    S6300470.jpg
    357.6 KB · Views: 192
  • S6300471.jpg
    S6300471.jpg
    319.2 KB · Views: 154
  • S6300472.jpg
    S6300472.jpg
    383.7 KB · Views: 170
those are excellent beyond words.. why don't you start up a new thread for those? I'd love some insight in how you do that much detail with paper!
 
I've got an entire thread over on zealot (a paper-modeling site).

Outside link: http://www.zealot.com/forum/showthread.php?t=158654

WARNING: pic's on zealot don't get shown unless you register (free).

My downloads though are offline (cause savefile.com is down for server upgrades). Means I been having to email the models every time someone asks me. (Savefile back up soon I hope).
 
Do i see a Gunstar-1 among those papercraft?
Regarding the Gratha: Did you consider putting the cockpit section a little higher and angling it a bit more towards the front? That would give it a more "hawkish" appearance as on the box art. Maybe it already is, i can't tell from the screenshots. The more i look at the original art the more i think its a Firekkan bomber.
 
That's not Gunstar-1 with the others, though I do think they did loosely base it on the gunstar, they call it the "dreadnought" and rather than 2 large-flat 90-degree things (which the gunstar from Last Starfighter has) its got 2 curved wing-shield type things, each connected via 2 small horizontal wings. Closest WC ship would be Confed's WC1 Raptor (front view).
 
its gunstar-1 like... but its got curved wing-shields closer to that of WC1's Raptor.

-- IMPORTANT --

I need a front-view of your red gratha. The top view and angled views a great, but I need a good level front-view (or a good level side-view) cause I can't really tell where some a few parts are compared to others (top of rear central tail-fin versus top of outer vertical wing-bits for example.)

I mean its like what, 5 minutes work for you to load the model and make a pic to post versus several hours of trial-and-error involving lots of paper and tape for me.

I can probably start as soon as you can post the required pic.
 
Red, I am considering raising the cockpit and changing the angle but I haven't gotten around to it.

Here you go rapier

sidegratha.jpg

front-gratha.jpg


I moved some images around and apparently one of them was the cockpit feather detail so the link to that file was broken and that's why it doesn't appear in those images.
 
The narrowness of the cockpit window makes me think that the pilot doesn't have much visibility especially above and below the plane of his vessel.
 
hidden bottom area

Thanks. Work will start later today.

Oh, bout the bottom.... guessing there'll be similar duct-work/shaping as your pic from post
(10-25-2009, 14:34 ... 5th overall pic... 2nd post) has been changed... (ref: the pic after the top-view pic) so that the gray duct-work from the intake seems to have been smoothened into the body and painted red.

I did kind of a cheap/quick paint edit to show structure where you can't see it. The red back changing to gray roughly 3/4 of the way back (compared to the vertical part of the wings) and the bottom intake (gray changing to red). (used blue for red and green for gray so that the lines show up nicely).

Just tell me if it looks roughly right for shape. Its not like I'm planning on cutting corners for the bottom just cause 90+% of the time it isn't looked at. (posting a bottom-view won't really help when you need something like a cut-view straight down the center-line) so I'm just approximating it.
 

Attachments

  • red-side-l.jpg
    red-side-l.jpg
    57.7 KB · Views: 128
gratha_sidereveal.jpg


Here is how I have the paint setup at the moment.


I remodeled that section so some older pictures show the intake as red but it's not, well not now at least.
 
Wings to fly with

First picture for ya.

Wings... with part of the gray bit in-between them, but no guns yet. Size, measured at bottom, is 7.5" by roughly 2" front-to-back and 2" tall.

Up next: one gray bit would run off the upper-central part of the gray-bit (which would then have red parts over it for the rear tail and engine area) and another narrower-long gray bit going forward (for the intake and that "gray under-neck" bit) which would then have the red armor over it to form the neck and cockpit.

Yeah, I know the black lines are a bit of an eye-sore, but I tried to use dark-red and it made scoring the folds and trimming parts a lot harder. Still, other than edges of wings and such, the worst place it really sticks out is blocks just to either side of the gray. Only other option would be to find some kind of closely-matching enamal paint (glossy finger-nail paint maybe?) to touch over some of the more obvious and annoying black lines.

Maybe what I'll do is once the model is done I'll see if I can do a second layer on top with the parts having dark-red lines (instead of black) and the parts just ever so slightly bigger (to provide a smoother look). Not really sure if I'll do that, cause to keep the images sharp I have to use BMP (rather than jpg) and sticking in that kind of detailing will make the file-sizes ten-times larger.

The colors are just a flat one-tone color right now. As I said, details like varying shades/tints to suggest a paneled armor-tile with rivets effect (like your lovely 3d pics have) would boost the BMP size to a rediculous level.

Nice thing bout using windows paint and its BMP format though is that when I print I get a nice 96 pixels per inch both vertically and horizontally... 1 page = 1 page... none of those jpg-sudden-resize problems that jpg's get cause even when they are the same overall Length x Height in pixels with the same compression-level, the actual compression varies by the image contents, causing a sq.inch from one jpg to not always match a sq.inch from another jpg (or for that matter, a sq.inch in one part of an image to a sq.inch in another area of the same image).

As they say... JPG's might be great for highly-compressed web photos, but their a nightmare for blueprints and other precision work where a few pixels here a few pixels there will render a house's building plans useless. When precision's needed, go with BMP, GIF, or PNG... each pixel is saved faithfully, rather than JPG's "approximated cluster groups" technique.
 

Attachments

  • S6300510.jpg
    S6300510.jpg
    15.3 KB · Views: 126
it doesn't really look bad with the black lines. and I can't believe you have gotten that far already.
 
Well, I got like NO LIFE. I be on the disability welfare, so like all I do is eat, sleep, internet, tv, games, and paper models. No job/school... just hours hours of free time.

What you've seen so far was like 5~6 hours of work... and most of that is doing the cutting and taping. Doesn't take much to look at say, the red gratha's neck, and work out that its more or less a hexagon-shaped tube, unfold it in my head, work a few numbers, and then print the part out to do a test-build.

I've gotten good enough at it that I can get bout 60% to 80% of that odd-block between teh gray and the flat outer wing done really quick... its the odd triangular side and the slanty-angled rectangular bit just under it that sometimes takes two or three tries to get right.

Thankfully my hip and lower back pain has been in the "enough to keep you awake and at it" zone the last few days. Sometimes it goes into "keep you awake but in so much pain its hard to think straight" zone. (or "finally gets enough time withe reduced pain that I end up sleeping too much cause I missed a bunch of sleep" zone).
 
update

As you can see, the upper 2/3rds of the body and neck start to take shape.
1 gun attached (other waiting for assembly).
 

Attachments

  • S6300511.jpg
    S6300511.jpg
    21.2 KB · Views: 124
Back
Top