You are using an out of date browser. It may not display this or other websites correctly.
You should upgrade or use an alternative browser.
You should upgrade or use an alternative browser.
Wing Commander Secret Ops Replay Week 5
- Thread starter Dundradal
- Start date
DaveO
Rear Admiral
If you don't want to fly the Luyten station defense mission multiple times like I did, stay close to the alien cap ship. You should be able to spot it as it shoots the capship missiles at the station.
9 Photobucket pictures for this session, and this IS a significant system since screwing up sends you to Sirius(yeah, I know a little tongue twister attempt there).
http://s204.photobucket.com/albums/bb15/DaveO-MM/Wing Commander/
The standard video action has been placed on my YouTube channel at:
http://www.youtube.com/davecaspermeyer
P.S. - I'm sad about the loss of the Cardinals to the Steelers, but it was one heck of a game.
P.S.S. - I thought we had three weeks left due to the listings on the guide section, but we're down to eight missions for next Sunday and then the final four. After that, it's time to go back to the beginning for me on Wing Commander 1. I'm sure there will be other replay sessions going on besides mine after Secret Ops is done.
Attachments

Lorien
Rear Admiral
Wow, next week is looking like a long one. The escort on the way to Krieger seemed like enough of a Marathon for me.
Luyten 1:
The captain's expecting a warm reception from the aliens in the Luyten system, so we're sitting in our fighters as the Cerberus jumps, ready to defend our home as it punches through the blockade. There's a big chunk of good news in my email as I wait, the word has finally gotten out about the aliens. A big of that was our saving of the Twilight Purchase. A lot of civilians died thanks to Confed and the corporations screwing around with the warning but hopefully no more will suffer the same fate. No one's managed to work out why the captain's callsign was Clippy, though Stiletto and Amazon have some interesting ideas on it.
The rest of my inbox is taken up by less pleasant news. Zero's dad has sent through some more information on contamination from the alien fighters and it's a very disturbing read indeed. Not only where the teams in charge of analysis known to be incompetent, but their failure to follow basic quarantine doomed not only themselves but the friendly forces sent to rescue them. Particularly chilling is the possibility of an infected smuggler craft on the loose and spreading the disease. Hopefully, we won't have to worry about civilians in the Luyten system, but you never know.
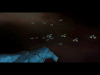
The captain's expectations about our reception turn out to be dead on and we're launched in Wasps to take out an alien force tasked with taking out the Cerberus. The alien strategy is a good one, forcing us to split our forces to take out three seperate bomber packages coming in from distant angles. I order my wing to engage one wing while I engage the wing on the other side. We should be able to crush the middle one between us.
I take out my bombers quickly enough and take out the Skate T in the second as my wingmen manage to take out the Skate T in their section. Unfortunately, they let a REd Manta slip through to enage the Cerberus. Weaving alien fire, I lock my afterburners and move to engage, but I'm too late and an alien torpedo detonates against one of the Cerberus' engines badly damaging it, but not destroying it. With the bombers disposed of, it's a relatively simple matter to take out their remaining escorts.
With the alien threat clear, speculation turns towards the alien presence in Proxima and why they haven't made a move on Sol yet. One theory is that the two suns in that system are attracting the aliens, but Maestro isn't convinced.
Luyten 2:
Now that we've succesfully forced out way into the Luyten system, it's time to start thinning out the alien presence here. The captain has dispatched three of us in Black Vampires to patrol a 4-point route and eliminate any alien craft we encounter. I've spent so much time in a Panther lately that it takes a little adjustment to get used to the Vampire's vertical fighting style, but I'm soon on top of the game.
The alien presence in this system is best described as heavy. Though Nav point 2 was clear, there was a heavy alien presence at the other locations, including a large number of independent Skate's. These aren't worrying on their own, but they can certainly be an annoyance as you hunt down bigger prey. Nav point 4 is a perfect example of this bigger prey with three Devil Rays and 3 Barracuda corvettes blocking our progress. I'm glad that I'd conserved a number of missiles up until this point, as the Pulse Particle Cannons on the Vampire feel like popguns against the heavy armour and shields of the heavy fighters and corvettes.
Zero is forced to eject by the crossfire from the Corvette's but Maestro and I are able to avenge his ejection with relative ease and mark his location for the SAR as we return to the Cerberus.
Luyten 3:
Luyten station has reported that an alien cruiser is moving in to attack it. We need the information available from the sensor array on the outpost as well as a resupply, so the Cerberus herself will be moving to support the station, with all of our Vampires flying in support. True to form, the aliens attempt to stop out mission before we can even reach the station using a mixed force of Mantas, Morays and Stingrays. Only the Stingrays pose a threat to the Cerberus and receive priority targetting until their numbers are thinned down enough to prevent them clustering up and attacking. With the aid of the Cerberus, the rest of the mop is a breeze.
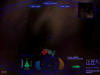
Arriving at the station, we find the situation to be grim. A large number of fighters threaten to overwhelm the Excaliburs defending the station, while the cruiser is sitting off and launching capship missiles towards the station. Targetting the capship missiles, I order my wingmen to cover me as I take out the missiles one-by-one, the first with an ELRIR and the rest with my guns. Once the cruiser's missile banks are emptied, the remaining alien fighters are quickly overwhlemed by our firepower. We move to start stripping turrets off the now exposed cruiser, but it's able to jump away before we finish the job.
With the station now secure, we're ordered to patrol the rest of the system to make sure no more attacks are forthcoming. We find some scattered light fighters, but nothing that poses a threat. With that station and the area surrounding it now secure, we land onboard the Cerberus, ready for our next mission.
Luyten 4:
Cerberus has detected an alien convoy moving through the Luyten system. We're not sure what the convoy is carrying but we do know that whatever the aliens want to have, we want them not to have it. To that end, Cerberus is launching a strike force of Shrikes and Vampires to take care of the convoy.
Alien presence in the Luyten system remains numerous, as we discover on our way to the convoy when we're attacked by a large for of Skates and Morays. Despite their numbers, the fragile craft the aliens are flying don't last long under a sustained bombardment and we're soon moving on to the convoy's location.
The fighter presence around the convoy is much heavier, including some Devil Ray Space Superiority fighters, but we've got some extra numbers on our side as well, with fighters from Luyten station joining in on the action. I order my wing to break and attack and move to take out the alien CAP with our escort to give my wing an easier time. I concentrate my fire on the lighter Skates and Morays that get too close to me and swiftly attract the attention of the Devil Rays. As usual against the more maneuverable fighters in a bomber, I'm forced to play chicken with them, relying on my heavy shields and armour to protect me as I tear chunks out of the fronts of the alien fighters with my guns.
It's a tactic that I've used a number of times before and it's no less succesfully now than it was back then. Soon the Vampires and I are moving in on the transports as I watch Amazon begin to pick off the bridges of the transports. I continue to play the support roles and take out the turrets on the transports, especially the vital rear turret, to help my wingmen do their jobs. I still get time to pump torpedoes into two tranports and take them out before we return to Cerberus.
Luyten 5:
With the convoy dispatched and Luyten station secure, we're able to make a move on the alien cruiser that attacked Luyten station previously. We'll have support from fighters launched from Luyten station. Unfortunately, the cruiser isn't present when we arrive at it's supposed location, just a few fighters. Spyder relays the situation to the Cerberus, who come back with bad news. Luyten station has spotted the cruiser on an attack course with the station. We clear out the light fighter force remaining around the Nav Point before moving to the defense of Luyten station.
We arrive at the station just in time, with fighters swarming the station and the cruiser just launching a flight of Stingray to finish it off. Ordering my wing to break and attack, I start destroying the Stingrays from long range using my ELRIRs to ensure a kill before moving on to the next. One fighter manages to slip past my attack but a quick check of my radar shows a bigger threat to the station. The cruiser has restocked it's missile supply from somewhere and is launching capship missiles against the station.
I leave the solo Stingray to it's job before heading off to intercept the missiles. Unfortunately, the Panther's armament is more suited to intercepting topedoes than capship missiles and it's a a desperate battle to keep the continously launched missiles from destroying the station. Bravo wing comes to my rescue as they've closed into attack range to the cruiser and begin the job of taking it out. I'm chasing what must have been the 5th of 6th missile fired towards the station when my ship shakes from the explosion of the cruiser. With their home destroyed, the alien fighters are quickly and easily mopped up. We set course for Cerberus, another mission succesfull.
Luyten 6:
With Luyten station being protected by Confed forces, Cerberus is tasked with removing the last of the blockade presence before moving on to the Krieger system. I'm command a wing of our Shrikes, with Spyder leading our Panther escort. Luyten station is contributing a heavy force of Thunderbolts and Excaliburs to support our mission. Before we can depart for an alien cruiser, Spyder relays some horrible news about the alien debris on the black market. The rash that we saw affecting the survivors of the Alberghetti wreckage appears on anyone who handles the debris. It's a nasty little bugger, too. This alien organism destroys the skin and the muscle tissue underneath it. The only cure is a simultaneous injection of hundreds of hyperdermic needles across the infection, as the organism is smart enough to avoid treatment by shifting through the skin. This makes our mission to get the aliens out of the Sol sector even more important.
The fighter presence around the cruiser is light, with only a few Medium fighters backing up the cruiser and it's corvette escorts. I order my wing to break and attack and move to clear out the few Mantas heading our way, leaving the Cerberus to handle the corvettes. The fighters don't last long and I'm soon moving in to clear out turrets on the Cruiser, starting with the missile turrets. I don't have time to make much progress, however, as the co-ordinated attack with Luyten's Thunderbolts soon leaves the Cruiser as space debris. The Triton might as well have blown up with it for how long it last without any cover.
The big goal of our mission, an alien carrier is present at Nav 2. I order the same break and attack and move to cover as usual, dodging the Cerberus' big cannon as it takes out a Barracuda. The Carrier's initial cover is soon taken care of and our bombers move in for the kill as it launches a few light fighters as a pathetic last attempt. Seeing that the wingmen were making runs on the bridge, I pull in behind the carrier's engines and take the time to lock on with a Pike Torpedo, before finishing the carrier off with a Light Torpedo. With the carrier taken care of, I clear the rear turret from the transport and it's a race with my wingmen to take the transport out. A race that I won.
The few alien fighters at the jump point into the Krieger system are a massive anti-climax to our mission and our massed forces quickly eliminate them and clear the way into the Krieger system for Cerberus.
Luyten 1:
The captain's expecting a warm reception from the aliens in the Luyten system, so we're sitting in our fighters as the Cerberus jumps, ready to defend our home as it punches through the blockade. There's a big chunk of good news in my email as I wait, the word has finally gotten out about the aliens. A big of that was our saving of the Twilight Purchase. A lot of civilians died thanks to Confed and the corporations screwing around with the warning but hopefully no more will suffer the same fate. No one's managed to work out why the captain's callsign was Clippy, though Stiletto and Amazon have some interesting ideas on it.
The rest of my inbox is taken up by less pleasant news. Zero's dad has sent through some more information on contamination from the alien fighters and it's a very disturbing read indeed. Not only where the teams in charge of analysis known to be incompetent, but their failure to follow basic quarantine doomed not only themselves but the friendly forces sent to rescue them. Particularly chilling is the possibility of an infected smuggler craft on the loose and spreading the disease. Hopefully, we won't have to worry about civilians in the Luyten system, but you never know.
The captain's expectations about our reception turn out to be dead on and we're launched in Wasps to take out an alien force tasked with taking out the Cerberus. The alien strategy is a good one, forcing us to split our forces to take out three seperate bomber packages coming in from distant angles. I order my wing to engage one wing while I engage the wing on the other side. We should be able to crush the middle one between us.
I take out my bombers quickly enough and take out the Skate T in the second as my wingmen manage to take out the Skate T in their section. Unfortunately, they let a REd Manta slip through to enage the Cerberus. Weaving alien fire, I lock my afterburners and move to engage, but I'm too late and an alien torpedo detonates against one of the Cerberus' engines badly damaging it, but not destroying it. With the bombers disposed of, it's a relatively simple matter to take out their remaining escorts.
With the alien threat clear, speculation turns towards the alien presence in Proxima and why they haven't made a move on Sol yet. One theory is that the two suns in that system are attracting the aliens, but Maestro isn't convinced.
Luyten 2:
Now that we've succesfully forced out way into the Luyten system, it's time to start thinning out the alien presence here. The captain has dispatched three of us in Black Vampires to patrol a 4-point route and eliminate any alien craft we encounter. I've spent so much time in a Panther lately that it takes a little adjustment to get used to the Vampire's vertical fighting style, but I'm soon on top of the game.
The alien presence in this system is best described as heavy. Though Nav point 2 was clear, there was a heavy alien presence at the other locations, including a large number of independent Skate's. These aren't worrying on their own, but they can certainly be an annoyance as you hunt down bigger prey. Nav point 4 is a perfect example of this bigger prey with three Devil Rays and 3 Barracuda corvettes blocking our progress. I'm glad that I'd conserved a number of missiles up until this point, as the Pulse Particle Cannons on the Vampire feel like popguns against the heavy armour and shields of the heavy fighters and corvettes.
Zero is forced to eject by the crossfire from the Corvette's but Maestro and I are able to avenge his ejection with relative ease and mark his location for the SAR as we return to the Cerberus.
Luyten 3:
Luyten station has reported that an alien cruiser is moving in to attack it. We need the information available from the sensor array on the outpost as well as a resupply, so the Cerberus herself will be moving to support the station, with all of our Vampires flying in support. True to form, the aliens attempt to stop out mission before we can even reach the station using a mixed force of Mantas, Morays and Stingrays. Only the Stingrays pose a threat to the Cerberus and receive priority targetting until their numbers are thinned down enough to prevent them clustering up and attacking. With the aid of the Cerberus, the rest of the mop is a breeze.
Arriving at the station, we find the situation to be grim. A large number of fighters threaten to overwhelm the Excaliburs defending the station, while the cruiser is sitting off and launching capship missiles towards the station. Targetting the capship missiles, I order my wingmen to cover me as I take out the missiles one-by-one, the first with an ELRIR and the rest with my guns. Once the cruiser's missile banks are emptied, the remaining alien fighters are quickly overwhlemed by our firepower. We move to start stripping turrets off the now exposed cruiser, but it's able to jump away before we finish the job.
With the station now secure, we're ordered to patrol the rest of the system to make sure no more attacks are forthcoming. We find some scattered light fighters, but nothing that poses a threat. With that station and the area surrounding it now secure, we land onboard the Cerberus, ready for our next mission.
Luyten 4:
Cerberus has detected an alien convoy moving through the Luyten system. We're not sure what the convoy is carrying but we do know that whatever the aliens want to have, we want them not to have it. To that end, Cerberus is launching a strike force of Shrikes and Vampires to take care of the convoy.
Alien presence in the Luyten system remains numerous, as we discover on our way to the convoy when we're attacked by a large for of Skates and Morays. Despite their numbers, the fragile craft the aliens are flying don't last long under a sustained bombardment and we're soon moving on to the convoy's location.
The fighter presence around the convoy is much heavier, including some Devil Ray Space Superiority fighters, but we've got some extra numbers on our side as well, with fighters from Luyten station joining in on the action. I order my wing to break and attack and move to take out the alien CAP with our escort to give my wing an easier time. I concentrate my fire on the lighter Skates and Morays that get too close to me and swiftly attract the attention of the Devil Rays. As usual against the more maneuverable fighters in a bomber, I'm forced to play chicken with them, relying on my heavy shields and armour to protect me as I tear chunks out of the fronts of the alien fighters with my guns.
It's a tactic that I've used a number of times before and it's no less succesfully now than it was back then. Soon the Vampires and I are moving in on the transports as I watch Amazon begin to pick off the bridges of the transports. I continue to play the support roles and take out the turrets on the transports, especially the vital rear turret, to help my wingmen do their jobs. I still get time to pump torpedoes into two tranports and take them out before we return to Cerberus.
Luyten 5:
With the convoy dispatched and Luyten station secure, we're able to make a move on the alien cruiser that attacked Luyten station previously. We'll have support from fighters launched from Luyten station. Unfortunately, the cruiser isn't present when we arrive at it's supposed location, just a few fighters. Spyder relays the situation to the Cerberus, who come back with bad news. Luyten station has spotted the cruiser on an attack course with the station. We clear out the light fighter force remaining around the Nav Point before moving to the defense of Luyten station.
We arrive at the station just in time, with fighters swarming the station and the cruiser just launching a flight of Stingray to finish it off. Ordering my wing to break and attack, I start destroying the Stingrays from long range using my ELRIRs to ensure a kill before moving on to the next. One fighter manages to slip past my attack but a quick check of my radar shows a bigger threat to the station. The cruiser has restocked it's missile supply from somewhere and is launching capship missiles against the station.
I leave the solo Stingray to it's job before heading off to intercept the missiles. Unfortunately, the Panther's armament is more suited to intercepting topedoes than capship missiles and it's a a desperate battle to keep the continously launched missiles from destroying the station. Bravo wing comes to my rescue as they've closed into attack range to the cruiser and begin the job of taking it out. I'm chasing what must have been the 5th of 6th missile fired towards the station when my ship shakes from the explosion of the cruiser. With their home destroyed, the alien fighters are quickly and easily mopped up. We set course for Cerberus, another mission succesfull.
Luyten 6:
With Luyten station being protected by Confed forces, Cerberus is tasked with removing the last of the blockade presence before moving on to the Krieger system. I'm command a wing of our Shrikes, with Spyder leading our Panther escort. Luyten station is contributing a heavy force of Thunderbolts and Excaliburs to support our mission. Before we can depart for an alien cruiser, Spyder relays some horrible news about the alien debris on the black market. The rash that we saw affecting the survivors of the Alberghetti wreckage appears on anyone who handles the debris. It's a nasty little bugger, too. This alien organism destroys the skin and the muscle tissue underneath it. The only cure is a simultaneous injection of hundreds of hyperdermic needles across the infection, as the organism is smart enough to avoid treatment by shifting through the skin. This makes our mission to get the aliens out of the Sol sector even more important.
The fighter presence around the cruiser is light, with only a few Medium fighters backing up the cruiser and it's corvette escorts. I order my wing to break and attack and move to clear out the few Mantas heading our way, leaving the Cerberus to handle the corvettes. The fighters don't last long and I'm soon moving in to clear out turrets on the Cruiser, starting with the missile turrets. I don't have time to make much progress, however, as the co-ordinated attack with Luyten's Thunderbolts soon leaves the Cruiser as space debris. The Triton might as well have blown up with it for how long it last without any cover.
The big goal of our mission, an alien carrier is present at Nav 2. I order the same break and attack and move to cover as usual, dodging the Cerberus' big cannon as it takes out a Barracuda. The Carrier's initial cover is soon taken care of and our bombers move in for the kill as it launches a few light fighters as a pathetic last attempt. Seeing that the wingmen were making runs on the bridge, I pull in behind the carrier's engines and take the time to lock on with a Pike Torpedo, before finishing the carrier off with a Light Torpedo. With the carrier taken care of, I clear the rear turret from the transport and it's a race with my wingmen to take the transport out. A race that I won.
The few alien fighters at the jump point into the Krieger system are a massive anti-climax to our mission and our massed forces quickly eliminate them and clear the way into the Krieger system for Cerberus.
DaveO
Rear Admiral
I'm just a few hours behind Lorien's journal reply for this week. For any wingnuts besides us on this, watch out in Krieger since multiple missions will hand out infinite waves of aliens. You'll likely use a number of those Mosquito missiles on the Devastor on the missions you have to fly with it, especially Kreiger 4. The third mission in Proxima can be tricky since you have limited torpedoes and two carriers to deal with.
Luyten 1
There is a reception committee awaiting us, which requires us to launch in Wasps to intercept the alien attackers. There are Morays, Mantas, and Skate bomber clusters rapidly closing their distance on Cerberus. I engage the booster pack of the Wasp to reach the bugs more rapidly. I target and destroy two of the Mantas with Swarmer missiles, and have to use my afterburners to get in range of the other bug bombers. I have to use the Dust Cannons of the Wasp to waste another Manta that took a small amount of damage from a Swarmer launch. A Moray fighter is close enough to engage without the risk of picking up a shadow. Controlled bursts of fire from my Wasp are the key to dispatching the Moray without using up the entire energy pool. Two more Mantas are shattered by a Swarmer missile hit, and two of the Morays are taken down by the Dust Cannon. One of the Skate bombers must have been separated since I see some of the smaller segments around. Two of those segments are gunned down, and the only close alien fighter is a Moray. Our wing of Wasps handles that alien without my assistance, but I pitch in to hit a Manta with those multiple missiles of a Swarmer. Our wing is able to eliminate the final three alien fighters at this nav point. Zero tells us the news that the aliens are massing in Proxima and not making a move on Sol. Maestro wonders why the aliens would be attracted to Proxima, and both Zero and Spyder point out that it has two suns. Maestro is not convinced that is the reason the aliens are there, and I hope our intel group can determine the plans in Proxima by the bugs.
Luyten 2
Due to the unknown concentration of aliens around here, we are to conduct a search-and-destroy patrol sweep. At the first nav point, there are Mantas, Morays and Skates. I look for the Mantas as my priority targets, and take one down after a few moments of switching targets on the radar. I’m able to assist Zero by destroying a Manta on his tail, and a third Manta is vanquished by my Vampire. I get behind a Moray, and put the pilot into space. I skewer two of the Skates, and give the same greeting to three more of the Morays. I shoot down the last Skate segment, and we proceed onward on our patrol. There are no bugs at the second nav point, and only light resistance from Morays, Skates, and Stingrays at the third nav point. I engage and shoot down both of the Stingrays, and look for the Morays to attack. Two of them are taken down, and my fighter finishes three of the Skates. We go onwards to the fourth nav point, and a heavy presence of alien Devil Ray aces along with some Barracudas and Skates are here to stop us. The first Devil Ray is dusted without me having to use any missiles on it, but that second one takes multiple missile and gun hits before it goes down. The final Devil Ray takes the same treatment before it follows its friends. I see a Skate close to my fighter, and its fragile frame is no match against the full firepower of the Vampire. I attack and destroy two more of the Skates, and have to use a missile on a third to avoid a friendly fire hit to our wing. There are mainly the Barracudas left, but they are quite close to each other to prevent a piecemeal pulverizing. I use one of the Vampire’s MIRV trackers to tag a Barracuda with multiple missiles, and then finish it off with my guns. I do the same procedure on the second Barracuda, and some assistance from Maestro makes short work of that threat. There is still a Skate around trying to take advantage of our attack on those corvettes, but I splatter that bug. Maestro and I combine to kill that final Barracuda and we make our way back to the Cerberus.
Luyten 3
An alien cruiser is closing on the Luyten outpost, and we need the outpost to stay in one piece so that it can supply intelligence on the alien movements and provide additional supplies. At our first patrol point, there are Stingrays along with Morays and a few Mantas. I target one of the Stingrays first to prevent any linkup with two others. The Stingray goes down, and two of the Morays join the extermination club. The turrets of the Cerberus tag a Stingray, and I shoot down another with my guns. Our fighter wing wipes out the remaining alien ships, and we move on to the second nav point. I see four capship missiles heading straight for the outpost, and I use my missiles to take three of them down. Zero accounts for one of the capship missiles, and I turn my attention against the fighters. I see a Manta, and use a missile and gun combination to take it down. There’s a Devil Ray hell bent on having my fighter fried, but simple flying along with a missile up its tailpipe trash that alien. I shoot down a Skate, and a second Devil Ray tries to have better luck against me. His flying is not much better, and the guns of my Vampire take care of it without a missile assist. There is a Moray that I make short work of, and the only target left is the Hydra. I get in range and take out a few of its turrets. The ship jumps out before significant damage can be inflicted, and we head for the next nav point. There are Mantas and Morays here, so I shoot down three of the Mantas to prevent their further threat. The final Moray fighter is a combined kill from our wing. The next nav point has almost the same resistance, but Skate and Moray support for Mantas is not a good solution to stop us. Two of the Mantas are vaporized by my Vampire, and a Skate is shattered after a stupid frontal attack.
Luyten 4
The jump detection software on the Cerberus has located an alien supply convoy. I’m put into a Shrike to assist in stopping those shipments, and the first nav point is clear. The second nav point has Skates and Morays to harass our bombers. I shoot down a Skate and take down a Moray, but get a missile hit in return. Another Skate and two more of the Morays are shot down by my Shrike, and I check the damage report before going on. There is only light ship core damage, but I definitely need to keep an eye on my six to stop more serious damage. At the next nav point, there is a significant bug presence. Multiple transports with Devil Rays, Mantas, Morays and Skates are around. I know that those Devil Rays are the most significant threat to my bomber. One Devil Ray is distracted in its attack on our fighters, and I get rid of it with multiple missile and gun hits. That other Devil Ray does not like what I did to its friend, but fortunately its aim is errant. I get the other Devil Ray with more firepower along with a missile. A Manta gets a few hits on my bomber, but I make him a hunted target and take it down. There are just the five transports left, and I systematically take down the rear turrets on three of them. Our other bombers take advantage of my shooting, and two of the transports are taken out by torpedoes. I see another transport with a rear turret still active, so I take care of that troublesome turret. I then use two of my torpedoes to take out the transport. I use two more torpedoes to take out another Triton, and our other bombers account for the last one. On our way back to the Cerberus, we are intercepted by a handful of alien fighters. I decide that it’s more important to keep my Shrike from taking more damage, so I use up three Friend or Foe missile along with gun support to take out three Morays. I switch to the Mosquito missiles and use up one missile each on two of the Skates. I take them both down, and our fighter wing mops up the final fighter.
Luyten 5
Due to our successful defense of the Luyten outpost, we’ll attack that alien cruiser that jumped away. This is the first of three big bugs believed to be in this system, and the defenses of the cruiser are expected to be light. Additional fighters and bombers from the outpost will be part of our coordinated attack. At the first nav point, there are Mantas, Morays and Stingrays. Those Mantas are the highest priority to prevent any bomber losses. I get rid of two of the Mantas, and a Stingray has clustered together to try to take me down from behind. I split the cluster apart, and splash a Stingray with a missile. I make another Manta permanently missing in action, and shoot down two of the Morays. Our wing easily takes care of the final fighter here, and we proceed onward to defend the outpost since the Cerberus warned us that the alien cruiser is heading for it. I stick close to the cruiser since I’m expecting some capship missiles to be launched against the station. I’m behind the Hydra when it launches the first missile, and have to engage afterburners in pursuit. There is no way I could catch up to that missile in time, so I use my own missile. My missile just barely intercepts the capship missile in time, and I resolve to not have any more close encounters. I’m able to spot and shoot down a second capship missile with my guns, and send a third to the scrap heap with another missile. I then close the distance on the Hydra since its previous attack on the outpost had four capship missiles deployed. Just after the engines of the Hydra are destroyed by our bombers, I spot that next capship missile. I try a single gun pass, but then decide that a missile is the surest way to take care of it. I dish out deadly damage to four of the Morays, and then see that there may be enough Stingrays left to cluster together. Our wing accounts for two of the Stingrays, and I shoot down one as well. There are no threats left to the Luyten outpost, and I can breath a sigh of relief.
Luyten 6
With continued help from the Luyten outpost, we will try to put an end to all other capship bugs blockading this system. We’ll then move onwards to begin the bug hunt in Kreiger. Right after launching, Spyder tells us the latest news about the alien debris being sold on the black market. A rash begins on the hands and arms of anyone touching alien starship debris. A necrotic effect occurs with the skin, causing a collapse of the flesh beneath the rash in a few hours. Zero regrets being right about the alien bacteria being a threat since that is the same effect he saw on the survivors of the Albergetti. Spyder says that it’s an organism that feeds on skin and muscle tissue. The treatment of this disease is a simultaneous injection of hundreds of needles over the whole area of the infection since the disease can shift thru the skin. We proceed on our mission, and the first nav point has a cruiser, transport, two corvettes and some Mantas as support. I have to handle four of the Mantas with my bomber, but it’s taken some damage in return. I take down a Moray fighter with my bomber, and see that there is only the transport left to deal with. I quickly take care of its rear turret, and Maestro makes good on that opening to trash the transport with a torpedo. We head for the next nav point, and there is a heavier presence here. A carrier, transport, three corvettes, Mantas, and Morays are all assembled here. I’m able to handle three of the Morays without troubles, and set my sights on one of the Mantas. It goes down with just the guns on my bomber, but the second Manta needs a combination of guns with a missile to kill it. I use my guns on another Moray, and get to see a rare occasion of the plasma gun on the Cerberus shooting down an alien fighter. I deal with five more of the Moray fighters before our bombers can take down the carrier. Another Moray is put out of action by my bomber, and I see only the Triton transport left. I take out the transport with two torpedoes, and we then move onwards. There are a few Mantas along with several Morays here. I’m able to take down one of the Mantas, but take a missile hit with some more damage to my bomber. I shoot down two of the Morays, and our wing takes care of the rest of the alien attack group.