I'm a bit puzzled about which picture is being referred to. I'm assuming it's one of the ones in the Photobucket location.
Courage 1
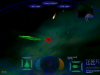
There is a celebration ceremony over our defeat of the bugs in Kilrah. Six of the best pilots from Midway, including myself have been transferred to a new Confed cruiser called the Cerberus. Governor Cavazos thinks that this new addition to the fleet will mean that there will be soon no more threats for Confed to deal with. I know that it will take a significant fleet to keep the peace in case the bugs show up again. On approach to the Cerberus, I agree with Maestro’s comment that the Cerberus looks to be built for speed. It’s a compact cruiser design, but it has a plasma cannon on the bottom to give it more than the standard turret defense. I check out the surroundings of the Cerberus first a bit, and also look at the killboard. The entire complement has a total of thirteen kills, although I should have a chance to be in the lead position quickly. I check my briefing for this mission, and we’ll escort the Cerberus along a designated navigation route. The Cerberus will use our nav system data for calibration of its jump detection software.
Our group of Panthers launches on this patrol, and I notice a difference on its guns. The ‘Black’ Panther comes with Cloudburst and Chain Ion guns along with a slightly increased speed, and I wonder how effective these changes will be. When we reach our first nav point, we get a surprise with alien Morays attacking. I send two into the void of space, and a third shakes off a missile with a decoy. I finish off that fighter with the firepower of my Panther, and the rest of the alien resistance is handled with no difficulties. Zero wonders how the bugs got out this far since there would have likely been an alert if an alien carrier group was spotted. At the second nav point, two Morays are attempting to make a run from our wing. All of the other fighters split off to attack targets besides the Morays. I have to pursue and shoot them down with missiles and gun blasts. A Manta took advantage of my pursuit, and did significant damage to my Panther’s core and afterburners. I handle two of the Mantas with a combination of missiles and guns, and there are no other aliens to deal with. We head back to the Cerberus, and I’m hoping that the damage I took is just a symptom of carelessness that I can correct.
Courage 2
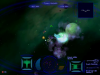
We launch immediately in Wasps to deal with aliens that are trying to make the maiden voyage of the Cerberus very short. I hit the booster of the Wasp, and use only the Dust Cannons for its guns. The ‘Black’ Wasp has twice as many Swarmer missiles as its predecessor, so I have a larger amount of targets I can trash with them. Four Mantas feel the power of the Swarmer missiles, but the bugs have brought in some Skate bomber clusters. The Dust Cannon and a Swarmer launch quickly smashes a cluster apart. I do the same thing to a second Skate bomber cluster, and now there are only the smaller Skate segments to deal with. A missile and the rapid fire of the Dust Cannon handle two separate Skates. Four more of the Skates are dusted, and a Lamprey follows suit after a foolish frontal attack. A Moray and another Lamprey fall to those fast guns, and another Moray along with two more Skates are shredded. There is a Barracuda corvette still left, but our group takes down this ship without my assistance.
Courage 3
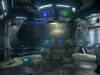
We have confirmed a significant alien presence in this system. To make sure the Cerberus lives to see another day, we’re heading straight for the jump point to the Ella system. Due to our quick action and defense in the previous mission, we should be able to take a direct path to the jump point.
I make a mental note that failure is not an option for this mission, and Maestro wonders how the bugs managed to make it to the Sol sector. Spyder says that Confed Intel believes that the aliens moved their forces from Kilrah into Epsilon. If the bugs reached Valgard, they would only be six jumps away from Vega. We head for the first nav point with the Cerberus along, and there are Morays and Skates here. I assist the Cerberus with its missile turret kill of a Moray, and then Zero and I make a combined kill on another Skate. I get the final fighter in this area, and we move on to the next nav point. The reception here consists of Mantas and Morays. I use a missile along with guns to make very short work of a Manta. Another Manta and Moray fall to the guns of the Panther. The Cerberus alerts us to a second wing of inbound aliens that consists of more Mantas and Morays. I see the Cerberus take a torpedo hit to the rear, and use another missile and gun combination to take down a Manta when I see another alien attempting to take me down from behind. I switch to that target and make that Manta pay for trying to put holes in my Panther. I have to use a missile along with some gun blasts to quickly take down a Moray after a Manta gets on my tail. The Manta is then dealt deadly blows from blasts, and two more Mantas follow its friend into the void. There is just a single Moray left, and I make an assist with my wing in eliminating it. We head along to the third nav point, with more Mantas and Morays to handle. I again assist the Cerberus with a missile turret kill of a Manta, and use a missile of my own along with my guns to trash another Manta. Five of the Moray fighters fall to the powerful guns of the Panther, and my ship is in perfect condition with no decoys deployed. I land on the Cerberus to see that I did not get all of the performance bonus objectives, but I still feel I made a significant contribution for this mission.
Courage 4
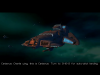
There is no time to relax with another group of aliens attacking us. I launch in the ‘Black’ Vampire for this mission, and notice multiple alien Devil Rays right away. The Vampire has Plasma Particle guns along with its Tachyon guns to help handle the situation. I destroy four of the Devil Rays with guns and Artemis enhanced long-range image recognition missiles. I scuttle two Skate clusters with my Vampire and then notice more of the Devil Rays. I get two of the Devil Rays in the same fashion that I did with the other four, and make a mess of two Morays. I notice some Stingrays around, and head after them to prevent any clustering. I finish one off with my guns, and do an assist with a second. Our wing combines together for the final Moray fighter kill. Zero jokes with Maestro that ‘We’re gonna miss you bug’, and the captain of the Cerberus congratulates us on our performance. The Cerberus makes its jump into the Ella system, and we wonder about the future missions we will undertake.