Wing Commander Prophecy Replay Week 7

Dundradal

Frog Blast the Vent Core!
Hrissith continues....now it gets interesting! We start this week with the Shipkiller assault. So it's Hrissith 3-6 and Kilrah 1 and 2. I'm going to save us four missions for next week, which will be our last on WCP. Then we have our week long break before starting SO.

Good work guys! I'm still catching up, I'm hoping to post several weeks worth this week so soon enough :)
 

Attachments

  • WCP_Midway_Plasma.PNG
    WCP_Midway_Plasma.PNG
    360.7 KB · Views: 66
  • WCP_Bug_Bits.PNG
    WCP_Bug_Bits.PNG
    377.6 KB · Views: 80
  • WCP_Too_Old.PNG
    WCP_Too_Old.PNG
    256.4 KB · Views: 73
  • WCP_Devastator.PNG
    WCP_Devastator.PNG
    86.1 KB · Views: 57
  • WCP_Capship_Missile.PNG
    WCP_Capship_Missile.PNG
    192.4 KB · Views: 55
Half of my journal for the missions. I should have the remainder in a few days.


H’rissith 4
As expected from my reconnaissance from the previous mission, we’re going after the second ship killer we spotted in our Vampires. Instead of going after the Ship Killer in a Shrike, we’ll be launching in new bombers called Devastators. The Devastators have been given new shield technology that should be better than the experimental missiles we’ve tried out before.

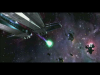
As soon as we reach the nav point with the Ship Killer, there is a bit of a welcoming committee. There are Morays and Mantas here along with three capital ships and a Barracuda corvette. I notice that the Devastator has more missiles than the Shrike did, and discover that part of the reason is the lousy maneuverability of this bomber. Hitting anything besides capital ships in this thing is going to be a major challenge. One of our pilots is blown away by the aliens, and I hope our fighter escort keeps me from having a similar fate. I manage to get two hits from the Devastator’s plasma cannon to shoot down a Manta. My rear end has taken some armor damage, and I keep on the communication channel to request assistance. The fighter cover does its job on clearing away my attacker. I then sucker a Moray into a direct attack, and another bug bites the dust. The alien fighter cover is cleared out, so it’s time to take on the capital ships. I disable the engines on the Orca with five hits from the plasma cannon. I do serious damage to its bridge, but have to peel off before dealing the final blow. We lose yet another pilot to the bugs, and Maestro bails out of his ship. I tag the Orca’s bridge, and head right for the Ship Killer. One of the Vampires is killed by the turrets of the Kraken. Another pilot ejects from his ship, and I wonder how many losses will be taken before we’re done here. I bring down the bridge of the Kraken, and head right for its engines. Five shots with the plasma cannon scuttle the Ship Killer for good. All that’s left is a Triton transport, and it should be easy pickings for our bombers. Only two shots are needed to fry the bridge and I follow suit with the engines of the Triton. We head back for the Midway, and I hope we don’t run into more bugs since my fuel is almost exhausted. Fortunately, there are no further alien encounters and Anderson congratulates me on my work. Stiletto also has praise for me after I land, and is starting to believe my ‘press’.


H’rissith 5
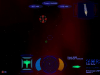
Due to our approach to the Kilrah jump point, the aliens have diverted a large portion of their fleet to this system. Our sensors have detected a large strike force approaching the Midway’s position. I’m to protect the plasma weapon of the Midway at all costs. All wings will be launched to specific defensive zones to counter the attack. Our fighters are still getting modifications from the engineering division for the missiles and shields.

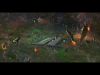
During launch, Anderson emphasizes how important it is to protect the Midway’s plasma weapon. I look for the largest threat and see some Stingrays. I head right for the nearest one on full afterburners, but it has combined with two other Stingrays. I take a few hits from the plasma shots of the Stingray cluster, but I get it to break apart. I can’t try a direct attack like that again if I want my frontal armor to not get blasted thru. I take down three of the Stingray segments with my missiles, and three more are eliminated by the guns of my fighter. The bugs have brought in more ships to attack, but they are fairly far away. I let the standard speed of the Vampire get me closer, but a call for help from Anderson makes me decide that speed is of the essence here. I go after the Stingrays that Anderson made a call of help for. The cluster must have been broken apart by the turrets of the Midway, since there are just the segments to deal with. I nail one just as two more of its buddies try to merge into a cluster again. Four more Stingrays are squashed, and there are no attackers left to try to take out the Midway’s plasma weapon. Anderson congratulates me on saving the situation, and after landing Rachel says that my father would have been proud.


H’rissith 6
Thanks to my success on the previous mission, the Midway will use its plasma weapon against the alien fleet heading our way. The CAG emphasizes that we’ll have to work twice as hard on this mission to ensure success. I’ve been assigned to plant a thermonuclear primer on the center part of the fleet to make sure the plasma shot from the Midway has the correct catalyst for maximum effectiveness. All available fighter wings from the Midway will launch to deal with any alien fighters. My objective is to put the primer on a transport at the heart of the fleet. To ensure I don’t make a targeting mistake, the primer will only lock on the transport. Once the primer is on the transport, I’m to get as much distance from it as possible to avoid the blast. The CAG emphasizes for us to stay focused and wishes us a successful mission.

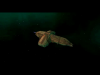
Together, we all meet the alien force at the first nav point. There is a destroyer, cruiser, and carrier here along with the transport and a bit of alien fighter cover. Some Vampires take out a Moray that was in my sights, and I gun down a Manta. My bomber takes multiple hits thru its shields and armor, and I know I can’t afford to keep this up if my bomber is to return in one piece. Fortunately, our fighters are around to bail me out and I commence my run on the transport. It takes two attempts for me to get the primer on the transport, and one of our pilots is lost for good. Finley congratulates me on putting the primer on the transport, and emphasizes to clear the area. I lock afterburners, and the Midway shoots its plasma weapon.

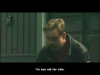
I see the plasma shot go off, and manage to see a flash from the hit to the transport. All of the capital ships are wiped out in a spectacular explosion and I manage to get clear of the blast to land on the Midway. The shields of our carrier hold against the large amounts of debris from the shattered fleet. There is a large crowd to welcome and congratulate me, and I see Commodore Blair. He struggles to say something, and then decides to salute me. I return the salute, and he nods his head in recognition of my accomplishments. I get a few pats on the back from Maestro after checking my performance score, and manage to see the carnage from the blasted bits of the capital ships from the window in the Rec room. We’re all celebrating there, and Stiletto comments that more plasma guns like the one on the Midway could carve out a corner of the universe. Maestro says that he’d like to share his happy gun with Stiletto, and she slaps him softly for his lewd remark. Stiletto notices that the Captain just entered the Rec room and calls us to attention. The CAG is along with the Captain, and congratulates us on clearing a path to the Kilrah jump point. Once we are thru the jump, we’ll head straight for the Wormhole Gate. The Captain tells us to be prepared for the Gate to be very heavily defended. Zero asks if the Midway’s weapon will be helping out to make short work of the remaining aliens. The Captain tells us the bad news that the plasma weapon turned out to be a fire-and-forget weapon. It was fired once, and we can forget about using it again due to the high risk of a fatal overload that would destroy the Midway. The Captain says that we’ll have to stick to winning our approach to the Gate mission by mission. The CAG says to expect a mission as soon as we have cleared our jump into Kilrah. Zero shakes his head as the Captain and the CAG leave, no doubt wondering how much it will take for us to succeed and at what cost. Just as I head to the ready room to check the computer, I overhear the CAG telling Blair that she won’t let him fly. The Commodore threatens the CAG that the Captain will deal with her, but she says the Captain will let her do her job. Blair asks why he’s not been allowed to help out, and the CAG says that he’s not ready. The Commodore points out that he has clearance to fly from the Captain and the flight surgeon. The CAG says that her decision is the one that matters over whether Blair can fly again. Blair sits down in exasperation and says that he’s too old to be dealing with this, and notices that I’ve overheard the conversation. He pipes in that he feels that I’m too young, and I ask him if he really wants to fly again. Blair says that we wants to help out more than anything, and thinks that he’s a better pilot than a staff officer. I wonder why he would want to face the bugs again after what they did to him, and he says that he wants to make sure that nobody else has to experience the same thing. Blair says that this new menace makes the Kilrathi he fought against for half his life seem like housecats. Blair wants the bugs to be stopped, and says that he wants to do his share regardless of what the CAG says.
 
And I'm finally caught back up! Kilrah 2 makes for a nice refreshing change. Any mission in the Vampire almost seems too easy.

H'Rissith 4:

With the data on the Ship Killer at hand, we need to launch an assault to take it out before it can fire on the Midway. I'll be leading a group of Devastators on the attack run with Vampires configured for Wild Weasel to assist us. Our craft are being further modified with alien technology, this time my shields have been enhanced. There's quite a fleet escorting the Ship Killer as we arrive, with a Cruiser, Corvette and Transport all in attendance. I release my wingmen to attack their targets and try to guard them as we're going in, using the plasma cannon and stormfire on the Devastator to weaken the alien ships before finishing them off with our new enhanced missiles. Once the fighters are gone, I move in on the Ship Killer. Time is of the essence so I leave the turrets as they are are instead take out the shield generators and damage the bridge on my first pass before looping up and taking the bridge out from above. The turrets have made swiss cheese of my shields and armour by this point, so I gladly escape behind the bulk of the alien ship to target the engines. A new enhanced Torpedo followed by an Enahanced Light Torpedo are all it take to finish it off, the Ship Killer's detonation neatly joined by it's cruiser escort. The transport remaining behind doesn't really warrant the use of a torpedo and is instead dealt with by the Plasma Cannon. Stiletto's praise upon landing sums up the incredible tour of duty I've had so far, though this is by no means over yet.

H'Rissith 5:

It's evident now that the aliens are beginning to feel the Midway's presence. We've approaching the Kilrah jump point and the aliens are throwing what remains of their forces at us in a vain attempt to slow us down. We're launching in Vampires to keep them away from our new Plasma Weapon. Once I gain space I realise how desperate the alien forces are. 12 fighters are there to greet us with no dedicated bombers amongst their ranks. 6 Stingrays could form into clusters and badly damage the Midway so they're my primary target. A Tracker MIRV shot take two down and the next dies to my guns. Ignoring the Morays swarming around me, I hunt down the remaining potential cluster as they had for the Midway. One of the newly enhanced IR missiles is enough to take them out and stop them being a threat, so I concentrate on the Morays attacking me and wipe them off my tail with some well-placed tachyon fire.

It's at that point when I new swarm of red dots show up on my radar. The aliens have committed another 12 fighters with the same force make-up as the last wave and they're on the other side of the Midway from the fighters defending her. Afterburning through the Midway's "legs" I open up with another long-range tracker shot to take down the Stingrays, followed by some close-range dogfighting to finish them off. After the last Stingray goes to pieces under my guns, I turn to see the last Moray taken apart by the Midway's swarming defenders. The Midway's new gun is intact and the aliens are in trouble.

H'Rissith 6:

With the alien's fighter compliment in pieces around the Midway, it's time that we made our way to the Kilrah system. The CAG personally thanks me for my performance in the last mission before we move on to the briefing proper. It seems the aliens have gathered their remaining forces around the jump point to stop us from making our way through. They're too concentrated for us to bull our way through, so the only option is to use the Midway's plasma gun against the concentrated forces. I've been selected to personally deliver the targeting disc to the transport at the centre of the alien fleet.

It seems that aliens still have a few fighters left in reserve and my first tast upon arriving at the alien fleet is to take out the Manta fighters guarding it, as they're trouble for bombers if left alone. Fortunately, they're also rookie pilots intent in flying straight at the heavy plasma cannon on the Devastator and then hanging around long enough afterwards for an enhanced IR missile to finish them off. With the main threat dealt with, I afterburn into the middle of the fleet slowing only to allow the targeting disc time to lock on. As soon as the disc is released, I divert all my power to the engines and afterburn back towards the Midway. Even with the proecaution taken, however, I barely reach the protection of the Midway's shields ahead of the shock wave. Watching them light up as they take the blast I realise that my bomber would have been torn apart if I'd been a little slower.

The celebration in the pilot's lounge is a happy one. Maybe a little too happy for Meastro as he tries what must be the universe's worst pick up line on Stiletto, possibly the universe's worst target. It's cut short as the Captain and the CAG make a visit to congratulate us on our success. Their warnings about the difficult missions to come seem a little dire until the Captain reveals the bad news. The plasma weapon seems to have been a one-shot only weapon. Now there's a 2 in 3 chance that the next time we try to use it will end with the destruction of the Midway. The Kilrah system will have to be deal with mission-by-mission. The CAG informs us that we'll be launching as soon as the Midway jumps into the system before telling us to continue our celebrations.

I'm heading towards the briefing room for that first Kilrah mission when I overhear a conversation between Blair and the CAG. He's eager to take the fighter to the aliens in the cockpit while the CAG doesn't want him to go. Unfortunately for Blair, the CAG's decision is the only real one that counts. After she departs Blair indicates that he knew I was listening in on the conversation. He tells me that he wants to stop the aliens from doing what they did to him to anyone else and the best way to to do that is in the cockpit. He ends the conversation by noting that these aliens are worse than the Kilrathi and to hell with the CAG, he has to do his share.

Kilrah 1:

Reading the briefing for today's mission, it certainly seems like we could use Blair's help. The enemy presence in the Kirah system is thicker than expected. My wing is being dispatched to take out a carrier that's strayed a bit too far from it's escorts while another wing hunts down a Destroyer that escaped destruction in the H'Rissith system. The carrier is obviously fresh with a full compliment of fighters as shown by the strong CAP already in place when we arrive. Fortunately, the CAP is only light fighters and are easily dealt with. Once they've been thinned out a bit, I head in towards the carrier and start using my HARMs to destroy the large number of missile turrets that dot her flanks. I'm just about done with them when the carrier gets a wing of Manta fighters in the air and I'm forced to change targets before they chop the bomebrs to pieces. Fortunately, having a heavy fighter pounce them causes enough of a distraction to the fighters that the bombers are able to finish off the carrier before it can get any more craft into the air. I almost feel sorry for the two remaining fighters as they're torn to pieces.

Any sympathy for them is short-live, however, as Anderson informs me that the other wing is having trouble taking out their destroyer and need our assistance. With the carrier out of commission we form up and engage autopilot immediately. When we arrive at the Nav point, it's easy to see why they were having trouble, with a large number of interceptors in space around the Destroyer. The interceptors aren't much of a match for our fighters and it's soon time to play "whack the turret" again. It's a shame to designers of the HARM didn't make it go straight for the nearest turret as it can be a pain targeting the right turret as I skim along the surface of the Destroyer firing at everything that gets in my way. The extra bombers soon take the Destroyer out of play and we set a course back to the Midway.

Kilrah 2:

It seems that our little strike has caught the attention of our enemies and a scramble alert is quickly called. The CAG fills me in as I launched. An alien dreadnought has launched several flights of bombers as well as some long-range anti-ship missiles. Our Wasps are to take out the missiles that are inbound with the bombers being our secondary targets. I release my wingmen to engage the enemy fighters as I start the booster rocket and head towards the missiles. The aliens armour their missiles much more heavily than Confed or the Kilrathi used to do and it takes two rounds of gunfire into each to take them out. With the alien fighters distracted, however, it an easy job to fall in behind each one and take them out. I'm heading back to join in with the general melee when Anderson reports that several bombers are inbound. 8 Torpedo clusters are going to be a tough target, especially with how spread out and distant they are. The only thing to do is order my wingmen after the other side of the bombers and engage my afterburners.

The new long range IR missiles really prove their worth in this battle, allowing me to severely damage each cluster from long range before finishing it off with guns. There's no time to hunt down the little Skate fighters that are ejected from each cluster and I have quite a collection of them following me around before I finally manage to take out the last cluster. Now it's simply a massive dogfight around the Midway, with the Aliens having lost the ability to target her vital components. The comm channel is filled with Alien death screams as we slice through the Skates surrounding the Midway like a hot knife through butter. The tougher targets, like Morays and Mantas, receive missiles from my remaining store of Swarmers and Heat Seekers. After what must have been a dozen kills I suddenly realise that the sky is clear. I take a quick survey of the Midway to find that a hangar bay had taken a minor hit and the bridge was out of commission but otherwise my home is intact. The damage to the bridge isn't enough to stop Anderson wondering if the aliens are getting a little scared of me as I bring my Wasp back in for landing.
 
great work! i love watching the youtube missions, i was searching for a link to all of the WCP misions to watch in a order...
looking forward to SO in January.

Happy Holidays to all and a great new year.
 
I've not made playlists yet for the YouTube videos, but I'll have to think about my approach since I've been playing the alternate paths for WC3, WC4, and Prophecy.
 
I'm caught up for the most part for my journals with still the exception of the WC4 Circe path. I'll get to it perhaps on Saturday.


Kilrah 1
In the briefing room, I find out that the alien presence is stronger than expected. The bugs are bringing to bear more reinforcements. I’m to cover our bombers as they attack the advance portions of the alien fleet. A second attack force will go after any survivors from our plasma attack on the alien fleet in H’rissith. All alien fighters and capital ships are to be destroyed.

Upon launching, Anderson reminds me to cover the bombers so that they can attack the capital ships. When we arrive at the location of the aliens, there are multiple Morays providing cover for the capital ships. I take two down with the guns of my fighter, and then get a third with a combination of missile and guns. Two more Morays fall to the guns of my Vampire, and one more can’t handle the combination of missile and guns. The way looks clear to attack the capital ship, and I get one turret before fighter reinforcements come in. This time Mantas join the fray. I manage to get a missile hit on a Manta in spite of its decoys, and finish it off with my guns. I take a few direct hits from a Manta, but the front armor barely held. I take out that fighter, and quickly down another Manta. Two more Mantas are vaporized by my Vampire, and there is a small window of opportunity to attack the carrier again. Two more turrets are trashed, and a wing of Morays comes in to try to stop our bombers. I’m one fighter short of shooting down the entire wing of Morays. With no more fighter defense, the door is completely open to take down all of the defenses of the carrier. I get three of the turrets on the carrier before our bombers finish it off. I’m not done yet on this mission, and set the navigation coordinates to the second nav point. When we arrive, there are Squid fighters along with an Orca destroyer. I squash two of the Squids, and take some damage to my afterburners. Maniac has to bail out from his attack on the Orca, and I take out four of its turrets. One of our pilots is killed by the Orca before our bombers can finish it off. Our group heads back for the Midway, and Anderson congratulates us on dealing with both of the alien capital ships.

Kilrah 2
We’re sent on a scramble in Wasps right away. The CAG tells me after launching that the dreadnought has launched multiple bombers along with missiles that could destroy the Midway. I use the boosters of the Wasp to quickly close the distance between the capital ship missiles and me. I get all four of the missiles, and Maniac compliments me on the good work. I gun down a Stingray, and Anderson comes on the communication line to warn us about more incoming aliens. I can’t get close enough to a Skate bomber cluster before it launches a torpedo. I do break apart a second cluster before it can launch its torpedo. I then quickly destroy one of the Skate segments, and a second segment falls to one of my missiles. Three more of the Skate segments are eliminated with my missiles, and now I only have the Swarmer missiles left. The Midway gets a few of the alien fighters with its turrets, and I break apart a Skate bomber cluster with a Swarmer missile launch. My Wasp stings five more of the Skate segments to death. I then use a Swarmer missile on the last alien Moray fighter, and there are no more alien fighter wings to deal with. Anderson says that was a bit of a close call with the multiple bombers and the capital ship missiles. He then says that perhaps the aliens are getting a bit scared of me due to my performances against them.
 
Back
Top