You are using an out of date browser. It may not display this or other websites correctly.
You should upgrade or use an alternative browser.
You should upgrade or use an alternative browser.
Wing Commander Prophecy Replay Week 5
- Thread starter Dundradal
- Start date
DaveO
Rear Admiral
I still have five of the losing or alternate missions to fly for Dodo, but I will save those for later in the week. At the pace the kills are coming, I should be able to break 400 since there are ~ 10 kills or more per mission as an average.
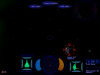
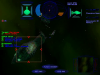
I added 18 new Photobucket shows to my album below:
http://s204.photobucket.com/albums/bb15/DaveO-MM/Wing Commander/
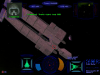
For the most part, the shots are either from the cinematics or ship captures. I have good shots of the worst WC ship ever designed: the Ray. The only threat this ship presents are mines that it occasionally drops.
New YouTube videos are at: http://www.youtube.com/davecaspermeyer
I added 18 new Photobucket shows to my album below:
http://s204.photobucket.com/albums/bb15/DaveO-MM/Wing Commander/
For the most part, the shots are either from the cinematics or ship captures. I have good shots of the worst WC ship ever designed: the Ray. The only threat this ship presents are mines that it occasionally drops.
New YouTube videos are at: http://www.youtube.com/davecaspermeyer
Attachments

DaveO
Rear Admiral
I just finished up the alternative and failing missions for T'lan Meth with the alternate pilot. Dodo has 369 kills at the end of T'lan Meth, although I would have had more if mission 4b was not bugged. I had to bypass it due to constantly failing the mission, but there will be those failing missions along with G'mar for the next videos. So for a total, there will be eight new videos in the series. I'll upload the failing path first, and then wait a few days before uploading the G'mar series. After experiencing all those mission bugs with the failing path missions, I can't recommend going down the failing path often.
P.S. - This also explains why I've not put in the time to post the journal yet since I was busy doing the alternate and failing path missions.
P.S. - This also explains why I've not put in the time to post the journal yet since I was busy doing the alternate and failing path missions.
DaveO
Rear Admiral
I ran into a recording glitch with the alternate missions by getting no sound, but I think I was able to record them successfully the second time. I'm surprised that it only took me one attempt to get thru those missions. Of course, the G'mar path will have to be flown again as well. If anybody gets the 'Bug Hunt' mission, my advice is to save afterburners for when ships are close. A potential benefit for this losing path mission is the high kill count you can achieve. 40-50+ kills are not unusual for this mission.
DaveO
Rear Admiral
I knew I'd have a choice between doing the journal and reflying the G'mar missions after the recording glitch. I felt the journal was a higher priority since I won't be uploading the G'mar missions until Wednesday anyway. I'm looking forward to Lorien's return so that I have somebody else flying along these missions as well.
T’lan Meth 6
I walk up to Hawk at the bar in the Rec room and ask him how long he’s going to give me the silent treatment for not attacking the Kilrathi on the previous mission. Hawk says to not expect a pat on the back for not telling the brass about his desire for revenge. I tell him that I did not want to help him to kill these Kilrathi. Hawk points out that these cats are what he considers to be terrorists, and I point out that the design of the Kilrathi fighters is decades old. Hawk wonders what my point is, and I state that these cats are still trying to fight the old war of the Kilrathi versus humanity. That war has been over for years, and those who are still attempting to fight this war again including Hawk should be pitied. Hawk does not like hearing that and pulls out his knife. He pins me to the table, and thrusts the knife into the table very close to my head. He says that the Kilrathi still are the enemy. I say that the Kilrathi were an enemy in the past, but this new enemy of the alien bug menace has the cats on the run with us as the next target. Hawk then realizes his mistake, and says that he’s a good pilot who is still alive to fight these bugs. I reply that the earlier advice from my father to stay alive is still a good idea. Hawk then helps me get up from the table, and I go into the briefing room for the next mission. Unexpectedly, Finley is in the room with the transmission assembly of the jamming device we retrieved on the first mission in this system. I ask her why it’s in this room, and she says she needed the special communications equipment in this room to test a theory. By using specific key codes from the assembly, she has more information to break the codes the aliens are using for their communications. She shows me a transmission coded in two parts that was recently intercepted. I see the ugly mug of one of the bugs on the briefing screen, and it says that it has captured one of the non-aligned for transport to Dula 7. I ask Finley what the alien meant by non-aligned, but she has no idea. She does say that there was a Kilrathi starbase in Dula 7, and the aliens must have taken it over. I comment that it’s strange for the bugs to capture the starbase installation, and Finley says that she has even more strangeness for me to see. She shows me the second part of the transmission, and I see what looks like something organic. Finley congratulates me for being right, and says that these look to be very thorough tissue sample scans. Finley thinks these scans could be from humans picked up by the bugs. This would mean that people are being dissected for study, and that the non-aligned are us. It takes a while for Finley to clear the briefing room for use again. The CAG asks for quiet and says that the tactical division has developed a new strategy. In order to get more intelligence about the starbase the bugs are now using, an SWACS will be sent to do a perimeter sensor scan. By sweeping a specific route, the SWACS will get full visibility of anything lurking in the starbase’s radar shadow. Obviously, the bugs won’t like us snooping around so the SWACS must be protected at all costs.
I launch in a Panther with Maestro on my wing as well. At the first nav point are a few new alien ships along with some Mantas. I attack the Mantas first since they are the most familiar threat. One Manta goes down quickly from the guns of my fighter, and the second one fares no better. There’s a new alien ship called a Lamprey doing a frontal attack against my fighter. It rapidly shoots ringed energy bursts, and those shots look designed to purposely designed to drain my shields. With help from my wingman, I blast that Lamprey to bits. I then approach the other new alien ship, and the radar identifies it as a Ray. This ship has multiple orbiting satellites called Remoras. The Ray can occasionally drop mines and launch missiles, so I match its speed to attack it without overflying it. Once the Ray is destroyed, its Remoras go off rapidly in random directions to attack. Maestro takes out two of those small Remoras, and I get three. We attack and destroy another Ray, and five of the Remoras fall to my guns. Maestro gets two more of the Remoras, and we head off to the next nav point for more scans by the SWACS. At the next nav point, there are some Morays along with two more of the Rays. Since the Rays present a smaller threat, I attack the Morays first. The first one takes a bit of extra effort to pulverize, and the second one also is a bit tougher to take out. Maestro took out a Ray while I was working on the Moray, and he also dusted two of those Remoras. I take care of the remaining Remoras from that Ray, and destroy the second Ray. I get six of the Remoras, and Maestro pitches in with a kill. We head off for the third nav point, and there are Morays, Mantas, and Rays here. The Manta is a bit far off, so I attack the Moray first. I pound the rear of the Moray with the Panther’s guns and hit it with a missile. That fighter is still there, but a few more shots take it out. I then pursue the Manta since it’s within a range to now present a threat to the SWACS. A Moray is a bit hot on my tail while I’m running after the Manta, and I have to do some evasive flying and dropping of a decoy to keep him from getting thru the rear shields. I get within gun range of the Manta, and give it a close encounter with the vacuum of space. I turn on the Moray that was pursuing me, and let it have a missile up its tailpipe. I finish off the Moray with guns, and go after one of the Rays. After the Ray is destroyed, I get five of its Remoras and Maestro gets two kills. Together, Maestro and I remove the Ray from the radar scope. Its Remora satellites are all dispatched by the guns of my Panther. Maestro and I head back to the Midway with the SWACS, and Anderson congratulates us on a good job. I check the performance score for my mission after landing, and am astounded at the 99% rank along with almost 40 blasted bugs. Stiletto comes over to tell us the news that Hawk got attacked by two squadrons of bugs while flying a recon mission. Only the wreckage of his fighter was found, so it must have been a concentrated attack to kill Hawk. Stiletto apologizes for giving me this sad news once she sees my reaction. We both had the same teacher of my father for his advice to get thru that tough time I was still having guilt over Blair’s abduction.
T’lan Meth 7
I see another pilot in the ready room cleaning out Hawk’s locker. I say that he was a good man, and the pilot says that Hawk was crazy. It was all work and no play with Hawk as far as the pilot was concerned. I state that it sounds like he did not like Hawk, and the pilot says he understood Hawk since it was the Kilrathi that made him act that way. The pilot tells me about how Hawk’s home planet of Mylon 2 was terraformed by the Kilrathi with proton bombs. Hawk was training at the Academy at the time, and his return to his homeworld showed no sign of survivors from the attack. The pilot says that Hawk died on Mylon 2, with today as a formality. He hands me Hawk’s knife, and says that Hawk would have wanted me to have it. I’m left to feel my sorrow for Hawk’s death and wonder how many more are going to die in this new war on the bugs. I go into the briefing room, and find that the SWACS data has found an alien destroyer in the radar shadow of the starbase. The sensors of the Midway have detected the destroyer moving away from the starbase and its defenses. Stiletto will be in command of a fighter wing to deal with fighters from the starbase, and our group of bombers will attack the destroyer.
I launch in a Shrike, and we head to the destroyer’s location. There are an array of alien fighters here with Morays, Mantas, and Squids for fighter cover. There are also alien Barracuda corvettes, but I’m more concerned over the Mantas. I destroy one of the Mantas with a missile after our fighters are able to seriously damage it. I get a Moray to back off with a charged mass driver shot missing its mark. Another Manta gets in range of my guns and one shot is all it takes for the charged mass driver to destroy it. I call for assistance against a Moray, and a combined response gets rid of that fighter. I help out on a Barracuda, and the full power of a charged mass driver shot takes out the armor on one side of the corvette. Our fighters finish off that ship, and I see another Barracuda close by. This time, I get to finish it off with a single shot after multiple fighters soften it up. Stiletto warns me of more alien fighters coming in to help, but the distance is over 100,000 for the Squids. The destroyer is much closer, so I concentrate on getting that shield emitter down and putting the engines of the destroyer out of commission for the other bombers in my group. I get the shield emitter eliminated and park right behind the destroyer. At my close range, its turrets can’t hit me. Two heavy torpedo hits explode the engines, and I see the bridge is also badly damaged. One of our pilots is lost to the destroyer, and I need to finish off that bridge to prevent more deaths on our end. The shields of the destroyer absorb two light torpedo hits from my Shrike, but the third shot strikes true and that destroyer is left as charred shell. We head back to the Midway, and Rachel congratulates me on my performance. The Shrike did take a missile hit during the attack on the destroyer, but its armor held. Compared to how damaged I’ve been before in a Shrike, I’m thankful that I got thru this mission in better condition.
T’lan Meth 8
I head right into the briefing room with a bit of an adrenaline rush after my last mission. Due to our success against the perimeter defenses of the starbase, we have an opportunity to make a direct attack on the starbase. All of our fighters will be assigned to handle the aliens at a specific zone, and I am responsible for eliminating any resistance in my zone.
This mission puts me back in a Panther, and as soon as we arrive at our assigned zone there are three Lampreys trying to make a run for it. All three of the Lampreys fall to the guns of the Panther, and I then make short work of a Moray. One of the other Morays gets a successful missile hit on my right side, and I make mincemeat of a second Moray. I squish two more of the Morays, and the wingmen of my fighter group eliminate a Ray. I get four of its Remoras, and one fighter from my wing takes out an alien ship. I vaporize another of the Morays, and get a compliment from one of my wingmen. There is just one Ray left here, so this should be a simple target. After the Ray is reduced to rubble, six of its Remoras are fried by the guns of my Panther. We got a call for help from a second nav point, so I set course for it. There looks to be a mix of Mantas and Morays at this location. I get to work on a Manta and skewer it with a combination of a missile and my guns. I destroy a second Manta with just my Panther’s guns, and a Moray is destroyed by one of our fighters. I head over to pitch in on a third Manta, but the other fighters destroy it without my assistance. I turn on a Moray that was on my tail, and give him a missile and gun treatment. That fighter is quickly destroyed, and the other fighters in our group handle the last alien left. I return to the Midway, and Rachel again congratulates me on my performance.
T’lan Meth 9
I head right for the briefing room since I expect that the Marines will be involved on this mission. The CAG says that the Marines will land on the starbase to take control of it. Any prisoners on the starbase will be rescued, and there should be a lot of valuable data to assist us in further efforts against the aliens. We’ll escort the Marine landing craft to the starbase, and continue covering the Marines while they storm the starbase. We run to our fighters in enthusiasm, and proceed on this important mission.
Mantas and Morays are providing cover for the starbase, and I focus on the closest Manta. It’s quickly ventilated by the guns of my Panther, and another Manta attempts to avenge its friend. Those Gorgon gun blasts of the Manta go wide, and I’m on the tail of that creep. I dispatch the second Manta, and the Marines notify us that they’ve docked at the starbase. I get another Manta eliminated, and the Marines say that the starbase is set on a self-destruct sequence. I fry a third Manta, and blast a Remora to pieces. The Marines notify us that their scans have located human life signs on the starbase, and they’re going to check it out. I take care of a fourth Manta, and then destroy a Moray and a Remora before the Marines tell us that they’ve made it to where a human prisoner is being held. There’s little time before the starbase’s self-destruct will go off, so the Marines are running back to their landing craft post-haste. I scuttle another Moray and Remora, and see another Manta on the radar that could be a threat to the withdrawal of the Marines. The Midway tells the Marines that the reactor of the starbase has already gone past the critical point, so the starbase could explode at any moment. I get rid of the Manta, along with two of the Moray fighters. There are no alien forces left at this area, and I make sure the Marines have launched off the starbase before heading back to the Midway. The starbase goes up in a series of explosions, so we lose the intelligence value of it. After landing on the Midway, Stiletto tells me that the Captain has recommended that I receive a Silver Star medal. I’m more concerned about the human prisoner the Marines rescue, and Stiletto tells me that it’s Commodore Blair! Stiletto tries to tell me something about Blair, but I want to see him right away. I rush to the elevator and find the Commodore in the briefing room. I tell Blair that I’m sorry, and he asks why. I tell him that I felt responsible for his abduction, but Blair says that I did the right thing by staying with Dekker and the Marines on the H’hrass mission. The Commodore winces in pain, and asks me to excuse his condition since the bugs bounced him around a bit. I express my thanks that he did not end up dissected. Blair says that the bugs did cut into his mind and made him relive everything he tried to forget about. The destruction at Telamon, the actions of Admiral Tolwyn, the destruction of Kilrah, and his tragic romantic involvement with Angel were some of the memories he relived. Blair’s puzzled on why the bugs let us find him, and says that they are fascinated by our darker nature of being able to kill without remorse or pity. I ask Blair if he knows who they are, and he says that they are death for everyone that encounters them.
T’lan Meth 10
After the emotional high of rescuing Commodore Blair, I go into the briefing room pumped for my next mission. The bugs have brought in a significant portion of their fleet assaulting E’loy to try to pin the Midway against an asteroid belt. The Midway has detected multiple bogies closing on its position at attack speed. Although we did receive a reply from Confed that they are sending reinforcements to our area, it’s highly unlikely they will reach us in time to provide assistance. The wing of Panthers I’ll be with are assigned to a specific intercept zone to destroy all ships in that zone. Just before taking off on this mission, the CAG asks for a bit of my time. She tells me that the Midway has been getting communications from the Kilrathi on E’loy about my ‘hairless’ clan. I explain that Hawk and I were instrumental in helping the Kilrathi out on the fifth mission in this system. She then says that Kilrathi would likely use this opportunity to provide assistance for this mission against the bugs. I admit that the experience of having the cats help out would feel a bit strange, and the CAG says that it can be a strange world.
Maestro and I launch in Panther fighters and proceed to the intercept zone. More Mantas and Morays to deal with here. I engage and destroy the closest Manta, and the next nearest ship is a Moray. The Kilrathi come into this area, and say that they’re here to help out with Vaktoth fighters. I destroy two of the Moray fighters, and one of the Kilrathi Vaktoths is destroyed. Maestro and I make a Moray sorry that it ever tried to attack us. Half a dozen hits to the rear end of another Moray destroy that ship. I shake a Manta from trying its heavy guns on us, and finish off that fighter before it can attempt any more damage. I destroy a Manta, and then have to make multiple hits permanently discourage another from using its full firepower. Two of the alien fighters are dealt with by the other fighters in our group. The Midway comes on the communication line, and tells us all to return since they are under attack. There are still Morays and Mantas to deal with, but it should be little problem with our two-to-one margin. I destroy a Moray and a Manta, and the Kilrathi take out the last Moray. We all head back to help out the Midway. The closest alien I see is a Stingray, and I go after it since I know how dangerous they can be if three link up together. The next priority target is a Skate bomber cluster. I break that cluster apart, and take down two of the smaller Skate segments with my missiles. Maestro scores an alien kill, and I let another missile take down another Skate segment. I see a banged up Stingray, and pursue it. Multiple hits to its rear end its threat, and I go after a Manta. I see the Midway take a torpedo hit, and Anderson comes on the communication line to implore that I keep attacking the bombers. I fry that Manta, so there is now one less torpedo threat. Multiple alien fighters are biting the bullet from the Midway’s turrets and assistance from the Kilrathi. Anderson again comes on the communication channel to say that the Midway is taking more hits. I see a Manta that is very close to the Midway. I let a missile and my guns take care of that enemy. I have to fly over the top of the Midway, and I see one of its missiles kill a Skate segment. I pursue a Manta, and introduce its pilot to the void of space. I destroy a Skate segment with one of my missiles, and the cats pitch in with a kill against a Manta. There are two Skate segments left, but they are no match for our fighters and the Kilrathi assistance. I get to see the three remaining Vaktoths line up in formation as I request clearance to land. Part of me hopes that perhaps one day may see the Kilrathi and us fighting together as one group. After landing on the Midway, the Captain congratulates me on my work. I express my regrets that Hawk is not here to see this, and a new Confed fighter called the Vampire lands. The CAG says that the support from the Kilrathi would never have happened without our earlier assistance. There’s a bit of a crowd here to congratulate me as well, so it feels very good to know that Confed and the cats are united against the alien foe.
Lorien
Rear Admiral
Slowly but surely catching up.
T'Lan Meth 6:
I decide to confront Hawk about this behaviour following my decision not to attack the Kilrathi. He's extraordinarily hostile to my attempts to talk to him accusing me of assisting terrorists. I decide to try another tack and point out that the Kilrathi and Hawk aren't too different in this situation but it must have come across a little too angry because the next thing I know Hawk has thrown me onto the table and stabbed his knife into it a little too close too my head for comfort. Trying my third tack, I try to get Hawk to focus on the new threat that's on the horizon and something seems to click in Hawk's brain. He repeats the advice my father gave him to himself and then helps me up from the table. Hopefully, that means he's back on the right track.
Hearing some strange noises from the briefing room, I decide to wander in a check it out. I find Commander Finley in there connecting a signal bouy into Anderson's work desk. Apparently, she needed the special equipment to help crack some of the alien's codes. A lot of what she's talking about goes over my head but becomes a lot clearer when she plays a message from an alien reporting the capture of what they call "the non-aligned" and it's subsequent transport to the starbase on Dula Seven, now occupied by the enemy. I ask her who the non-aligned are and she admits that she doesn't know. However, she's just cracked the rest of the message, which may shed some light on the mystery. What she displays looks like some stuff that I saw in the Biology classes at the Academy and Finley congratulates me on the observation. She elaborates a bit further, comparing the results to tissue samples, possibly human. The implications are clear, we are the "non-aligned" and the aliens are dissecting us for study. My first thought rushes to concern over what they might be doing to Blair.
The Captain must have received the same information that I did, today's mission is to escort a SWACS as it scans the perimeter of the captured Kilrathi Starbase. Once the scan is complete, we can plan our move to retake the station. Our proximity to the starbase definitely attracts the enemy's attention, every nav point has some fighters present. Nav point 1 features only a few fighters, one of which I don't recognise but it seems to specialise in fast straight-line travel. It's guns don't doo much damage, however, so it's dispatched easily. The other nav points all feature a mix on Morays, Mantas and Rays. The Rays, usually easy targets are best left until last so that the little Remora fighters they release upon death can't swarm the seahawk. Unfortunately, this leaves them plenty of time to drop mines and Maestro is force to eject at Nav 3 after colliding with one. I mark the pod for SAR and escort the SWACS back home. I wait for Maestro to be released from the SAR shuttle before going to check the mission scores, a wonderful 99%. Our elation is short-lived, however, when Stilletto reports that Hawk was jumped by two squadrons of enemy fighters were killed. She doesn't seem very remorseful but I hate thinking that Hawk was killed just after I got through to him, exactly like Dallas.
T'Lan Meth 7:
I find Spyder cleaning out Hawk's gear in the pilot's barracks. I offer my condolences but he doesn't seem interested. We talk a little and it seems not that they were friends but just people with an understanding. Spyder relates an event from Hawk's early days where the Kilrathi attacked his homeworld and devastated it while he was away at the Academy. Returning to find his family and home ruined made much of what he is today. As he walks away, Spyder hands me Hawk's knife saying that he would have wanted me to have it but I'm forced to wonder how well I really knew Hawk. I certainly had no idea about his actual age.
Our SWACS scan has definitely paid off. They detected an alien destroyer that had been hiding behind the station but is now moving out of the station's cover. We're going to mount a strike against the Destroyer while it's vulnerable. Stilletto wing covers my bombers as we move to engage. There's quite a heavy escort around the Destroyer, including three corvettes and I concentrate on taking out the ships threatening my wing as they demolish the Destroyer's systems. 2 of the 3 Barracudas have been destroyed, along with both Mantas and Morays before my wing reports some heavy turret fire and I move into a SEAD role to help them out, using my dumbfires and stormfire cannon to rapidly take out the Destroyer's turrets. Once they're all dealt with, it a race to see who can take out the Destroyer first and I'm proud to say that my choice of a light torpedo lets me deliver the killing blow. The Panthers finish off the last Stingray and we head back to the Midway, mission accomplished.
T'Lan Meth 8:
With the Destroyer taken care of we have to move quickly to take advantage of their weakened state. The Midway is launching several wings to clear a path for the marines to the starbase. Our mission is to fly to an assigned zone and kill all the bugs there, easy enough. We arrive to find a large number of fighters, but mostly light fighters, so things should be easy enough. The only complication is that three of those Lamprey fighters make a run for it when we appear, no doubt to alert their friends. I can't allow that to happen and I'm forced to weave through alien fire from behind as I take the enemy fighters out. Once they're taken care of, it's a simple matter to take out the light fighters and then the Rays, before switching to just the Ion cannon to take down those damn Remoras. Once our nav point is taken care of, we receive a distress signal from another interception point. They're being overwhelmed by the enemy forces so I gather my mostly intact wing and head off to assist. When we arrive, the confed pilots are badly damaged and outnumber 3 to one. My wing makes the battle much more even numbers-wise. Skill-wise it's no contest and my wing forms a protective shell around the damaged fighters as we autopilot through the alien debris back to the Midway.
T'Lan Meth 9:
The turn-around time is quick but spirits are high at the briefing as we find that the marines are heading in to Dula 7. We've got 8 Panthers committed to the attack and there are still enough alien fighters around the starbase to make them needed. I keep an eye on the Marine transport during the battle but not a single enemy fighter makes a run towards it, which is a little strange. Soon enough the marines are in and reporting that the base's self destruct is set and they can't turn it off. There's some good news over the comm channel as well, they've managed to locate some human life signs and are ready to extract them. The last alien fighter is going up in a shockwave as the last of the marines make it to the transport. The entire force makes a hasty retreat before the station blows and takes us with it.
When I land, Stilletto fronts up with the news that the Captain has recommended me for the Silver Star. While this is great news, I'm more concerned about the human the marines rescued. She confirms me hopes and fears that it's Blair. She's saying something about him as I rush into the elevator to check on him.
Blair definitely doesn't look to be in good shape when I catch up to him. I apologise for letting him get caught but he doesn't want me to blame myself for doing the right thing and staing with Dekker and the men. His winces as he moves, no doubt because of his injuries, make it hard for me to accept that, but I'm glad that they didn't do anything worse to him. Blair corrects me and says that while he wasn't cut up physically the aliens did have their way with his mind, dredging up old wounds long forgotten. Apparently, they're fascinated by our ability to kill without remorse, our darker nature. Sounds like they would have loved Tolwyn. Blair's been through a lot so, I forgive his overly dramatic "Death" answer when I ask more about who the aliens are.
T'Lan Meth 10:
With the starbase destroyed, the aliens have pulled their fleet from the blockade of E'Loy and are attempting to destroy the Midway herself. My wing of Panter's will be performing long-range intercept duties, as well responding to an attacks that get through. Before I leave on the mission, though, the CAG pulls me aside and informs me that they've received word that with the blockade on their world lifted, some of the Kilrathi on E'Loy are willing and able to help the Midway out. The Kilrathi at Nav point 1 are just a mix of light and medium fighters, obviously meant to clear out the CAP so that bombers can get to work and my wing set to them with their usual style. The Kilrathi come good on their word and assist us in finishing the aliens off with several Vaktoths. Just as the last fighter dies, we receive word that the Midway itself is under attack and set a course back to defend it.
Fortunately for the Midway, not too many bombers made it through the initial intercept point and most of the attackers are fighters. That means that a lot of weaving through fire is required as the fighters stick to my tail as I hunt down the bombers. I manage to avoid major damage, but I can't say the same for the Midway as a Red Manta releases a torpedo into the starboard engine, disabling it. The dogfight around the Midway at this point is fierce, with gunfire flying everywhere between Confed, Kilrathi and alien fighters, punctuated by the Midway's gun and missile turrets. Another torpedoe manages to penetrate our defenses, this time almost destroying the port launch bay. That bomber is descended upon with a vengeance and is quickly destroyed, along with it's wingmate. With the last of the bombers out of the way, our forces quickly overwhelm and destroy the remaining enemy fighters. As I join the landing queue, I survey the damage to the Midway: light damage to the remaining engine and bridge, one launch tube almost out of commission and the starboard engine destroyed. The Midway will need some extensive repair work but at least she lives to fight another day.
I land to the congratulations of the Captain and the CAG. I just wish that Hawk had been here to see the Kilrathi helping us out.