You are using an out of date browser. It may not display this or other websites correctly.
You should upgrade or use an alternative browser.
You should upgrade or use an alternative browser.
Special Operations 2 Replay Week 4
- Thread starter Dundradal
- Start date
DaveO
Rear Admiral
I finished a few hours ago, and was waiting on the subject post. The only really tricky parts seemed to be the two Fralthra strike on mission 14 and taking out six Sabres and Ayer's Rock on mission 15. 'Jazz' also flew a bit fast, so other pilots should slow down so that 'Jazz' does not ram them like I had happen to me. If anybody watches the final mission video, stick around past the credits for a little zinger.
I took a whole slew of screen shots with 22 in total, and it was REAL hard picking just five favorites.
Fans can go select their own personal favorite shots from: http://s204.photobucket.com/albums/bb15/DaveO-MM/Wing Commander/
Or watch the final action from those finishing missions at: http://youtube.com/davecaspermeyer
I'm going to record the intro of Wing Commander 3 using DOSBox's nifty tool, and post that next Sunday just to get fans enthused. I've slightly changed my backwards sync plans for Wing Commander 1. I'll be doing that after Prophecy is complete, just so that I don't have two competing WC videos AND so that fans of the videos or pictures can have a sense of completion.
P.S. - Just like before, those videos were viewed a few times already before this reply.
P.S.S. - I'm quite an 'early bird' in waking up since it's not uncommon for me to be up around 3-4 AM, but working an early shift has given me the need to be up early. It does give me an unfair advantage though since I have plenty of time to play thru the missions, do video editing and screen shots, upload those edited videos, and do some other gaming while waiting on the start of my Sunday weekly session of Sacred. Have fun, have a good week off from Wing Commander, and I'm looking toward much more fun for Wing Commander 3!
Attachments

DaveO
Rear Admiral
Looks like I can continue using YouTube for the videos. I was quite concerned about DOSBox and Fraps recording going over the YouTube size limit, but VDub did a REALLY good compression of multiple gigabyte source videos into ones that are only about the size of long WC2 missions. Great tool to have, so I have all intros for Wing Commanders 3-5 ready. It does take longer to compress in comparison to Wing Commander 2, but in regards to how much compression we're talking about I'm happy that the video fans can watch the whole series. 
DaveO
Rear Admiral
Nice catch on the mission 14 bug, Mincemeat. BOTH SO1 and SO2 have bugs thoughout, so I'm guessing that Origin rushed these to market without thorough bug squashing. Does anybody know how long it took Origin to release those expansions?
Fortunately, the bugs are not showstoppers but they do detract from the experience. I'm looking forward to other player replies, and I'll be watching for Dundradal's post on these missions once he catches up.
Fortunately, the bugs are not showstoppers but they do detract from the experience. I'm looking forward to other player replies, and I'll be watching for Dundradal's post on these missions once he catches up.
Mincemeat
Doomsday's Neighbour
I would be interested to see how you handle DOSBox WC3 recordings.
If I use the internal video capture in DOSBOX, then I have to configure WC3 to use Sound Blaster music, as the General MIDI emulation is a pass-through to the host operating system and the music will not be recorded.
I am also experimenting with Gravis Ultrasound support, but it seems to be too CPU intensive for my computer
DaveO
Rear Admiral
Using SoundBlaster 16 is the way to go for recording WC3. I had to reinstall WC3 due to playing around too much in wanting to see the losing cinematics. I have the movie viewer, so I'll see if that is a better option than using DOSBox recording for the cinematics. I don't think DOSBox yet records those really nice music settings, AND there will be unavoidable artifact video glitches throughout on the cinematics. I am using DOSBox 0.70, so I don't think any higher versions address the limitations of the recorder. Using Fraps is out of the question, since my last experiment meant massive stuttering.
Lorien
Rear Admiral
And so ends Wing Commander 2. Ayer's Rock 2 is a doozy of a mission, just like the last Ghorah Khar mission but without the billions of torpedoes to keep me company. Fortunately all the same tricks worked and I'm not entirely sure if the second Fralthra actually fired it's AMGs. Did anyone try the mace in the front/back? It was my only shot left, so I wanted to make sure it did the job.
Ayer's Rock 1:
The Gamal Gan succesfully jumps into the Ayer's Rock system. They quickly challenge us for a countersign but fortunately Talon knows the rest of the story they're using. It's a good thing they didn't pick a countersign that had nothing to do with the sign. With Ayer's Rock pacified, Paladin assigns us to collect intelligence. Hopefully we're leading up to destroying the base.
I tempt Murphy by telling Paladin how smoothly everything is going and sure enough our conversation is interrupted by a coded transmission from Paladin's agent, Scorpion. It seems the Mandarins have detected the masking on the Gamal Gan and sent out a patrol to investigate. With their suspicions raised, we might as well blow them away before the Mandarins can provide a detailed report. The 5 Gothri approaching the Gamal Gan react smoothly to the appearance of two Morningstars, but despite the numbers being in their favour they don't stand a chance. Maniacs choice of three particle cannons really tears through the enemy fighters. The 5 Sartha following them don't stand a chance. I dock back at the Gamal Gan as we withdraw. This areas getting a little hot for snooping.
Ayer's Rock 2:
We receive another transmission from Scorpion. Predictably, Ayer's Rock has gone to high alert after our ambush of their patrol. The suprising information is that Ayer's Rock is currently hosting a meeting of all the Mandarin leaders, no doubt bouyed by the successes in the Deneb sector. This is our chance to not only take out their central hub but the leaders of all the cells as well. We contact the Concordia to call in a strike but receive some very worrying news. They're about to come under attack. With their flight deck sealed for repairs, they won't be able to launch any fighters and this time I can't come blazing to the rescue. Paladin focusses my attention back on our situation. We'll just have to let the Concordia deal with it's own battles. In the meantime, we're no doubt about to receive a rather nasty visit from the Mandarins.
The Mandarins have scrambled quite a force after the Gamal Gan. The loss of their patrol must have made them nervous. Our first target are 4 Sartha that have gotten ahead of the group. They really should have known better as Maniac and I shred through them without damage. The second Nav point contains a much tougher force, 2 Fralthra and 4 Sabres. My mind flashes back to Ghorah Khar, except this time I don't have Bear backing me up. Maniac and I draw the Sabres away from the cruisers and receive a nasty suprise. The Mandarins have been using Minx's knowledge well and have refitted the Sabres with stronger shields and 3 particle cannons, making them a match for the Morningstar. At least the rear guns no longer work.
The pilots aren't up to the standard of Maniac and I, though, and are easily lured into presenting their noses repeatedly to let me burn through the front armour and take them out. Still, it's a tough dogfight and Maniac and myself both turn damaged Morningstars towards the Fralthras. Like Ghorah Khar, these Fralthra have no qualms aiming their heavy guns at us and Maniac is forced to eject. Fortunately, he distracted them enough for my torpedo to score a hit. I pull back out of range and lock on my second torpedo. I use the same trick I did at Ghorah Khar and fake an attack run on the second Fralthra, causing the first gunners to miss. I then afterburner into range and deliver the killing blow. Not quite sure of the mace against the Fralthra's thick armour, I use the last of my afterburner fuel to place myself off the side of the second one and deliver the nuke to the weaker armour, destroying it. I return to base with a damaged and almost fuel-less ship, but have taken out two Heavy Cruisers again.
Ayer's Rock 3:
Paladin's glum about our chances of survival. With my ship being repaired we're in trouble if they throw the same force at us again. We receive another communication from Scorpion we reveals that Ayer's Rock is being evacuated in the face of the Concordia threat. Unfortunately, Talon lets slip that we're all on our own and before Paladin can stop him a Kilrathi appears on the screen. Paladin recognises this Admiral Rakh'rhi and I suspect they've been at odds for quite a few years. The Admiral orders the execution of Scorpion before giving us the chance to surrender. Thankfully, Paladin says what we're all thinking when he tells him to go to hell.
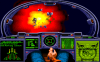
Paladin collects the crew to present our options, run or fight. We have no idea if we can run back to the Concordia or not and, frankly with Jazz Colson still out there, there's really one option. Fight. Paladin states that he can't order us on this attack but both Maniac and volunteer, anyway. At least this way we can pay them back if the Concordia's been damaged. There's another strong force between us and Ayer's Rock. Starting with two Kamekh's. Both of them concentrate their fire on me, letting Maniac get nice and close and take one out. I claim the kill on the second as I return it's fire. Guarding Ayer's Rock are another 6 of the Mandarin special Sabres, though these ones seem to have been thrown together hastily and don't last nearly as long. Once the fighters are dispatched, we move on to Ayer's Rock. In typical Maniac fashion, he gets very close to his target before releasing his torpedo. Unfortunately the heavy flak in close forces him to eject. I don't use a mace with his ejection pod so close to Ayer's Rock so I pull back to make a torpedo run. Without the AMGs to worry about, this is almost anticlimatic. I return to the Gamal Gan as Ayer's Rock detonates spectacularly behind me. SAR will have to pick up Maniac.
Ayer's Rock 4:
While I worry about the Concordia's fate, we receive a tranmission from Ayer's Rock. Minx managed to escape in a life pod, though the radiation from the explosion will kill her. She tells us that Jazz has escaped and he has the Morningstar before begging us to kill him as her signal fades out. I'm not too eager to do missions at the direction of a traitor but another crack at Jazz is something I'm not going to pass up, and neither is Maniac.
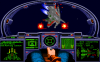
Unfortunately, Jazz doesn't make his own attack which means we have to go searching for him. Without any definite word, we have to assume that he's somewhere between here and the Jump Point waiting for me, so I set out in that direction. Maniac takes off to follow but his new Morningstar still needs some bugs worked out and falters soon after launch, leaving me to face Jazz alone. Jazz isn't the only person I find, though, there are 3 Sabres guarding the jump point. He should have left more, as these three soon find themselves debris while my fighter is untouched and ready. Still no Jazz, unfortunately, so I jump to the Concordia and receive a very pleasant suprise. Jazz is on the other side waiting for me. He launches a vicious first attack that downs my shields before I manage to get behind him and take out the rear armour. He exposes his side as he tries to protect his rear and an IR missile followed by another volley of gunfire take him. I see the flash of ejection briefly before his fighter detonates. I scour the area afterwards to make sure and find his battered flight helmet. Satisfied, I return to the Concordia.
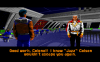
The Admiral meets me on the bridge to personally congratulate me on my efforts in taking out Jazz and Ayer's Rock. He'll be putting me for an award for all of done. Frankly, marking that 901st kill on my fighter is reward enough. Unfortunately he also has some bad news to relay to me. The Kilrathi have managed to destroy the 6th battle fleet and the Concordia is to retreat from the Deneb sector. It's going to be a hard battle ahead to protect Earth and the inner colonies from the Kilrathi.
Ayer's Rock 1:
The Gamal Gan succesfully jumps into the Ayer's Rock system. They quickly challenge us for a countersign but fortunately Talon knows the rest of the story they're using. It's a good thing they didn't pick a countersign that had nothing to do with the sign. With Ayer's Rock pacified, Paladin assigns us to collect intelligence. Hopefully we're leading up to destroying the base.
I tempt Murphy by telling Paladin how smoothly everything is going and sure enough our conversation is interrupted by a coded transmission from Paladin's agent, Scorpion. It seems the Mandarins have detected the masking on the Gamal Gan and sent out a patrol to investigate. With their suspicions raised, we might as well blow them away before the Mandarins can provide a detailed report. The 5 Gothri approaching the Gamal Gan react smoothly to the appearance of two Morningstars, but despite the numbers being in their favour they don't stand a chance. Maniacs choice of three particle cannons really tears through the enemy fighters. The 5 Sartha following them don't stand a chance. I dock back at the Gamal Gan as we withdraw. This areas getting a little hot for snooping.
Ayer's Rock 2:
We receive another transmission from Scorpion. Predictably, Ayer's Rock has gone to high alert after our ambush of their patrol. The suprising information is that Ayer's Rock is currently hosting a meeting of all the Mandarin leaders, no doubt bouyed by the successes in the Deneb sector. This is our chance to not only take out their central hub but the leaders of all the cells as well. We contact the Concordia to call in a strike but receive some very worrying news. They're about to come under attack. With their flight deck sealed for repairs, they won't be able to launch any fighters and this time I can't come blazing to the rescue. Paladin focusses my attention back on our situation. We'll just have to let the Concordia deal with it's own battles. In the meantime, we're no doubt about to receive a rather nasty visit from the Mandarins.
The Mandarins have scrambled quite a force after the Gamal Gan. The loss of their patrol must have made them nervous. Our first target are 4 Sartha that have gotten ahead of the group. They really should have known better as Maniac and I shred through them without damage. The second Nav point contains a much tougher force, 2 Fralthra and 4 Sabres. My mind flashes back to Ghorah Khar, except this time I don't have Bear backing me up. Maniac and I draw the Sabres away from the cruisers and receive a nasty suprise. The Mandarins have been using Minx's knowledge well and have refitted the Sabres with stronger shields and 3 particle cannons, making them a match for the Morningstar. At least the rear guns no longer work.
The pilots aren't up to the standard of Maniac and I, though, and are easily lured into presenting their noses repeatedly to let me burn through the front armour and take them out. Still, it's a tough dogfight and Maniac and myself both turn damaged Morningstars towards the Fralthras. Like Ghorah Khar, these Fralthra have no qualms aiming their heavy guns at us and Maniac is forced to eject. Fortunately, he distracted them enough for my torpedo to score a hit. I pull back out of range and lock on my second torpedo. I use the same trick I did at Ghorah Khar and fake an attack run on the second Fralthra, causing the first gunners to miss. I then afterburner into range and deliver the killing blow. Not quite sure of the mace against the Fralthra's thick armour, I use the last of my afterburner fuel to place myself off the side of the second one and deliver the nuke to the weaker armour, destroying it. I return to base with a damaged and almost fuel-less ship, but have taken out two Heavy Cruisers again.
Ayer's Rock 3:
Paladin's glum about our chances of survival. With my ship being repaired we're in trouble if they throw the same force at us again. We receive another communication from Scorpion we reveals that Ayer's Rock is being evacuated in the face of the Concordia threat. Unfortunately, Talon lets slip that we're all on our own and before Paladin can stop him a Kilrathi appears on the screen. Paladin recognises this Admiral Rakh'rhi and I suspect they've been at odds for quite a few years. The Admiral orders the execution of Scorpion before giving us the chance to surrender. Thankfully, Paladin says what we're all thinking when he tells him to go to hell.
Paladin collects the crew to present our options, run or fight. We have no idea if we can run back to the Concordia or not and, frankly with Jazz Colson still out there, there's really one option. Fight. Paladin states that he can't order us on this attack but both Maniac and volunteer, anyway. At least this way we can pay them back if the Concordia's been damaged. There's another strong force between us and Ayer's Rock. Starting with two Kamekh's. Both of them concentrate their fire on me, letting Maniac get nice and close and take one out. I claim the kill on the second as I return it's fire. Guarding Ayer's Rock are another 6 of the Mandarin special Sabres, though these ones seem to have been thrown together hastily and don't last nearly as long. Once the fighters are dispatched, we move on to Ayer's Rock. In typical Maniac fashion, he gets very close to his target before releasing his torpedo. Unfortunately the heavy flak in close forces him to eject. I don't use a mace with his ejection pod so close to Ayer's Rock so I pull back to make a torpedo run. Without the AMGs to worry about, this is almost anticlimatic. I return to the Gamal Gan as Ayer's Rock detonates spectacularly behind me. SAR will have to pick up Maniac.
Ayer's Rock 4:
While I worry about the Concordia's fate, we receive a tranmission from Ayer's Rock. Minx managed to escape in a life pod, though the radiation from the explosion will kill her. She tells us that Jazz has escaped and he has the Morningstar before begging us to kill him as her signal fades out. I'm not too eager to do missions at the direction of a traitor but another crack at Jazz is something I'm not going to pass up, and neither is Maniac.
Unfortunately, Jazz doesn't make his own attack which means we have to go searching for him. Without any definite word, we have to assume that he's somewhere between here and the Jump Point waiting for me, so I set out in that direction. Maniac takes off to follow but his new Morningstar still needs some bugs worked out and falters soon after launch, leaving me to face Jazz alone. Jazz isn't the only person I find, though, there are 3 Sabres guarding the jump point. He should have left more, as these three soon find themselves debris while my fighter is untouched and ready. Still no Jazz, unfortunately, so I jump to the Concordia and receive a very pleasant suprise. Jazz is on the other side waiting for me. He launches a vicious first attack that downs my shields before I manage to get behind him and take out the rear armour. He exposes his side as he tries to protect his rear and an IR missile followed by another volley of gunfire take him. I see the flash of ejection briefly before his fighter detonates. I scour the area afterwards to make sure and find his battered flight helmet. Satisfied, I return to the Concordia.
The Admiral meets me on the bridge to personally congratulate me on my efforts in taking out Jazz and Ayer's Rock. He'll be putting me for an award for all of done. Frankly, marking that 901st kill on my fighter is reward enough. Unfortunately he also has some bad news to relay to me. The Kilrathi have managed to destroy the 6th battle fleet and the Concordia is to retreat from the Deneb sector. It's going to be a hard battle ahead to protect Earth and the inner colonies from the Kilrathi.
DaveO
Rear Admiral
I used the Mace on Ayer's Rock 2 pretty much like a FF missile from long range and tagged the capship. So any direct hit should kill it. The Mace definitely works wonders against capships, but is a bit of a crapshoot in taking out fighters. I managed one kill IIRC in trying to take out fighter wings with it. Oh well, at least the big bangs are fun to capture.
DaveO
Rear Admiral
Ayer’s Rock 1
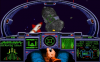
Shortly after our arrival here, we get a communication from Ayer’s Security. They’re speaking some sort of Kilrathi challenge code, which we have to respond to quickly. Since Talon can speak Kilrathi, Paladin asks him what they’re talking about. Talon responds that it’s part of an old Kilrathi war story he knows about. Talon takes a risk in replying with what he believes is the next part of the story. Ayer’s Security replies that the countersign is confirmed, and they ask where the former Captain is. Talon makes a lie in stating that we’ve had engine difficulties, and that the Captain is supervising the repairs. He also tries to buy us some time in saying that our approach will be delayed for an hour. Ayer’s Security asks to be kept notified of our status. Paladin says that now we will collect vital intelligence needed before our strike at Ayer’s Rock and get out alive afterwards. I see Paladin again later, and he says that Talon is manning the communications station to see if Scorpion will be sending more transmissions. He hopes that luck will be on our side, and that we’ll get this valuable information quickly. Talon interrupts any further comments from Paladin by asking us to come to the bridge. Scorpion tells Paladin the news that the Mandarins want a closer look at the Grimalkin, and are sending two fighter wings to investigate. The electronic screen around our ship is why the Mandarins are so interested in checking us out, and Paladin knows that any close range scans will blow our cover. It’s time to take preventative action, and I tell Paladin that Maniac and I will deal with the first incoming fighter wing. We’ll make a quick strike against the second wing before they can make a report. Then we’ll head off to a different area before more fighters are launched. Maniac wants to personally give both wings a demonstration of the Morningstar’s abilities. Upon launch, it’s an instant furball. Five Gothri fighters are almost right on top of us. I afterburn a bit to slide to the side of an approaching Gothri. I then lock on one Gothri target, and whittle away at the fighter with guns. I turn that fighter into plentiful particles, and switch to a target closer than one that is lingering near the Grimalkin. That Gothri joins his friend in oblivion, but my shields are quite low on both ends. I go after a third Gothri, and fortunately the Morningstar can take some punishment on its armor. It looks like Maniac is sticking pretty close to me, and I eliminate the final Gothri with no assistance from Maniac. Either Maniac or Paladin tagged the other I did not shoot down myself. On the next nav point, there are enemy fighters at far range. I launch the Mace after lining up and trigger off a detonation. At least one Kilrathi fighter is immediately destroyed. I see that the approaching fighters are Sarthas, and easily eliminate one on its frontal pass. I notice on the target display that two other Sarthas are heavily damaged, so the splash effect on the Mace must have hit them. I target one that is not damaged, and my particle cannons pulverize him. I make short work of two more Sarthas, and then Maniac decides to get aggressive and go after that cat. It’s hard to tell if Maniac or myself got the final kill. Upon our approach back to the Grimalkin, Paladin congratulates us on this victory. I find out that Maniac did not get the final kill, so it looks like nine cats for me, one for Paladin and zero for Maniac on this round. Paladin asks us to both to dock immediately so that we can get out of the area before reinforcements arrive.
Ayer’s Rock 2
On the bridge of the Grimalkin, Talon picks up another transmission from Scorpion. Scorpion is taking some heavy risks by sending the transmissions while the Ayer’s Rock base is under security alert. Scorpion gives us the important news that Ayer’s Rock is the primary base for all Mandarin operations. Scorpion gives even more incredible news to us. The Mandarins have called a meeting for all of their leaders, so this is our chance to take out the whole resistance in one blow. The transmission from Scorpion is cut off before he can relay additional information. Paladin asks Talon to contact the Concordia, but they have their own problems in fending off a Kilrathi attack. The Concordia’s flight deck is sealed off, so they can’t even launch fighters. We’re on our own here with no backup, and Paladin says that by the time we can get back to the Concordia’s position the fight will be over. Paladin wants Maniac and myself to launch in case the Mandarins traced Scorpion’s transmission to its destination. Once in space, Paladin tells us that we’re heading for the nearest jump point. Our goal is to keep the Mandarins from intercepting us, and Maniac asks if they have pinpointed our location. Paladin is sure that the Mandarins have found us since our communications are being jammed. He also tells us that there are ships approaching from two directions. Paladin emphasizes that speed is of the essence here, and we get to the first nav point at our fastest possible speed. There are multiple Sarthas here, but unless they are Drakhri it should be a cakewalk. Two of the Sarthas are easily turned to shards from my guns, and I make short work of the last one as well. At the next nav area are some Sabres with Kilrathi Fralthras. I notice that these Sabres have been refitted with particle cannons and shields just like our Morningstars. While this refit is interesting, the result makes little difference for the pilots. I take them both out, although my frontal armor is now quite thin. I then get within 10000 kilometers of the first Fralthra and launch my Mace from long range once I have him in my sights after making a minor evasive maneuver against his anti-matter guns. I turn in time to catch a glimpse of the Mace detonating, and one Kilrathi Fralthra is gone. I get within torpedo range of the second, and lock on. I notice that he’s heading away from me, but I’m not about to let him escape. I launch my first torpedo from a bit further range than usual, not knowing if it hit. I get just outside anti-matter gun range, and lock on with my last torpedo. I again release a bit farther away than usual, but the Fralthra takes the hit and explodes. During my approach back to the Grimalkin, I tell Paladin of my encounters. He’s sure there will be more, and he still can’t contact the Concordia.
Ayer’s Rock 3
Paladin thinks that we’re not going to survive this excursion into the Ayer’s Rock system. Talon breaks Paladin’s pessimistic mood with news of another message from Scorpion. Scorpion thinks it’s safe enough for him to transmit, and tells us that an evacuation is beginning on Ayer’s Rock. The evacuation is due to the belief that the Concordia will be attacking them, and Talon lets slip that they are in no condition to help us. Paladin chastises Talon for saying this over an unsecured channel, and we see a Kilrathi appear on the communications screen. It’s Admiral Rakh’rhi, and he used Scorpion’s transmission to find him AND hope we got sloppy. The gamble paid off, and the Admiral asks us to surrender. Paladin tells the Admiral what he thinks of that, and cuts the transmission. Maniac and I see Paladin privately, and he tells us of our options of running or fighting. There is no way to know if the Concordia is still intact, and I state that our only option is to take out the Mandarins on Ayer’s Rock. Paladin says that it won’t be an easy job to eliminate the base, and that he can’t order me to fly such a mission. Maniac volunteers, and I tell him that my motivation is to finally take care of ‘Jazz’. In space, I tell Paladin that my course is set for the Ayer’s Rock base and he wishes me good luck. Just before we get within range of the base, there are two Kilrathi Kamekhs here. They launch multiple missiles, but Maniac and I split a capship apiece. Upon approach to the base, I immediately launch my Mace but miss a detonation. Fortunately, one of the Sabres makes a direct approach and I take him out with full guns on my first pass. I target and take on a second Sabre, and he also is eliminated quickly from gun attacks. The third one decides to make things a little interesting with his improved skills in comparison to his departed friends. It’s not good enough to save him, and now half the fighter patrol is gone. The next Sabre does get thru my shield defenses and frontal armor significantly, and I take him down before he can do more damage. I let Maniac engage the other Sabre for a bit, and then help him out. Another fighter joins his dead friends, and I see no fighter opposition left. Maniac goes charging in with his fighter, and it looks like he tagged the base with a torpedo. I lock on with one well out of range for flak defense. I then go in full speed with some afterburner bursts and let the base have it. My torpedo might have not hit since my fighter takes some internal damage. I get out of range and know I can’t afford to miss again. I line up for the torpedo to lock and head in again at full speed with a bit less afterburner assistance. That torpedo strikes true, and the Ayer’s Rock base is destroyed. Upon my landing approach to the Grimalkin, I tell Paladin of the good news and he says he could see the destruction of the base from his position. I explain about the fighter and base defenses, and Paladin asks if I saw Jazz, Minx, or the Morningstar that was taken by Minx. I tell him that I did not have luck on finding them or the hijacked fighter.
Ayer’s Rock 4
On the Bridge of the Concordia, Angel tells Admiral Tolwyn that a Kamekh is making an attack approach and he wants to fire the Phase Transit Cannon. Angel warns about the low capacity of the power plant, and that a shot with the cannon could make it blow up. Tolwyn thinks the risk is justified, and a burst from the cannon streaks towards the Kamekh blowing it into pieces.
In the communications room of the Grimalkin, Talon picks up a transmission from where Ayer’s Rock was. Minx is trying to communicate with us, and her signal is quite weak. Apparently that Mace I missed with went off since she says that there was too much radiation damage from the explosion of the base. She’s in an escape pod with all systems failing, and she tells us that ‘Jazz’ is in the Morningstar. He left Minx to die, and she makes her last plea for me to take vengeance upon that bastard for her before we lose the transmission. I ask Maniac if he’s up for a mission against ‘Jazz’, and he definitely wants a piece of him. In space, I ask Paladin if he has tracked ‘Jazz’ in the Morningstar. Paladin has not spotted him yet, but he knows how much ‘Jazz’ wants to kill me. He believes that ‘Jazz’ is waiting to ambush me somewhere between our current position and the jump point. Paladin gives me the most likely course for ‘Jazz’ to take, and tells me to head for the Concordia if I don’t encounter him. I get the good news that they survived their encounter with the Kilrathi, and have made repairs to the ship and flight deck. Paladin plans to follow us to the Concordia, and Maniac wonders if our jump drive will work. I autopilot away from the Grimalkin, and Paladin tells Maniac to put the pedal to the metal. Maniac encounters a Murphy event by having his Morningstar shut down as he’s trying to follow me. I’m all alone against whatever opposition is waiting. I run into a small welcoming committee of Sabres at the first nav point. They are a little more difficult than the ones I encountered defending Ayer’s Rock. Both try running for it after I damage them, but blasts from behind without seeing any turret shots makes it simple to finish them off. I turn on the jump drive at the jump point and cross my fingers. I am able to make a successful jump, and ‘Jazz’ is here to make good on his threat to kill me. He taunts me in saying that he thinks I’m foolish in thinking I can beat him AND that this encounter is easier than he thought. He is flying too fast and turns into my ship. That direct hit damages my front armor completely and wipes out the forward shields. ‘Jazz’ then makes a threat to destroy the Concordia, and I know he can do it with the Mace. Now ‘Jazz’ is just flying around hoping that I’ll get sloppy but I tag him multiple times again with the particle cannons. While trying to finish him off, ‘Jazz’ rams into me again and his Morningstar is destroyed. I manage to see ‘Jazz’ ejecting from his fighter, but he’s too close to the explosion of the fighter and is killed. You're solo in Hell on this one, maestro. I head for the Concordia, and land in the hangar bay. I then see Admiral Tolwyn on the bridge, and he congratulates me for my good work. He expected that I would not let ‘Jazz’ escape again. I tell the Admiral of the destruction of the Ayer’s Rock Mandarin base, and he says that he’ll be sending a commendation to Confed High Command for my work here. Tolwyn says that I have again proved that I’m a hero.
Meanwhile, the Kilrathi have certainly not been slacking off. The Emperor asks Prince Thrakhath if it’s true that a Morningstar was not captured, and that the primary Mandarin base has been destroyed. The Prince explains that the Mandarins were about to outlive their usefulness to the Kilrathi. While they were not successful in getting the Morningstar, they did keep the attention of the Concordia occupied. This distraction led to the successful annihilation of the entire 6th Battle Fleet and forcing the withdrawal of the Confederation. Prince Thrakhath tells the Emperor that he intercepted orders for the Concordia to retreat. The Emperor is pleased at hearing this report, and believes that nothing can now stand in the way of the Kilrathi conquest of Earth.
The Concordia is pulling away from its orbit of a planet and jumps out, and the empty charred helmet of ‘Jazz’ is drifting in space. In another sector, Maniac is STILL stuck in his incapacitated Morningstar with nobody in sight. ‘WHERE THE HELL ARE YOU’ is voiced in frustration by the Morningstar-marooned Maniac. To be continued in Wing Commander 3…
P.S. - The ending of SO2 tends to still bring a chuckle for me.
LarkInFlight
Rear Admiral
Hey! I killed the Ayer's Rock with a mace! It feels so good to know that all of those mandarin scum die with the blast or from ratiation! Killing Jazz can only make it better.. Now.. Wing Commander 3 is waiting for me..
DaveO
Rear Admiral
Congratulations!!! We are quite a bit along, but there is ample opportunity to catch up and also post journals if you want for the series. I don't expect those first ten missions to present much difficulty to you unless you're flying on Hard or Nightmare difficulty. I'm looking forward to seeing your replies, and also hope that Dundradal is doing well on his catching up.
LarkInFlight
Rear Admiral
Thanks! I'll be playing Wing Commander 3 & 4 on Hard level. And where in the story the Durandal is?
DaveO
Rear Admiral
The original organizer was in Secret Missions 2 last time I checked, so it's going to take him longer to catch up. Best of luck to you Larkin, although I suspect Hard may be too tough for the Tyr 4 mission in WC4. I could always be wrong, so I'm looking forward to a different perspective since I'm playing Ace. I debated about Hard, but given my Ace problems of mission 4 I think Veteran will be the better road for me. I do plan on doing Prophecy on Hard though since the bugs don't seem as dangerous as the Kilrathi or fellow human pilots in WC4.
LarkInFlight
Rear Admiral
I won Wing4 on Hard level once, Wing Commander 3 is even easier.. Hey! I won firrekka campaign which I consider the most difficult part (Dralthi vs 2 carriers and Jalthi/other escort on one occasion - all of 'em nailed)