F-103 Excalibur Model

So this is just a mockup? I assume you're planning a subsequent build with different materials then?

Indeed. the ultimate goal of this project is to build a styrene model with a mount and light up effects. So will have plastic, balsa wood, copper, steel, fiber optics, styrene, acrylic... probably some other materials in there. Right now this stage of the projects is for figuring out how to build the physical model. Looking at the mock up at this stage, one thing that's bugging me is how 'flat' it is, which ironically does match up to the in-game version. But yeah...

raptor-excalibur_zpsicjkkhds.gif


If you look at the Raptor and compare it tot he Excalibur, the Raptor is way more interesting to look at. It's got all sorts of panel lining and surface details that give it life. While the Excalibur... um... yeah. It's just kind of there. It gives me good references for size and dimension... but it looks more like a toy then a space fighter. This does appear to be a game engine limitation. If you look at this artist rendering of the Long Bow, you can see the same panel work and surface details reminiscent of the Raptor image.
longbow-01_zpsw6c4pnon.png


This rendering of the Excalibur shows that other artists have come to the same conclusion:
flightoftheexcalibur_zps64dov76g.jpg


So once I have a good idea of how to build the over all shape of the Excalibur, I'll be working on adding the surface details. And when I complete that, I'll go back and figure out how to achieve the lighting effects I mentioned.
 
So yes, whatever you do, don't use the in-game 3D model as your reference. It is primitive at best, contains only flat surfaces instead of curves, and also does not give you accurate measurements. I eventually gave up trying to use it when building my Hellcat, and stuck only to detailed drawings from the game manuals, as well as stills from the FMV's, where they used much more detailed models.
 
That they are. Building a model that looks exactly like Klavs's render would certainly be time well spent.
That would be something I would probably be willing to spend cash on, TBH. It would feature prominently in my Wall of Loot.
 
That would be something I would probably be willing to spend cash on, TBH. It would feature prominently in my Wall of Loot.

Assuming you can find the modeller willing to sell you all that blood, sweat and tears when they're done with it. I certainly wouldn't :D
 
Between kids and an Excalibur models? Duh, choose the one with Tachyon guns.

So, the kids, right?

That is right, isn't it? Your children are armed with weapons that involve hypothetical particles somehow? I figure with the level of destruction they generally cause, my kids must be...
 
Hey, I'm perfectly willing to sell the finished result. Just be aware you will be paying for my time in building it. I'll be nice and only charge for the time building the finished version, not the development series. Figure 96 hours gross construction time plus another 24 for painting, add in materials and components.... about $60 I would say off the top of my head. So 120 hours at $30 an hour, plus $60. So yeah, finished price could be as low as $3660.
 
Hey, I'm perfectly willing to sell the finished result. Just be aware you will be paying for my time in building it. I'll be nice and only charge for the time building the finished version, not the development series. Figure 96 hours gross construction time plus another 24 for painting, add in materials and components.... about $60 I would say off the top of my head. So 120 hours at $30 an hour, plus $60. So yeah, finished price could be as low as $3660.
Well, maybe not. It's almost as expensive as my entire plushie collection. :-P
 
So not EXACTLY a work log update, but something I want to announce and ask people to come to all the same. This Sunday, May 21st starting at 4pm EST I will be relaunching my live stream, the Resurrected Hobbyist!

med_gallery_18358_13010_233764.jpg

My big goal for hosting my live stream is to inspire, educate and encourage others in the model building and painting hobby. It's not just about me showing off my work and talking cause, let's face it while I have been involved in the hobby for a long period of time, I am hardly the end-all be-all master of everything that can possibly be involved in the hobby. But what I can be is a stubborn ogre that works toward a goal! And my goal is inspiration and education, both for myself and others. I know the thrill I get when I take on the mentor role to a younger hobbyist and that sensation of glee when my student shows of something that looks amazing. Like wise I love that sensation of being the student and learning something new. It's that cross hairs that is the heart of soul of what I want to do with my live stream!

How am I going to do that?
Well I actually have several things I'm doing with the stream to encourage that plus several other things I hope to implement in the next year. The first thing I've added is a community gallery. This is a gallery that anyone can load pictures of their projects up to and they will be talked on live stream. Weather you're an experienced hobbyist posting a picture to showcase a particular approach to achieving a particular paint scheme, an enthusiast who tried something and completely screwed it up and want to talk about what you did, or someone who is trying their first time at taking paint from the bottle and putting it on the model, this is an avenue to post your materials and get feed back and show off you stuff. For more information on using the Community Gallery, see this video.

Another feature I'm implementing is developing short 10-15 minutes segments with various hobbyists who are willing to lend their experience to the show and talk about some facet of it. These segments may be a live interview where they hobbyist talks about their latest project to build a 2k point Ultramarines army based on 'Dead sky, Black Sun', or they could be talking about how they tried to resin cast a translucent sword blade and found out the coloring dyes are super super powerful so it came out as a solid color. Maybe they want to do a segment on a particular step in the modeling process, or a particular process that they feel doesn't get talked about enough. If you are interested in appearing on the stream I would first recommend you check out this video play list to get a better idea of what is needed and how it would work then I would say go ahead and drop me a line about what it is you want to come on stream and talk about.


Another feature I have implemented into the stream is a prize give away. People will have the ability to donate to the stream and when we reach a certain thresh hold in donations it will unlock a prize that will be received by a random person in chat who has donated. These prize may be a set of bases from Dragon Forge Designs, it could be a book from Evergreen plastics about working with their products, it may be a gift voucher to Games Workshop. The idea is to open people up to new possibilities by exposing them to something from that possibility. Maybe they've never worked with Resin bases, or had never considered scratch building. Hell, maybe they just wanna take a shot at building a new army.

You said you were going to add more to the stream later, like what?
Yup I do have intentions of adding new features to the stream over the next year. One of my plans is to include a segment I call "The Screw Up" where I show case a hobby based screw up of some form, and discuss what has been learned from the effort. This might be something that I have done, like mixing the resin for too long and not being able to pour it into the mold, or perhaps one of my viewers has a story they would like tell in this segment. Really this segment would be about learning how to celebrate our mistakes and learn from them. There are other features I'm working to implement in the future beyond "The Screw up" but they take time and I don't want to sabotage myself by talking about before I can even start working to implement them.

So in closing, be sure join the Resurrected Hobbyist this Sunday at 4pm EST time for the relaunch of his Live Stream!​
 
So not exactly an update on the Excalibur, but kind of a sister project update to it. Putting the Excalibur on hold for the time due to school demands but I can't just not work on stuff. So I took Pericles' paper-craft model of the Vampire, upscaled it in photoshop and got to work on it as a styrene model. Basically the same thing I'm working toward as an end result for the Excalibur, well partly. I'm already encountering some problems with starting from Pericles' smaller file as details becomes a bit hard to discern when it gets blown up to this size. I've reached out to DefianceIndustries to ask if he could provide a copy of his high-res texture file for the Vampire. I'm hoping I'll be able to use that for a better detail job.

So far I've only got part of one engine pod to show off:
qqkvaiA.jpg


I'm working on building in a turning point for the engine.
 
Bit of an update on the Vampire. I had made a mistake when I first built the engine pod. The shaft that I built into the pod to allow it to rotate I cut too long and I didn't realize it until I had already mounted the other side of the pod. So when I went to put the top/bottom on... surprise it doesn't fit! So I switched gears and went to build the part in cardboard mainly just to let me screw around with out using the more expensive Styrene.
tRsrHo4.jpg


It gave me a chance to be reminded that I wanted to build the radiator... ram scoops.... bursar collectors.... whatever those blue glowing areas on the engine pods are.... but I wanted to build those as internal constructs for the engine pod.

Also came up with a modification for an "extreme maneuver" version of the Vampire:
9lHWf7F.jpg

Now the engines rotate on 2 axis! Now you can get space sick twice as fast!

No I'm just kidding. It was just a happen stance of the straw I used bending.

re-building the engine in cardboard did give me a chance to figure out a way to address the error with the styrene version. Cut the shaft into 3 parts, remove the 2nd part, slap a patch over the other two parts!
e0JxuyM.jpg


This allowed me to shorten the tube and bring the outside of the pod in enough to align with the top and bottom panels.

The.... Bbussard collectors! I'm just calling 'em Bussard collectors until I find something to tell me other wise. Those blue radiator looking spots on the engine pods, those are now Bussard Collectors! Anyway, I built a sort of internal construct to represent the Bussard collectors that will be mounted inside the engine pods.
bnB8lUX.jpg
 
So I'm back working on this project... sort of. Really this is more of a "I was bored and remembered I had this project, so lemme do something" kind of thing. The low resstextures for the Vampire are head ache inducing to work with, so I've reached out to DefianceIndustries to see if I could get my hands on a copy of his high resstexture. He said sure but it's going to take a little while to get it to me. So I have that to look forward to.

in the mean time I'm tinkering with the Hornet layouts and designs. Nothing really substantial, Just been working on figuring out meassuring ments for the Hornet. I may actualy work to build this model at some point. Given it's similer design compared to the Vampire and Excalibur I may get it built first. Anyway, time till tell.

001.png 
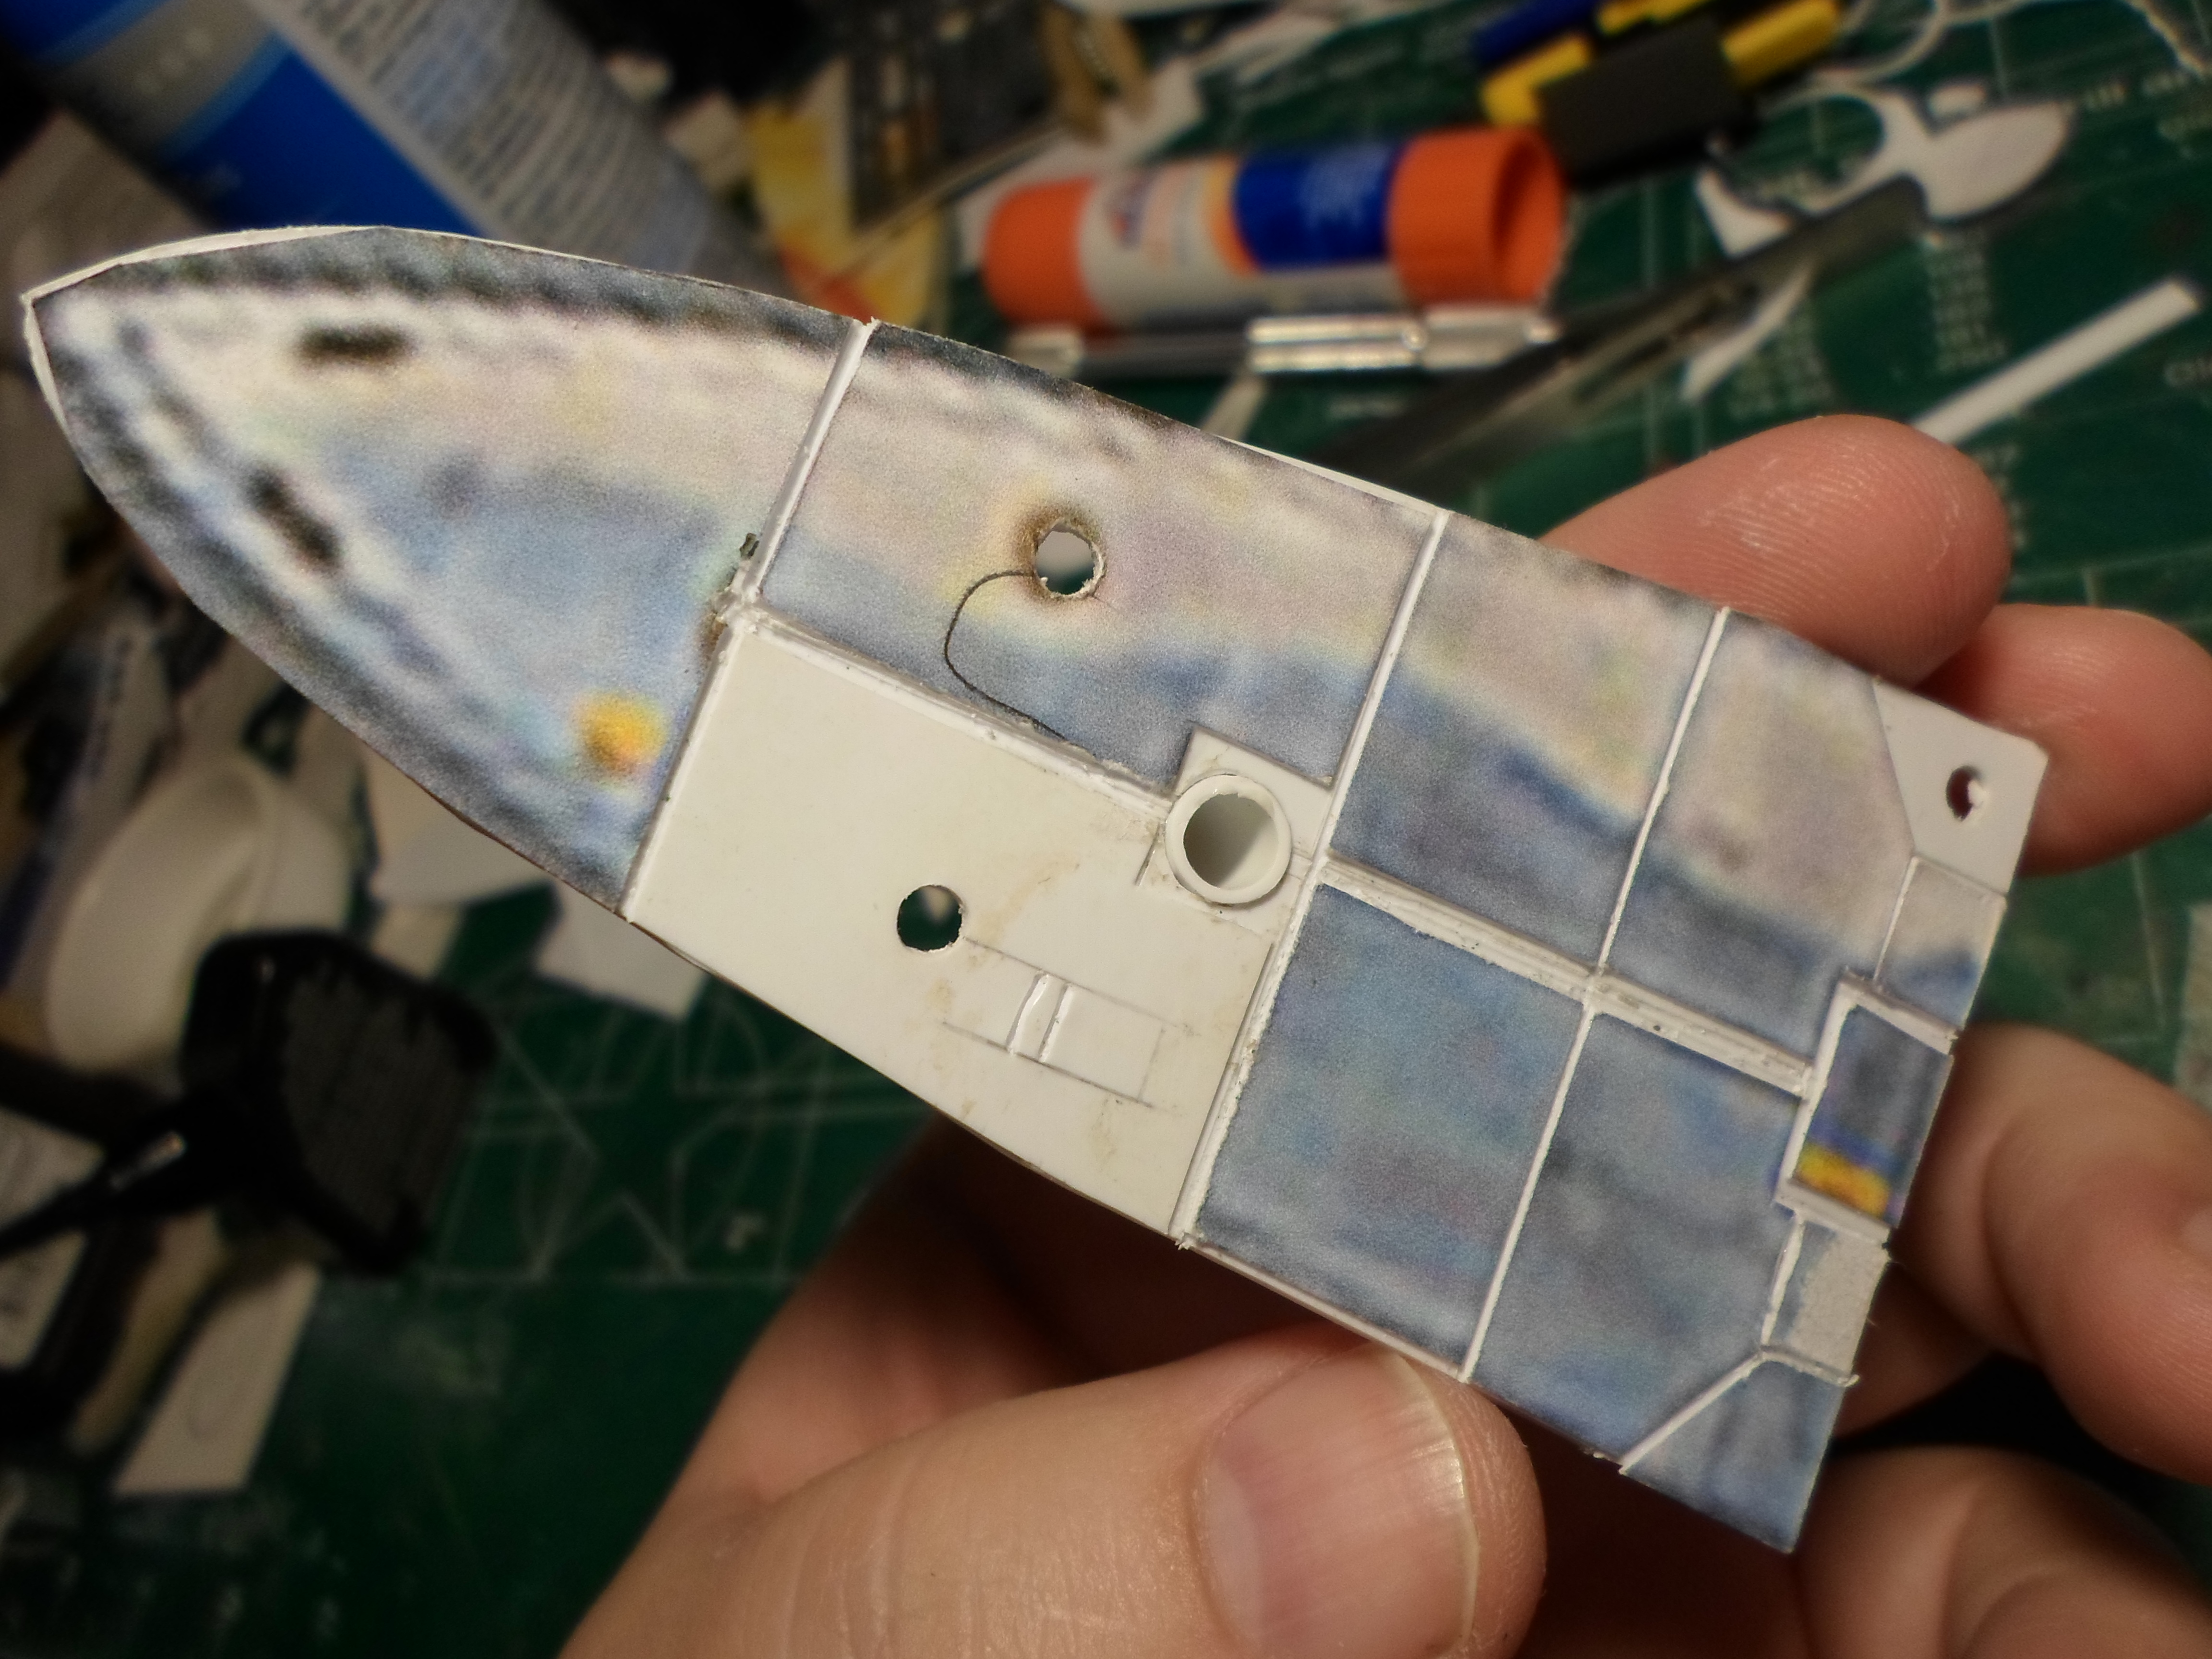
As you can see I've collected a series of meassurments so far.

Now, here is the part where I'm not totally sure I did this part right, so I'll walk through how I approached it and see if anyone spots any mistakes in my approach.

So I need to figure out the length of the side panel of the main hull, the one highlighted in green here:
2018-01-21 (1).png

But it's a 3 dimensional construct, so there is a difference between the height of the lower end of the upper end. So I couldn't just meassure it. I needed to compute it. I've been studying programming the last two semesters and one thing I've noticed I've gotten much better at doing because of that is taking a complex problem and breaking it down into smaller components. That is why I used the approach I did to address this challenge. By studying the design I saw that what I'm actually looking for is the hypotenuse of a right triangle. A triangle I only have one meassurement for. Which meant I need to get the second meassurement for the triangle so I could compute the length of the third leg.

Here is what I did:
1- Figured the horizontal width from the edge of upper most plane of the body to where the edge of the the body is. This turned out to be 17mm. I arrived at this meassurement by meassuring the total width of the main mody from the rear facing and got 71mm, then subtracted the width of the upper most edge of the main body, which was 37mm, and then halved the result, coming up with 17mm.
2- I then meassured the rise or height of the space from the lowest point of the side panel of the main body, to the highest point of that panel. This turned out to be 12mm.
3- Finally, I meassured the run, that's the distance from the point laterially furthestest back to the farthest point point. In this case the point where the main body meets the tail edge of tyhe wing. This was 9mm.
So thoe meassurments gave me a 3 dimensional cube that meassured 17mm wide by 12mm high by 9mm deep.
4- Next I figured out the distance from the back left corner to the bottom facing to the front right corner (in blue). This worked out to be 19.24mm. I figured out this distance by use the Hypotenuse formula using the 9mm and the 17mm.
5- With that meassurment, I was able to use the 19.24mm and the 12mm to compute the length of that edge.

At least I think so. Hopefully this image will show the information more clearly then I can explain.

2018-01-21.png
 
Back
Top