Scratch Built Tallahassee Cruiser

Adm_maverick

Rear Admiral
If you've been following my F-103 Excalibur project thread, you've seen that I've been bouncing all over the place with it. Well that's because I grossly over-estimated my skills/under-estimated the demands of the project. Originally I was aiming to design, build, paint, and install lighting effects on a 16" model of the Excalibur. And while I'm at it let me go work to achieve the top 10% performance of pole-vaulters. It's not that it's not possible, but it's so far beyond what I am currently capable of achieving that the development path went from being a path to being Snake Way from DBZ.

So I tried stepping back and doing a more scaled back project and went to try and take the paper-craft model for a 2" vampire and upscale that to scratch build a F-109 vampire. Well the big challenge here is the scale of the original template. I'm not 100% certain about this, but it looks like the template is built directly from the in-game model and templates. Well this is the point where the age of WCP comes to be a problem. The textures just don't scale well and a great deal of detail is lost in the process. I've reached out to DefianceIndustries to see if he can hook me up with a PNG of the textures for his High-def Vampire. He said he'd be happy to but timing kind of sucks at the moment so it would need to wait a while.

Well then I tried doing a full scratch build of a simpler fighter and looked at the Hornet. I was able to do a lot of work on developing the template for it... right up until I realized the meassurements I have been taking weren't accounting for 3 Dimensions. On the Excalibur that wasn't a huge issue because of the way the Excalibur was designed. The couple times it would be relevent were fairly miner. On the Hornet... yeah basically 3/4 of the meassurements I had taken are probably incorrect.

So as you can see I've made a lot of extra work for myself and it gets frustrating. So I decided to take a step back and work with something that already had a template. Did some looking and found templates for Broadside, The Dralthi, the Arrow, The banshee, and a hand full of others. For whatever reason none of them caught my attention.

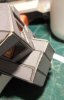
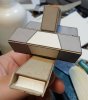
Then I stumbled on a template of the Tallahassee Cruiser. Initially I was going to just stick it in my library but then I looked at it a bit closer and realised there is some more potential for the otherwise fairly simple model. So I decided to make an enlarged version and prototype it. In this case the template was intended to build a model that's about 2.5 to 3" long so I upscaled it to about 12" and then did a rough build in cardboard. This gives me a good idea of size and spacing and also some problem points in building a more up-scale version of the ship.
 
tallahassee-005.jpg
This is the finished rough model. For a quick build it turned out rather well. But there are some problems with it, some of them because of how I built it and others because I used something a lot thicker then a single sheet of card stock to build.

The first thing is that I built the model from front to back and then bottom to top. Having built the model once, I would completely reverse that and build it from top to bottom, back to front. The front is largely enclosed and self supporting, while the back with the bridge, engines and several sections all joining together is more dependent on components joining together properly to support other components.

tallahassee-003.jpg

The bridge of the model is a good example of this. Since I built the main hull block before the bridge block the bridge didn't line up quit right with the top of the hull. Where has if I had built the bridge first, and then used that to brace the main body, it would have lined up better.

tallahassee-002.jpg

The tail end of the model is a simila issue, though for other reasons. In this case it's because the model used 3 components, two with some very small parts to them, to assemble this construct that is intend to afix to the back and basically wrap around the bottom of the main hull. Next time these 3 parts are getting re-designed to be stronger and be used to help shore up the contors of the model.

tallahassee-004.jpg
The top hull of the model seems a bit odd as it seems to be wider then the lower hull. Intially I thought I had built the model wrong, but upon closer inspection I found that, no I hadn't. It is actually designed that way.

However I did make a couple modifications to this model out of the gate:

tallahassee-001.jpg

There is a block on the top of the forward prow that looks like it's a landing platform or a swappable module area or similar idea. So I built in some braces and a lowered platform.
 
So working on version 1.5 of the model. In this case I'm working to adapt and modify the build to address the problems I encountered during the version 1.0 so just as a refresher the majority of issues I encountered in the first build I felt could be address by changing the order in which I built the model. As an example here is version 1.0:
tallahassee-002.jpg tallahassee-003.jpg

As you can see there are several gaps between sections. In that case I figured building the bridge first and then attaching the rear assembly to that so that it would contoure to the under side of the bridge.

tallahassee-011.jpg tallahassee-012.jpg tallahassee-009.jpg

As you can see the lower assembly and bridge all fit much better with the rear assembly. To help with planning I modified the template part to have several sections named, which you can see with the rear assembly (And yes I didn't account for the part being printed 'upside down') the bridge, and the under carriage. I also re-designed the section in the back, between the engine blocks to be one large part that connects directly to the under carriage. This tightened it all up very nicely.

With the forward prow I like wise started working in a different direction then when I first built. In stead of building from the front back, I am working from top down:
tallahassee-007.jpg

I spliced all the panels on top from the front of the prow all the way back to where it connects to the rear assembly into a single part and started working down from there. I again incorporated the inset panel to the prow.

However... I ran into an odd mistake... of some form.
tallahassee-008.jpg

Where the neck and rear assembly meet, I some how left about 1/8" gap in the connecting parts. Not really sure how I did this. But will need to be careful when I do version 2.0.

tallahassee-006.jpg

I built a brace that will be inserted into the angled neck of the main body.
 

Attachments

  • tallahassee-010.jpg
    tallahassee-010.jpg
    1 MB · Views: 111
  • tallahassee-013.jpg
    tallahassee-013.jpg
    147.8 KB · Views: 124
Last edited:
So working on version 2.0 now. I've addressed many of the hickups and issues I encoutnered with the 1.5 version. The single biggest change I made in this version is the flight deck. In the prior version the flight deck, or at least what is suggested to be a flight deck, was built out of 2 parts that were then attached to the rear of the rear assembly. In this version I've built an internal structure that sticked out the back.
tallahassee-014.jpg
Here you can see the flight deck mounted in what will become the rear assembly. Those white step blocks are the engine inserts. Building the flight deck like this also helps to reinforce the structure of the rear assembly.

tallahassee-015.jpg

I'm also working on adding additional details. As I'm sure we're all aware the original in-game models as used in Heart of the Tiger are painfully simplistic and dull looking. So I've been hopping around and collecting immages of the Tallahassee to find inspiration of new details to build and incorporate into the model. The WC Saga models have been proving particularly helpful in this regard. I do have to say that the Tallahassee models from WC Saga doesn't exactly match the style of the WC3 Tallahassee. So I'm kind of picking and choosing what details to incorporate into the model. The first such effort can be seen here.
tallahassee-016.jpg

And for reference, here is the image of the WC-Saga Tallahassee cruiser I'm looking at for inspiration.
2010092402.jpg
 
So Version....2 on deck, at least I think it's version 2. Anyway, new updates.
SAM_3850.jpg


So I ran into a bit of a snag. Basically I lost my source file with all my resized parts and info for resizing parts. Remember the original template was for model that would about 2 inches long which this model is about 12" long so there is a fair bit of scaling. Well I lost the source file I assembled with all my notes and information in it. And while I know I had scans of the original plans that I used for guides to build the new parts from, I do not know what the resolution of those original scans was. Hence why the inner body is exposed like it is. In the short term this is actually a good thing. My ultimate end-goal with this project is to built thel in styrene and apply some lighting effects. So this gives me a good means for planning out component placement. As far as the scaling issue, I'm trying to contact ThunderChild

And speaking of components, one of the improvements I made in this version is the inclusion of a... um... main deflector? Big blue light. The big blue light thing. I added that. Sort of. My originaly intention for building and mounting it didn't work out quit like I thought it would. But that's the entire reason I'm doing this builds first. So I can make this particular screw ups and learn from them.
SAM_3853.jpg


I used a new method of mounting the neck to the rear assembly. Nothing terribly complex, but I used parts from the neck to form plates that provides some good contact area and reinforcement for where the parts come together.

SAM_3851.jpg
 
So have a bit of a so-so update. I am continuing this project... sort of. My summer semester is proving to be nigh-hellish as I'm talking System Analysis, Introduction to Information Systems and Network Security Fundimentals this semester, and the first two of those classes are regarded as the most demanding classed in this program under normal circumstances. And I'm taking the 8 week version of them where they are normally 16 week classes. So I do not have the time right now to commit to this project beyond what I did today. Which was take a break from class work before I decided to gouge my own eyes out so I wouldn't need to look at one more DFD or RAD diagram.

So what am I doing? Well, I'm sort of starting over... kind of. As I mentioned previously I lost the file that had all the notes for scaling so I couldn't finish the last version of the model I was working on. Well, I desided to take the first steps and go big or go home! I went back to the drawing board and re-scaled all of the parts. How big did I make them? Well... here's an example:
SAM_3954.png
Here you can see the previous model laid ontop of the page that has the part for the left side of the forward prow. You can see the prow itself is nearly as long as the entire previous model. If my numbers are correct this should turn out to be about 24 1/4" long when it's built. I'm going for a large model to push myself, and to give myself a good canvas for 'developing' details and materials for it. Remember my ultimate end goal is to have a ship on a base with lights. Going for this large of a model give me space to work with.

For the cardboard verison I'm marking down lots and lots of meassurements as well.

SAM_3953.png

But as I mentioned, my class load is rather demanding this semester. So work is going to be sparcefor at least the next 4-5 weeks. We'll see how my work load is after that.
 
So I took a few hours off from... well every thing today to do some work on the big verison of the Tallahassee.
SAM_3956-web.jpg
I think this shot makes a good effort at showing the size difference. The prior version is about 11" long (show on the left) while this large version will be abound 24" long. Seeing the fully assembled smaller verison, along side the partly assembling engineering section for the large version I think helps show the difference really well. I've been including meassurments in the parts as an element of planning so I can go back and develop new details, design new parts etc. As an example, I'm thinking about how I can build the engines so that they are A-lighted, and B- have a distinct structure to the glow when I get around to building the finished model. Knowing that the smaller engines are 12mm by 12mm helps me keep track of sizes and area to work with.
SAM_3960-web.jpg
This is an an example of something I should have thought about when I was laying out the parts for the flight dech, but sadly I did not. What I could have done is built up the internal structure of the flight deck to support the forward section of the engineering section. Oh well, this is why I'm doing this in cardboard. Try, screw up, understand, and develop.
SAM_3962-web.jpg
 
Back
Top