You are using an out of date browser. It may not display this or other websites correctly.
You should upgrade or use an alternative browser.
You should upgrade or use an alternative browser.
Wing Commander 3 Replay Week 7
- Thread starter Dundradal
- Start date
Flying Target
Swabbie
Banned
...and no matter what you do, one by one your wingmen will disappear... until... there's just... you.
I'll tell you something, some support would've been nice on the "trench run". That and wishing I hadn't used up most of my afterburners.
Great way to finish a long campaign though. Tolwyn gets his Macarthur moment on the deck of the Victory, and I get to disappear into the sunset with an 80s porn star. Fantastic.
DaveO
Rear Admiral
I've not finished yet, but am going back into action. I want to finish Hobbes as a means of getting closure. And I still have to get the Flint alternate cinematics. The other two missions were not as tricky as the final one is. Since I need to keep my ship in pristine condition as long as possible, expect the cap ships to not get gunned down.
DaveO
Rear Admiral
Ok!!! What a great ending, and that final mission had me on edge! I flew that mission a lot, with several KIAs, accidently using the T-Bomb on a fighter, and other messups like attempting to attack the cap ships along the way.
I was SO disappointed that Thakhath was such a no-challenge. I think his Bloodfang in WC2 was so much better than that pile of junk he threw together for WC3.
Videos are up at the usual location: http://www.youtube.com/davecaspermeyer
P.S. - Stick around past the end credits for a special scene. I'll be adding the WC4 intro cinematic next Sunday. I'm still not done with WC3 since I have to go back for the Flint cinematics, but that will be for tomorrow. I am really looking forward to other pilot reports!
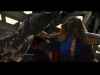
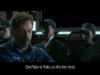
P.S.S. - I thought the look Tolwyn gives Eisen in picture four was priceless.
I was SO disappointed that Thakhath was such a no-challenge. I think his Bloodfang in WC2 was so much better than that pile of junk he threw together for WC3.
Videos are up at the usual location: http://www.youtube.com/davecaspermeyer
P.S. - Stick around past the end credits for a special scene. I'll be adding the WC4 intro cinematic next Sunday. I'm still not done with WC3 since I have to go back for the Flint cinematics, but that will be for tomorrow. I am really looking forward to other pilot reports!
P.S.S. - I thought the look Tolwyn gives Eisen in picture four was priceless.
Attachments

Lorien
Rear Admiral
Argh! Dosbox crashed right as the T-Bomb hit the fault line. I spent what felt like forever in that damned trench, so the movie recollections are thanks to HCl's wonderful WC Movie Player.
Kilrah 1:
Our force of 4 Excaliburs make a break for the jump point as the rest of the fleet distracts the Kilrathi from our real target: Kilrah. The heavy Kilrathi presence makes some encounters inevitable, though, so it is without suprise that I find 2 Sorthaks guarding the jump point to the Kilrathi homeworld. The ultra-heavy fighters are almost designed to be taken out by the Excalibur's heavy arsenal and they last only a few seconds before the way to Kilrah is cleared. I lead the way into the Kilrah system. It would be nice to have the Tarawa along backing us up.
There's a light reception committee waiting for us on the other side, a mixture of Darkets, Dralthi and Corvettes. My wingmen focus on taking out the corvettes while I keep them clear of the fighter cover. I fulfill my end of the bargain, but Maniac was somehow shot down as he engaged the corvettes. I don't know how, they certainly weren't any trouble for the rest of us. A similar force waits for us at Nav 2 and we use the exact same tactics as before. I make short work of the bunched up Dralthi and my wingmen take out the corvettes. The final nav point before the depot has something a little heavier, a Heavy Destroyer escorted by Darkets. Vagabond and Flint proceed to tear it apart as I engage the 3 waves of Darkets the destroyer had launched. One was obviously returning from a recon flight and appeared on my radar miles away, forcing me to afterburn out and hunt him down. The Destroyer is still left after it's fighters are gone, though, and I dive in to assist my wingmen, who have both taken heavy damage from the AMGs. I target the most damaged point on the Destroyer and let fly with all my missile banks and a full salvo of guns just as my wingmen are making a run and I'm rewarded with a gigantic explosion.
Arriving at the first depot, we weave our way through the asteroids and land.
Kilrah 2:
Paladin's briefing is rather brief. He's happy to know that I'm listening to his second recording as it means we've penetrated the Kilrah system. Our next step is to hop to a depot closer to Kilrah where the T-Bomb has been hidden. From there, we take out Kilrah!
The Kilrathi are heavily patrolling their system with Corvettes it seems. We encounter another pair working with some Darket and Dralthi and another pair working with Vaktoths and Strakha. There's only three of us now, so it takes a little longer to take down the corvettes but the Kilrathi fighters are nothing but meat in front of the Excalibur. With enough time to put this baby into full production we wouldn't need a desperate last plan.
Disaster strikes at the third nav point. 3 Sorthak ambush us as we make a run on a Kilrathi Light Destroyer that's blocking our way. They catch Flint by suprise and take her fighter out in their first salvo. The resulting dogfight is too hectic for me to search for a beacon, but I hope in my heart that she's ok. Without any word on Flint's status, I take my anger out on the Destroyer. Forgoing the usual attack patterns I simply park in the blind spot behind it and divert full power to my guns, not letting the trigger go until I see the flash. At least Vagabond surives the encounter to join me at the last depot and our final mission.
Kilrah 3:
Paladin's briefing is again very simple. I have a Cloaking Device and a T-Bomb that I'm to take to Kilrah and use to send them all to Hell.
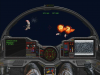
The Kilrathi presence close to their homeworld is getting a lot heavier. Instead of the corvette pairs on patrol in the outer system, Vagabond and I encounter nothing but Destroyers. The first one is escorted by Paktahns and Dralthi. The fighers are easily taken care of, but Vagabond wanders into the path of too much of the Destroyer's fire and I'm forced to send him home and take care of the Destroyer myself. The next Destroyer is guarded by Dralthi and a cloaked contingent of Strakha. The Dralthi are taken care of easily, but the Strakha swarm in such numbers that I'm forced to turn around and kick them in the chops as they fire upon me. I hang back a second to let my shields recharge before diving in on the Destroyer's rear, which is covered only by laser turrets and not the heavy AMGs. The weaker rear armour also helps it go down quickly. I'm unable to take full advantage of this weakness with the last Destroyer. The Darkets escorting it swarmed in much the same way as the Strakha did at the last nav point and fortunately the tactic used against them worked just as well. The Destroyer captain, however, is very aggressive and maneuvers his ship around to constantly face my Excalibur and bring the heavy guns to bear. I'm forced to fly carefully, but eventually it goes down.
Next stop, Kilrah. I engage my cloaking device so that I can slip through the gigantic Kilrathi fleet in orbit but I disengage the cloak when a very tempting target presents itself. Thrakhath and Hobbes. Thrakhath is flying his personal Bloodfang while Hobbes is in a Thunderbolt. No doubt they've taken a guess at the pilot destroying random Destroyers in their system and Hobbes' Thunderbolt is a carefully calculated insult. I'm not one to pass up a slap in the face like that, however, and decide to play the Strakha game against him. From the cloak, I lock two IR missiles onto him and match speeds to Hobbes' rear. Disengaging the cloak, I open fire with a full barrage of guns and missiles. I doubt the traitor even knew what hit him, but I'm sure he knew who. Thrakhath and his escort of two Paktahns move to engage me and I decide to take out the Paktahns first to make it properly personal. Once they can no longer interfere, it's time to dance with Thrakhath. It's a disappointingly short dance, however, Thrakhah makes one pass that barely scores any hits on me before I fall onto his tail. The Bloodfang's shields and armour do it little good from behind and I finally rid the universe of Prince Thrakhath. With his debris field behind me, I dive towards the Kilrathi homeworld.
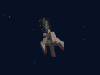
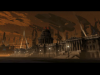
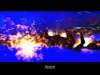
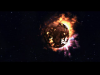
Engaging my afterburners, I head towards the valley that Paladin had picked out as leading towards the Fault Spot that I'm to target. Compared to all the combat I've been through, weaving my way through the valley below the Kilrathi radar almost seems effortless and I shake off a strange feeling of deja vu. Eventually, I'm forced out of the valley and have to engage the cloaking device again to protect me from the swarms of atmospheric fighters looking to shoot down this lone intruder. Still cloaked, I manage to locate the Fault. Diverting all power to shields, I climb high to get a straight shot towards the target and decloak as the T-Bomb locks on. The Ekapshis rush to shoot me down, but only a few stray shots hit me before the T-Bomb detaches from my fighter and impacts the target. I aim straight up and engage the afterburners to get away from the blast zone.
I watch in the rear vision screeen as the shockwave passes through the Kilrathi Imperial Palace. I'm sure the Emperor was inside as it collapsed. I'm still gaining space as the exploding Kilrathi homeworld ejects debris into the orbiting fleet, destroying more ships in a few minutes then I have in my entire career. My afterburners are still firing as the blast catches up to my fighter and knocks it tumbling, the engines destroyed. I brace myself for the end as a badly damaged Kilrathi Dreadnought pulls me into it's launch bay. Inside is a character I've never met but heard plenty about. Melek, advisor to Prince Thrakhath.
He greets me with his desire to kill me, claws extended. I'm prepared for the end, though, and determind to get one more shot about Kilrah in before I go. He shocks me by pausing for a second and retracting his claws. It seems Intelligence was right about the importance of Kilrah to the Empire as Melek cannot comprehend a Kilrathi empire without Kilrah. He then shocks me even furhter by saying the Kilrathi need to change to face the new millenium ahead and proceeds to do something the Kilrathi have never done before. He surrenders.
It takes a long time between then and the treaty signing ceremony on board the Victory. Tolwyn is granted the honour of signing for the Confederation and fulfills his duties with suitable aplomb. A flight of Hellcats perform an overflight as the treaty signalling peace is finally signed.
As I relax on the shuttle back home, I think back to something Flint said back on the Victory. After one coversation with myself and Maniac, he apparently turned to her and said "Isn't that the guy from Star Wars?" Apparently, it's a 20th century movie and I look like one of the main characters. Maybe I'll ask Bear about it.....
Kilrah 1:
Our force of 4 Excaliburs make a break for the jump point as the rest of the fleet distracts the Kilrathi from our real target: Kilrah. The heavy Kilrathi presence makes some encounters inevitable, though, so it is without suprise that I find 2 Sorthaks guarding the jump point to the Kilrathi homeworld. The ultra-heavy fighters are almost designed to be taken out by the Excalibur's heavy arsenal and they last only a few seconds before the way to Kilrah is cleared. I lead the way into the Kilrah system. It would be nice to have the Tarawa along backing us up.
There's a light reception committee waiting for us on the other side, a mixture of Darkets, Dralthi and Corvettes. My wingmen focus on taking out the corvettes while I keep them clear of the fighter cover. I fulfill my end of the bargain, but Maniac was somehow shot down as he engaged the corvettes. I don't know how, they certainly weren't any trouble for the rest of us. A similar force waits for us at Nav 2 and we use the exact same tactics as before. I make short work of the bunched up Dralthi and my wingmen take out the corvettes. The final nav point before the depot has something a little heavier, a Heavy Destroyer escorted by Darkets. Vagabond and Flint proceed to tear it apart as I engage the 3 waves of Darkets the destroyer had launched. One was obviously returning from a recon flight and appeared on my radar miles away, forcing me to afterburn out and hunt him down. The Destroyer is still left after it's fighters are gone, though, and I dive in to assist my wingmen, who have both taken heavy damage from the AMGs. I target the most damaged point on the Destroyer and let fly with all my missile banks and a full salvo of guns just as my wingmen are making a run and I'm rewarded with a gigantic explosion.
Arriving at the first depot, we weave our way through the asteroids and land.
Kilrah 2:
Paladin's briefing is rather brief. He's happy to know that I'm listening to his second recording as it means we've penetrated the Kilrah system. Our next step is to hop to a depot closer to Kilrah where the T-Bomb has been hidden. From there, we take out Kilrah!
The Kilrathi are heavily patrolling their system with Corvettes it seems. We encounter another pair working with some Darket and Dralthi and another pair working with Vaktoths and Strakha. There's only three of us now, so it takes a little longer to take down the corvettes but the Kilrathi fighters are nothing but meat in front of the Excalibur. With enough time to put this baby into full production we wouldn't need a desperate last plan.
Disaster strikes at the third nav point. 3 Sorthak ambush us as we make a run on a Kilrathi Light Destroyer that's blocking our way. They catch Flint by suprise and take her fighter out in their first salvo. The resulting dogfight is too hectic for me to search for a beacon, but I hope in my heart that she's ok. Without any word on Flint's status, I take my anger out on the Destroyer. Forgoing the usual attack patterns I simply park in the blind spot behind it and divert full power to my guns, not letting the trigger go until I see the flash. At least Vagabond surives the encounter to join me at the last depot and our final mission.
Kilrah 3:
Paladin's briefing is again very simple. I have a Cloaking Device and a T-Bomb that I'm to take to Kilrah and use to send them all to Hell.
The Kilrathi presence close to their homeworld is getting a lot heavier. Instead of the corvette pairs on patrol in the outer system, Vagabond and I encounter nothing but Destroyers. The first one is escorted by Paktahns and Dralthi. The fighers are easily taken care of, but Vagabond wanders into the path of too much of the Destroyer's fire and I'm forced to send him home and take care of the Destroyer myself. The next Destroyer is guarded by Dralthi and a cloaked contingent of Strakha. The Dralthi are taken care of easily, but the Strakha swarm in such numbers that I'm forced to turn around and kick them in the chops as they fire upon me. I hang back a second to let my shields recharge before diving in on the Destroyer's rear, which is covered only by laser turrets and not the heavy AMGs. The weaker rear armour also helps it go down quickly. I'm unable to take full advantage of this weakness with the last Destroyer. The Darkets escorting it swarmed in much the same way as the Strakha did at the last nav point and fortunately the tactic used against them worked just as well. The Destroyer captain, however, is very aggressive and maneuvers his ship around to constantly face my Excalibur and bring the heavy guns to bear. I'm forced to fly carefully, but eventually it goes down.
Next stop, Kilrah. I engage my cloaking device so that I can slip through the gigantic Kilrathi fleet in orbit but I disengage the cloak when a very tempting target presents itself. Thrakhath and Hobbes. Thrakhath is flying his personal Bloodfang while Hobbes is in a Thunderbolt. No doubt they've taken a guess at the pilot destroying random Destroyers in their system and Hobbes' Thunderbolt is a carefully calculated insult. I'm not one to pass up a slap in the face like that, however, and decide to play the Strakha game against him. From the cloak, I lock two IR missiles onto him and match speeds to Hobbes' rear. Disengaging the cloak, I open fire with a full barrage of guns and missiles. I doubt the traitor even knew what hit him, but I'm sure he knew who. Thrakhath and his escort of two Paktahns move to engage me and I decide to take out the Paktahns first to make it properly personal. Once they can no longer interfere, it's time to dance with Thrakhath. It's a disappointingly short dance, however, Thrakhah makes one pass that barely scores any hits on me before I fall onto his tail. The Bloodfang's shields and armour do it little good from behind and I finally rid the universe of Prince Thrakhath. With his debris field behind me, I dive towards the Kilrathi homeworld.
Engaging my afterburners, I head towards the valley that Paladin had picked out as leading towards the Fault Spot that I'm to target. Compared to all the combat I've been through, weaving my way through the valley below the Kilrathi radar almost seems effortless and I shake off a strange feeling of deja vu. Eventually, I'm forced out of the valley and have to engage the cloaking device again to protect me from the swarms of atmospheric fighters looking to shoot down this lone intruder. Still cloaked, I manage to locate the Fault. Diverting all power to shields, I climb high to get a straight shot towards the target and decloak as the T-Bomb locks on. The Ekapshis rush to shoot me down, but only a few stray shots hit me before the T-Bomb detaches from my fighter and impacts the target. I aim straight up and engage the afterburners to get away from the blast zone.
I watch in the rear vision screeen as the shockwave passes through the Kilrathi Imperial Palace. I'm sure the Emperor was inside as it collapsed. I'm still gaining space as the exploding Kilrathi homeworld ejects debris into the orbiting fleet, destroying more ships in a few minutes then I have in my entire career. My afterburners are still firing as the blast catches up to my fighter and knocks it tumbling, the engines destroyed. I brace myself for the end as a badly damaged Kilrathi Dreadnought pulls me into it's launch bay. Inside is a character I've never met but heard plenty about. Melek, advisor to Prince Thrakhath.
He greets me with his desire to kill me, claws extended. I'm prepared for the end, though, and determind to get one more shot about Kilrah in before I go. He shocks me by pausing for a second and retracting his claws. It seems Intelligence was right about the importance of Kilrah to the Empire as Melek cannot comprehend a Kilrathi empire without Kilrah. He then shocks me even furhter by saying the Kilrathi need to change to face the new millenium ahead and proceeds to do something the Kilrathi have never done before. He surrenders.
It takes a long time between then and the treaty signing ceremony on board the Victory. Tolwyn is granted the honour of signing for the Confederation and fulfills his duties with suitable aplomb. A flight of Hellcats perform an overflight as the treaty signalling peace is finally signed.
As I relax on the shuttle back home, I think back to something Flint said back on the Victory. After one coversation with myself and Maniac, he apparently turned to her and said "Isn't that the guy from Star Wars?" Apparently, it's a 20th century movie and I look like one of the main characters. Maybe I'll ask Bear about it.....
Lorien
Rear Admiral
I finally got WC3Edit working. I had 466 WC3 kills before leaving on the last mission. Vagabond took out 1 Paktahn and 1 Dralthi before I sent him home, leaving 28 kills for me. I tried the trench run this time and didn't take out any Ekapshis, leaving my total kills for WC3 at 494. Should have killed 6 Ekapshis to make it a nice round number.
Adding it to my previous kills gives me a Kilrathi campaign kill score of 1395, with the Kilrathi killing me twice but only due to game issues.
Adding it to my previous kills gives me a Kilrathi campaign kill score of 1395, with the Kilrathi killing me twice but only due to game issues.
DaveO
Rear Admiral
Ok, I added the Flint cinematics. Yikes, talk about some serious consequences if you ditch Rachel! You don't get a missile loadout for the next few missions, and I don't think this is worth the risk for heading on to Kilrah.
P.S. - What caused your deaths, Lorien? The game was serious struggling on the last two missions for me. At least WC4 will run smoothly without issues. I think my kill score was somewhere between 350-450, but I could always check the final save file and translate the hex if anybody is interested.
P.S. - What caused your deaths, Lorien? The game was serious struggling on the last two missions for me. At least WC4 will run smoothly without issues. I think my kill score was somewhere between 350-450, but I could always check the final save file and translate the hex if anybody is interested.
Death
gh0d (Administrator)
I always disliked the extremely long length of the trench. Even if you cloak and fly out of it with Ekapshis on your tail it still takes a bit too long.
Admittedly the last time I played through WC3 I made use of the second cloak bug (for those who weren't aware, the set up was supposed to have you recreate the SW4 trench run, but since the ground part of Kilrah 4 was treated by the game as a separate mission it reset the one-time cloak count), but when flying to the site I made sure to get clear of any mountains that pop up by flying high, and locked on autoslide after engaging AB, releasing AB afterwards to maintain AB speeds, but only consume cruise speed fuel amounts.
(That's probably also questionable, in terms of gameplay, but dammit I don't want to spend all day flying one single mission.
 )
)Lorien
Rear Admiral
P.S. - What caused your deaths, Lorien? The game was serious struggling on the last two missions for me. At least WC4 will run smoothly without issues. I think my kill score was somewhere between 350-450, but I could always check the final save file and translate the hex if anybody is interested.
The first death was during the first week of SO2, when I discovered that the new AVG really likes system resources when it's doing a scan. The second was a bit later in SO2 again when I forgot to turn it off.
Lorien
Rear Admiral
Admittedly the last time I played through WC3 I made use of the second cloak bug (for those who weren't aware, the set up was supposed to have you recreate the SW4 trench run, but since the ground part of Kilrah 4 was treated by the game as a separate mission it reset the one-time cloak count), but when flying to the site I made sure to get clear of any mountains that pop up by flying high, and locked on autoslide after engaging AB, releasing AB afterwards to maintain AB speeds, but only consume cruise speed fuel amounts.
(That's probably also questionable, in terms of gameplay, but dammit I don't want to spend all day flying one single mission.
The trench really does take forever. I'm not quite sure why they made it so long without any challenges, though. At the start there were a bunch of tanks firing away inside the trench and it would have been a lot more interesting if they'd stuck tanks along the way.
Lorien
Rear Admiral
Is it even possible to fly all the way to the fault line by following the trench? The last time I tried it, I ended up in what seems like a dead end with two possible paths. Go in one and come out the other...
That's what I found, too. So I popped out and used the cloaking device.
Dundradal
Frog Blast the Vent Core!
Is it even possible to fly all the way to the fault line by following the trench? The last time I tried it, I ended up in what seems like a dead end with two possible paths. Go in one and come out the other...
Yeah it just takes half an hour...
Chaosbringer
Rear Admiral
When i first played it I did the whole path. This time i used the cloak. Still, it's a long way (but not that long).
DaveO
Rear Admiral
I've finished the failing path too, so I'll be uploading those videos later today. Overall, I thought there were supposed to be unlimited fighters but once the Dreadnought arrives you only have to handle a wave of Dralthi. My Excalibur did take some damage, but I was a bit disappointed that it was not a test of endurance. You folks will get a bonus though: How to take out Corvettes!
DaveO
Rear Admiral
YouTube was down for maintenance last night, so I decided to try the Dreadnought with an Arrow. Even with max firepower from lasers, I could not make any dent in the shields of that thing. I might try again with a Longbow when I revisit the game after finishing Wing Commander 1, but I don't expect any better results.
Just scroll up in this thread to access the new videos, including Wing Commander 4's intro.
I know...you...can...do......it!
P.S. - You saw Mincemeat's recordings, so now you get a different wingnut's experiences. As far as the Corvettes go, I seriously sucked on Proxima but made up for it on Sol.
Just scroll up in this thread to access the new videos, including Wing Commander 4's intro.
I know...you...can...do......it!
P.S. - You saw Mincemeat's recordings, so now you get a different wingnut's experiences. As far as the Corvettes go, I seriously sucked on Proxima but made up for it on Sol.
DaveO
Rear Admiral
At long last, my journal of the losing path and winning path final missions. I should have an update to Photobucket as well soon. I'll be doing some diving into my recordings since I'm pretty sure one of them has an Object view shot for the Dreadnought.
Proxima
Things have taken a turn for the worse. The Kilrathi are coming after us with practically everything they have. We’re making a last-ditch defense here, but there is little hope that it will hold off the cats. I choose Hobbes and an Excalibur to provide our best chances at success.
I make a minor communications error by talking to the Victory for their status instead of giving Hobbes the orders to break and attack. He goes after the fighters with gusto, and I fry a Darket with my cannons. I get an entire wing of Darkets and Dralthi with Hobbes scoring one kill from the bunch. Heavy Vaktoth fighters join the duel, and Hobbes makes up for his lack of kills earlier. I take two hits on my fighter, and then I notice that my guns are seriously damaged. I am forced to use missiles on those fighters with the guns damaged up to 99%. I get enough of a break after taking out two Vaktoths to readjust power settings. I see the damage go down for the guns while the repair system does its thing. Some stealth fighters have an idea to take advantage of my vulnerability. I get repaired enough to fend them off, but this leaves me in no position to help out Hobbes. In the distance, I can see Hobbes trying to take out a Corvette but one of the stealth fighters is just lying on a perfect attack angle to harass him. My guns are finally fully repaired, and before I can even close distance to shred that stealth fighter Hobbes tells me he has to pull out. He also tells me that he thinks he got a lethal hit, and I hope in my heart that he is exaggerating. I take down both the final stealth fighter and the Corvette, and another wave of ships comes in with more stealth fighters and another Corvette. I get the good fortune to hit and destroy two of the fighters at the same time, and the other one soon follows. It takes what seems like almost forever to eliminate that Corvette, but I do learn a better method for taking them down for the future. After finishing off the Corvette, Eisen tells me the bad news that we could not hold the jump point. We’ll be forced to try defending Earth, but it’s a no-win situation. I get in range to land, and Rollins points out the obvious that we’ll either be eating cat food or become cat food pretty soon. I then have to face with a heavy heart the burial of Hobbes. I do my best to give him a good eulogy, but we’re all going to need one within the next few hours.
Sol
This is it. Time to fight like a person possessed since there is no hope of victory. Excalibur is the choice to go with, and I’m solo on this one. There are multiple Paktahns looking to torpedo what remains of our battlegroup. They get one of our ships before I can do anything about it. I take out two of the bombers, and one of the Confed cap ships shreds two of the bombers. Another wave of Paktahns are looking to add more of our ships to their killboard, but I get them all without taking any damage. Some Vaktoths come in, and they swarm all around. I’m fortunate enough to get one eliminated quickly with a direct pass. The others take more persistence, evasive maneuvering, and decoys against missiles. I take some hits and damage but my fighter is still ticking well enough to continue. Stealth fighters along with a Corvette jump into the area. The fighters are pretty easy, so I use my new technique on the Corvette. I purposefully go after the turrets to defang the ship, and some sloppiness on my part causes more damage to my fighter. I do destroy all of the turrets and shoot the defenseless capital ship. Another reception wave wing of stealth fighters with a Corvette comes in. The fighters all follow the same route as the first wave did, and the Corvette is defanged with no damage to my ship. I let that defenseless ship take multiple barrages from my guns. The Corvette explodes in a flash, but a new arrival has put in a final nail to our coffins. A Kilrathi Dreadnought with a few Dralthi comes in for the finishing blow. I take out the fighters easily enough, but I know I’m no match for the Dreadnought and eject. The Victory does not last long against the firepower of the Dreadnought, and I see the ship make a final move to take out as many Kilrathi as they can. The Victory rams into one of the other Kilrathi capital ships. I get picked up by the Dreadnought’s tractor beam, and am brought before the captain who happens to be Prince Thrakhath. The Prince is gloating over our defeat, but I let him know that he’ll be forced to destroy Earth before he can conquer it. The Kilrathi and Thrakhath don’t care much for the watery world of Earth, and they are taking pleasure over this victory. Prince Thrakhath gives me an opportunity to beg for ‘mercy’, but I know that I’m dead no matter how I respond. I decide to go out in defiance and tell the Prince to screw off. He gives me the same warrior’s death as Angel by disembowelment.
The Kilrathi fleet rains destruction down upon Earth, and the cats trod upon our skulls in ultimate triumph. THE END…
NOT THE END! You did not think I’d end my journals that way, did you?
Kilrah 1
Captain Eisen tells me that he was not so sure of my impact when I first arrived on the Victory. He’s glad that I’ve come to finish this fight with the felines. He tells me that it’s been an honor to have me make a difference. He admits the T-Bomb is a long shot to destroy Kilrah, but I feel that we have the proof of what it can do to the right target. I do appreciate the Captain’s faith that I’m up to the challenge of this task, and express my hopes that I can justify it. Eisen gives me the briefing where our subtle strategy is revealed. I’ll be flying with three other wingmen in an Excalibur equipped with a cloaking device. The cloak takes a huge strain on my energy reserves, and will be useless after I launch the T-Bomb at the Kilrah fault point. There only two charges for the cloak, so I can’t afford to abuse its capability. All of our fighter group will head to a clandestine outpost staged in Kilrah. On our second leg, we’ll pick up the T-Bomb and make our ‘trench run’ for the fault. I’ll have to ‘use the force’ to get a perfect hit, but it should have spectacular results in shattering the planet. In a twist of good fortune, successful destruction of Kilrah will also cause massive casualties to much of the fleet that is being outfitted in orbital shipyards. Eisen then tells me that Paladin will handle further briefings at the asteroid outposts. Paladin assures me that I can count on him this time, and I certainly hope those outposts have not been found by the Kilrathi yet. I choose Vagabond, Flash, and Maniac to come along on to help me out.
At the first point before our jump into Kilrah, there are two Sorthaks looking to slow us down. Both Vagabond and Maniac make very short work of the Kilrathi fighters. On the other side, there is a heftier welcoming committee. Multiple fighter wings are here with a Corvette. All my wingmen break and attack the Corvette while I’m handling most of the fighters. I do take one hit to my armor, but the Excalibur is not a lightweight in a heavyweight fight. At the next nav point, there are more fighters and two Corvettes. Flash comes in quite handy here, and he takes out several of the fighters AND the Corvettes. I have no idea what Maniac was doing, but I do notice that Vagabond is no longer on my radar. We go onward, and the reception is only getting heavier. Now there is a Destroyer and Darkets to delay our progress. I take a few more hits from the fighters, but the Destroyer is demolished by our combined firepower. I breathe a small sigh of relief when I see the first asteroid outpost in perfect condition. My Excalibur is not so fortunate with some sparks coming out of the rear, but a little time will fix it up like new.
Kilrah 2
Paladin tells me to not waste any time for my next briefing. Time is of the essence in order to load the T-Bomb at my next stop outpost stop before the Kilrathi can find it. Paladin has no doubts that I’ll make it to the outpost for the final briefing.
Yet again, the Kilrathi are at the first nav point with fighters and a Corvette. I let my two remaining wingmen break and attack, and again they seem to be concentrating on the Corvette for the most part. I do the standard fighter frying, but Flash does help out a bit with some fighter kills too. Again, Maniac is not heard from on his attacks so he’s been a washout thus far. I’m going to need his help on that final leg, and I can only hope he wakes up to start acting like his usual self. Both Corvettes are again eliminated by Flash, and we go to our next nav point. Vaktoths and a Corvette or two are here, and it turns into a bit of a furball right away. There are so many targets on my scope that aren’t friendly, and I’m dodging the standard Vaktoth missile fire too. We all take down the heavy fighters, but a serious wave of Strakha comes in to help the Corvette. There must be 6-8 of them here, and I’m weaving all over the place to avoid taking any hits. I take out at least three, and Flash pitches in with some help too. I give Flash orders to head back to base, so now Maniac can at last try to get a kill. When Maniac ices the Corvette, he does not do his standard kitty litter comment. I guess he has a lot on his mind right now. Another Kilrathi Destroyer and several Sorthaks are waiting for us at the next nav area. We get the Sorthaks with no troubles, but the Destroyer wants some Darkets to play tag with us next. I use a few missiles to cut down the number of Darkets, and then use my guns to take care of the rest. Maniac and I handle the Destroyer with no damage, so I did much better on this portion of our infiltration closer to Kilrah.
Kilrah 3
Paladin’s final briefing informs me that the T-Bomb has been loaded and the cloaking device equipped. I’ll have to make sure that shot counts, and the coordinates of the fault have been downloaded into my nav computer. Time to send the cats to hell.
At the first nav point, there is a Destroyer along with Paktahns. Manaic and I easily blow the bombers to bits, and it brings in a wave of Dralthi. After I get a fighter, Maniac says that things are getting too hot. I nail another Dralthi, and then hear Maniac rapidly repeating ‘woah’ over the intercom and his Excalibur is no longer on my radar. I finish off the remaining fighter defense and autopilot to the next area. That Destroyer is likely able to cause damage to my Excalibur and I can’t afford to let a lust for kills cloud the better goal of finishing the furballs for good with the T-Bomb. The next nav area has Dralthis and another Destroyer. I only go after the fighter defense, and that Destroyer has a Strakha surprise. I have to do serious maneuvering to avoid the several stealth fighters from getting enough hits to penetrate my shields. After gunning down a few of those fighters, I get enough time to take them out individually without having to constantly do evasive action. At the third nav point is another Destroyer and Darkets. I use half of my missiles to drop the Darkets to a manageable amount. My guns drop the others, and I cloak before heading to the fourth nav point in order to not have a huge welcoming committee waiting for me at orbit around Kilrah. In orbit, there is a light defense in terms of fighter count but two of the fighters may give me troubles. Prince Thrakhath and Hobbes are here along with two Paktahns. While uncloaking and unleashing hell on Hobbes is tempting, I know that the better course of action is to take out a Paktahn first and then go after the traitor and the Prince. I get within close range of one of the bombers, uncloak, and let him have it. It’s destroyed very quickly by my guns, but Thrakhath and Hobbes want to hand me defeat before I can go down to the planet surface and drop the T-Bomb. I have to do some weaving around, but I get enough of an opening to let Hobbes have a barrage. His Thunderbolt took serious rear damage, and another few hits to the rear of the fighter cause it to explode. Hobbes has no final words, and I turn my attention to the Prince. Thrakhath comes directly towards me for a head on pass. He misses in his attempts to hit me with that volley of firepower. I let him have a return volley, and his Bloodfang is vaporized. I then head to the planet surface, and make two mistakes. I head the wrong way initially for the fault point and I get too low and hit the ground. Fortunately, I recover from both and have to let my repair systems fix the afterburners that took some damage from the crash. It takes many minutes for me to get in position, but the cloaking device helps me do it without being harassed by the Ekapshis. I have to do a little bit of additional aerial maneuvers to see the fault point directly in my sights. I’m almost at maximum altitude, and I make absolutely certain I have a clean shot. I let the T-Bomb lock on and uncloak to launch it. I then lock afterburners to get away as quickly as possible. An Ekapshi launches a missile, but I safely decoy it away. I hear the T-Bomb strike the fault line, and exit the atmosphere as the chain reaction goes underway. Anything on the surface is shattered apart, and the Kilrah capitol crumbles in an explosion. The fleet in orbit is attempting to evade the deadly rain of embers being ejected from the dying planet. I’m STILL going full throttle, but it’s not enough to evade the explosive wake. My Excalibur is tossed like a rag doll, and it’s so badly damaged that I can’t even engage the engines again to limp back to the Victory. A tractor beam from a Kilrathi Dreadnought brings my fighter into its hangar bay. I can see the serious damage the Dreadnought has taken, and I am brought before Melek. He greets me with the Kilrathi title of Heart of the Tiger, and expresses his wishes to kill me. I defiantly tell him to go ahead and avenge Kilrah, but his home world can never be brought back. Melek ponders the fate of the Kilrathi without their homeworld, and admits that they have been defeated due to my actions. Melek decides to let me live, and mourns that it took the corruption and bloodlust of the Kilrathi to cause the heavy price of defeat. He then drops his equivalent of the T-Bomb by surrendering to me personally. Melek is determined to not let the Kilrathi die out as a race.
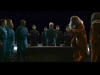
On board the Victory, Melek and many more Kilrathi are attending the signing of a peace treaty. I can see Melek sign with what looks like to be an ‘X’ and Admiral Tolwyn shoots a look at Captain Eisen as if it’s his fault that the cats don’t understand our expectations of an actual name on the treaty document. Tolwyn decides that the show must go on, and adds his signature to the treaty. The Admiral gives Melek a salute, and Melek bows in submission. Four Hellcats do a flyby over the hangar, and I see a healthy Maniac before departing on a shuttle for some much-needed R&R on Earth. Rachel is along with me, and I ask her what she would like to do first. She wants to take a long walk on a seashore and enjoy the scenery. Sounds good to me! We head off to begin Melek’s new millennium of peace with the Kilrathi…
To be continued in Wing Commander 4: The Price of Freedom
EDIT - The total was twelve shots added to Photobucket. Take a look at the new stuff at: http://s204.photobucket.com/albums/bb15/DaveO-MM/Wing Commander/
I'm including five as compensation for such a delayed reply, so there are only two that are not in the replies.
Proxima
Things have taken a turn for the worse. The Kilrathi are coming after us with practically everything they have. We’re making a last-ditch defense here, but there is little hope that it will hold off the cats. I choose Hobbes and an Excalibur to provide our best chances at success.
I make a minor communications error by talking to the Victory for their status instead of giving Hobbes the orders to break and attack. He goes after the fighters with gusto, and I fry a Darket with my cannons. I get an entire wing of Darkets and Dralthi with Hobbes scoring one kill from the bunch. Heavy Vaktoth fighters join the duel, and Hobbes makes up for his lack of kills earlier. I take two hits on my fighter, and then I notice that my guns are seriously damaged. I am forced to use missiles on those fighters with the guns damaged up to 99%. I get enough of a break after taking out two Vaktoths to readjust power settings. I see the damage go down for the guns while the repair system does its thing. Some stealth fighters have an idea to take advantage of my vulnerability. I get repaired enough to fend them off, but this leaves me in no position to help out Hobbes. In the distance, I can see Hobbes trying to take out a Corvette but one of the stealth fighters is just lying on a perfect attack angle to harass him. My guns are finally fully repaired, and before I can even close distance to shred that stealth fighter Hobbes tells me he has to pull out. He also tells me that he thinks he got a lethal hit, and I hope in my heart that he is exaggerating. I take down both the final stealth fighter and the Corvette, and another wave of ships comes in with more stealth fighters and another Corvette. I get the good fortune to hit and destroy two of the fighters at the same time, and the other one soon follows. It takes what seems like almost forever to eliminate that Corvette, but I do learn a better method for taking them down for the future. After finishing off the Corvette, Eisen tells me the bad news that we could not hold the jump point. We’ll be forced to try defending Earth, but it’s a no-win situation. I get in range to land, and Rollins points out the obvious that we’ll either be eating cat food or become cat food pretty soon. I then have to face with a heavy heart the burial of Hobbes. I do my best to give him a good eulogy, but we’re all going to need one within the next few hours.
Sol
This is it. Time to fight like a person possessed since there is no hope of victory. Excalibur is the choice to go with, and I’m solo on this one. There are multiple Paktahns looking to torpedo what remains of our battlegroup. They get one of our ships before I can do anything about it. I take out two of the bombers, and one of the Confed cap ships shreds two of the bombers. Another wave of Paktahns are looking to add more of our ships to their killboard, but I get them all without taking any damage. Some Vaktoths come in, and they swarm all around. I’m fortunate enough to get one eliminated quickly with a direct pass. The others take more persistence, evasive maneuvering, and decoys against missiles. I take some hits and damage but my fighter is still ticking well enough to continue. Stealth fighters along with a Corvette jump into the area. The fighters are pretty easy, so I use my new technique on the Corvette. I purposefully go after the turrets to defang the ship, and some sloppiness on my part causes more damage to my fighter. I do destroy all of the turrets and shoot the defenseless capital ship. Another reception wave wing of stealth fighters with a Corvette comes in. The fighters all follow the same route as the first wave did, and the Corvette is defanged with no damage to my ship. I let that defenseless ship take multiple barrages from my guns. The Corvette explodes in a flash, but a new arrival has put in a final nail to our coffins. A Kilrathi Dreadnought with a few Dralthi comes in for the finishing blow. I take out the fighters easily enough, but I know I’m no match for the Dreadnought and eject. The Victory does not last long against the firepower of the Dreadnought, and I see the ship make a final move to take out as many Kilrathi as they can. The Victory rams into one of the other Kilrathi capital ships. I get picked up by the Dreadnought’s tractor beam, and am brought before the captain who happens to be Prince Thrakhath. The Prince is gloating over our defeat, but I let him know that he’ll be forced to destroy Earth before he can conquer it. The Kilrathi and Thrakhath don’t care much for the watery world of Earth, and they are taking pleasure over this victory. Prince Thrakhath gives me an opportunity to beg for ‘mercy’, but I know that I’m dead no matter how I respond. I decide to go out in defiance and tell the Prince to screw off. He gives me the same warrior’s death as Angel by disembowelment.
The Kilrathi fleet rains destruction down upon Earth, and the cats trod upon our skulls in ultimate triumph. THE END…
NOT THE END! You did not think I’d end my journals that way, did you?
Kilrah 1
Captain Eisen tells me that he was not so sure of my impact when I first arrived on the Victory. He’s glad that I’ve come to finish this fight with the felines. He tells me that it’s been an honor to have me make a difference. He admits the T-Bomb is a long shot to destroy Kilrah, but I feel that we have the proof of what it can do to the right target. I do appreciate the Captain’s faith that I’m up to the challenge of this task, and express my hopes that I can justify it. Eisen gives me the briefing where our subtle strategy is revealed. I’ll be flying with three other wingmen in an Excalibur equipped with a cloaking device. The cloak takes a huge strain on my energy reserves, and will be useless after I launch the T-Bomb at the Kilrah fault point. There only two charges for the cloak, so I can’t afford to abuse its capability. All of our fighter group will head to a clandestine outpost staged in Kilrah. On our second leg, we’ll pick up the T-Bomb and make our ‘trench run’ for the fault. I’ll have to ‘use the force’ to get a perfect hit, but it should have spectacular results in shattering the planet. In a twist of good fortune, successful destruction of Kilrah will also cause massive casualties to much of the fleet that is being outfitted in orbital shipyards. Eisen then tells me that Paladin will handle further briefings at the asteroid outposts. Paladin assures me that I can count on him this time, and I certainly hope those outposts have not been found by the Kilrathi yet. I choose Vagabond, Flash, and Maniac to come along on to help me out.
At the first point before our jump into Kilrah, there are two Sorthaks looking to slow us down. Both Vagabond and Maniac make very short work of the Kilrathi fighters. On the other side, there is a heftier welcoming committee. Multiple fighter wings are here with a Corvette. All my wingmen break and attack the Corvette while I’m handling most of the fighters. I do take one hit to my armor, but the Excalibur is not a lightweight in a heavyweight fight. At the next nav point, there are more fighters and two Corvettes. Flash comes in quite handy here, and he takes out several of the fighters AND the Corvettes. I have no idea what Maniac was doing, but I do notice that Vagabond is no longer on my radar. We go onward, and the reception is only getting heavier. Now there is a Destroyer and Darkets to delay our progress. I take a few more hits from the fighters, but the Destroyer is demolished by our combined firepower. I breathe a small sigh of relief when I see the first asteroid outpost in perfect condition. My Excalibur is not so fortunate with some sparks coming out of the rear, but a little time will fix it up like new.
Kilrah 2
Paladin tells me to not waste any time for my next briefing. Time is of the essence in order to load the T-Bomb at my next stop outpost stop before the Kilrathi can find it. Paladin has no doubts that I’ll make it to the outpost for the final briefing.
Yet again, the Kilrathi are at the first nav point with fighters and a Corvette. I let my two remaining wingmen break and attack, and again they seem to be concentrating on the Corvette for the most part. I do the standard fighter frying, but Flash does help out a bit with some fighter kills too. Again, Maniac is not heard from on his attacks so he’s been a washout thus far. I’m going to need his help on that final leg, and I can only hope he wakes up to start acting like his usual self. Both Corvettes are again eliminated by Flash, and we go to our next nav point. Vaktoths and a Corvette or two are here, and it turns into a bit of a furball right away. There are so many targets on my scope that aren’t friendly, and I’m dodging the standard Vaktoth missile fire too. We all take down the heavy fighters, but a serious wave of Strakha comes in to help the Corvette. There must be 6-8 of them here, and I’m weaving all over the place to avoid taking any hits. I take out at least three, and Flash pitches in with some help too. I give Flash orders to head back to base, so now Maniac can at last try to get a kill. When Maniac ices the Corvette, he does not do his standard kitty litter comment. I guess he has a lot on his mind right now. Another Kilrathi Destroyer and several Sorthaks are waiting for us at the next nav area. We get the Sorthaks with no troubles, but the Destroyer wants some Darkets to play tag with us next. I use a few missiles to cut down the number of Darkets, and then use my guns to take care of the rest. Maniac and I handle the Destroyer with no damage, so I did much better on this portion of our infiltration closer to Kilrah.
Kilrah 3
Paladin’s final briefing informs me that the T-Bomb has been loaded and the cloaking device equipped. I’ll have to make sure that shot counts, and the coordinates of the fault have been downloaded into my nav computer. Time to send the cats to hell.
At the first nav point, there is a Destroyer along with Paktahns. Manaic and I easily blow the bombers to bits, and it brings in a wave of Dralthi. After I get a fighter, Maniac says that things are getting too hot. I nail another Dralthi, and then hear Maniac rapidly repeating ‘woah’ over the intercom and his Excalibur is no longer on my radar. I finish off the remaining fighter defense and autopilot to the next area. That Destroyer is likely able to cause damage to my Excalibur and I can’t afford to let a lust for kills cloud the better goal of finishing the furballs for good with the T-Bomb. The next nav area has Dralthis and another Destroyer. I only go after the fighter defense, and that Destroyer has a Strakha surprise. I have to do serious maneuvering to avoid the several stealth fighters from getting enough hits to penetrate my shields. After gunning down a few of those fighters, I get enough time to take them out individually without having to constantly do evasive action. At the third nav point is another Destroyer and Darkets. I use half of my missiles to drop the Darkets to a manageable amount. My guns drop the others, and I cloak before heading to the fourth nav point in order to not have a huge welcoming committee waiting for me at orbit around Kilrah. In orbit, there is a light defense in terms of fighter count but two of the fighters may give me troubles. Prince Thrakhath and Hobbes are here along with two Paktahns. While uncloaking and unleashing hell on Hobbes is tempting, I know that the better course of action is to take out a Paktahn first and then go after the traitor and the Prince. I get within close range of one of the bombers, uncloak, and let him have it. It’s destroyed very quickly by my guns, but Thrakhath and Hobbes want to hand me defeat before I can go down to the planet surface and drop the T-Bomb. I have to do some weaving around, but I get enough of an opening to let Hobbes have a barrage. His Thunderbolt took serious rear damage, and another few hits to the rear of the fighter cause it to explode. Hobbes has no final words, and I turn my attention to the Prince. Thrakhath comes directly towards me for a head on pass. He misses in his attempts to hit me with that volley of firepower. I let him have a return volley, and his Bloodfang is vaporized. I then head to the planet surface, and make two mistakes. I head the wrong way initially for the fault point and I get too low and hit the ground. Fortunately, I recover from both and have to let my repair systems fix the afterburners that took some damage from the crash. It takes many minutes for me to get in position, but the cloaking device helps me do it without being harassed by the Ekapshis. I have to do a little bit of additional aerial maneuvers to see the fault point directly in my sights. I’m almost at maximum altitude, and I make absolutely certain I have a clean shot. I let the T-Bomb lock on and uncloak to launch it. I then lock afterburners to get away as quickly as possible. An Ekapshi launches a missile, but I safely decoy it away. I hear the T-Bomb strike the fault line, and exit the atmosphere as the chain reaction goes underway. Anything on the surface is shattered apart, and the Kilrah capitol crumbles in an explosion. The fleet in orbit is attempting to evade the deadly rain of embers being ejected from the dying planet. I’m STILL going full throttle, but it’s not enough to evade the explosive wake. My Excalibur is tossed like a rag doll, and it’s so badly damaged that I can’t even engage the engines again to limp back to the Victory. A tractor beam from a Kilrathi Dreadnought brings my fighter into its hangar bay. I can see the serious damage the Dreadnought has taken, and I am brought before Melek. He greets me with the Kilrathi title of Heart of the Tiger, and expresses his wishes to kill me. I defiantly tell him to go ahead and avenge Kilrah, but his home world can never be brought back. Melek ponders the fate of the Kilrathi without their homeworld, and admits that they have been defeated due to my actions. Melek decides to let me live, and mourns that it took the corruption and bloodlust of the Kilrathi to cause the heavy price of defeat. He then drops his equivalent of the T-Bomb by surrendering to me personally. Melek is determined to not let the Kilrathi die out as a race.
On board the Victory, Melek and many more Kilrathi are attending the signing of a peace treaty. I can see Melek sign with what looks like to be an ‘X’ and Admiral Tolwyn shoots a look at Captain Eisen as if it’s his fault that the cats don’t understand our expectations of an actual name on the treaty document. Tolwyn decides that the show must go on, and adds his signature to the treaty. The Admiral gives Melek a salute, and Melek bows in submission. Four Hellcats do a flyby over the hangar, and I see a healthy Maniac before departing on a shuttle for some much-needed R&R on Earth. Rachel is along with me, and I ask her what she would like to do first. She wants to take a long walk on a seashore and enjoy the scenery. Sounds good to me! We head off to begin Melek’s new millennium of peace with the Kilrathi…
To be continued in Wing Commander 4: The Price of Freedom
EDIT - The total was twelve shots added to Photobucket. Take a look at the new stuff at: http://s204.photobucket.com/albums/bb15/DaveO-MM/Wing Commander/
I'm including five as compensation for such a delayed reply, so there are only two that are not in the replies.