I'm a little bit late on the journal reply due to also doing a new Diablo 2 run under patch 1.12. I'm trying out an Assassin on this single player run thru Normal, and so far there seem to be few changes from my runs in version 1.09. Now back to our regularly scheduled Wing Commander 2 action!
Canewdon 9
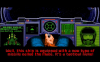
I see Paladin again in the barracks, and ask him if he’s found Ayer’s Rock yet. He has not found the Mandarin outpost, and asks if I’ve heard about the hijackings. I complain that the Mandarin propaganda is all I’ve been hearing about lately, and wonder why I should take blame for all of the crimes of ‘Jazz’. Paladin tries to calm me down by explaining that ‘Jazz’ is a skilled spy as well as an ace fighter pilot. With his latest actions, ‘Jazz’ is considered a Mandarin hero. He also correctly explains that ‘Jazz’ inflicted a lot of damage to others besides me. I have to wonder what other dirty deeds he had been committing before I finally stopped his traitorous acts on the Concordia. Paladin says that I can’t feel that it’s my fault, and I express how hindsight now makes my choice of letting ‘Jazz’ live a mistake I won’t make again. I definitely want the opportunity to correct that mistake, and Paladin says I may soon get that chance. I try pressing Paladin to tell me if he knows something I don’t, but he says that I’ll get the full picture soon. I see Angel in her office, and she explains that the Mandarins have offered a deal to trade the crews of the hijacked freighters for three Mandarins in prison. There must only be one fighter at the exchange point, or the deal won’t happen. Admiral Tolwyn wants me to fly that ship for the exchange, and I wonder why we’re dealing with the Mandarins with these conditions. I also ask if High Command approved the release of the prisoners. Angel explains that there is no further useful intelligence they will get out of the prisoners, and I ask if there is another reason that Tolwyn wants me to fly this mission. Angel says that Intelligence thinks that ‘Jazz’ will be at the exchange site, and that I’m the best pilot that has a chance of defeating him again. Oddly, I’m assigned to a Broadsword to fly on this mission so I have to wonder if there is something Angel did not tell me in the briefing since the Broadsword is a bad ship to dogfight against a fighter. I head off for the exchange, and after that rendezvous I get to a nav point where five Drakhri are looking to wipe out the transport I’m escorting. I nail one with my forward guns on its frontal pass, and switch to rear turrets where another gets foolish in trying to attack me from behind. The turrets easily vaporize that fighter, and I switch back to my forward view. After nailing a third Drakhri, I notice that a Ralatha cruiser is also here. Those Kilrathi sure mean business in killing the freighter! I take care of wiping out the remaining Drakhri and get into range to start my torpedo run on the cruiser. The Kilrathi captain is more concerned about nailing the transport than attacking me and I have the fortune of attacking him from behind. That Ralatha must be going full speed to try and nail the transport since I notice that he’s heading away from me while locking on with my first torpedo. I get within close range and tag the cruiser with the torpedo. I again get out of range for my next run, and again I’m coming from the Ralatha’s six. Another close release of a torpedo, and the Ralatha leaves a nice debris field in its wake. I head back to the Concordia with the transport, and head to the bridge to tell Tolwyn what happened. I tell the Admiral that I was not surprised that the Mandarins tried to renege on their deal by having a Kilrathi force nearby. I explain about the trap as well as telling him that I defeated it. Tolwyn explains that the Kilrathi are working quite closely with the Mandarins in this area. One of the rescued hostages learned something that the Mandarins did not want us to find out about so that was the reason for the ambush. That prisoner told us that there is going to be a high-level Mandarin meeting, and Confed is making it a priority to get more data about this. I inform the Admiral that ‘Jazz’ was a no-show for this little dance.
Canewdon 10
In the barracks, Maniac is telling Talon and Crossbones to do a standard diamond patrol in the Morningstars. Maniac also asks to be informed of anything unusual and that he wants them to make him proud of their abilities. Crossbones promises that the Kilrathi will be fearing the name of the Wild Eagles squadron today. In the hangar bay, something unusual is happening. Sparks is asking why they’re suited up for a patrol. She says that she thought Minx was going to be doing the Morningstar test flight today. She explains that Minx has already prepped a Morningstar, and is almost ready for takeoff. Talon says that Minx is NOT scheduled for any missions for today, and Crossbones signals an alert to stop the liftoff. Unfortunately, Minx MUST have planned her escape since a timed bomb explodes in the hangar and effectively prevents immediate pursuit. On the Bridge, I learn of what just happened. Minx has stolen the Morningstar, and her sabotage will keep us from pursuing her for another fifteen minutes. Sparks was able to confirm that Minx was the pilot of the Morningstar. The explosion in the hangar killed Crossbones, and both Talon and Sparks are in sickbay to get their injuries treated. Our goal is to find that traitorous space witch vixen, and either recapture or destroy the Morningstar. The Admiral says that the Morningstar does not have the range to reach the nearest system, and that a rendezvous with a Kilrathi ship must be the plan since the Morningstar still has the random jump problem. Tolwyn emphasizes that we must not let the Morningstar fall into enemy hands at all costs. I get a big surprise when I find out that I’ll be in a Morningstar myself for this pursuit. Time to see what this fighter can do! After launching with Maniac, he tells me about a new capability of the Morningstar. It’s equipped with a tactical nuclear missile called a Mace, and he tells me that the best way to use it is to fire at an enemy squadron when I first see them. The particle cannons of the Morningstar are the trigger to detonate the nuke, but it’s obviously in my best interest to make that detonation as far away from me as possible. I express my wish that Maniac is just kidding about the Mace, but I know him well enough that he’d ask for something like this. We make our best possible speed for our pursuit, and there’s a minefield that does nothing to slow us down. Past the minefield, there is a wing of Sarthas hobbling our pursuit. While those ships have little chance against the tight particle gun grouping and nearly double the shield strength of a Sabre, they are successful in buying more precious time for Minx. I take down two of the Sarthas, and Maniac pounds the other one into oblivion. Our next encounter is with two Jalkehis. One makes a successful hit on my shields, and I watch it drop to a fifth of its strength. I pursue and take out that Kilrathi before he can inflict more damage. Maniac and I engage in a little tag team on the other Jalkehi, and Maniac is able to finish him off. At the next nav point are four Gothris blocking our way. I make a misfire with the Mace and don’t take out any of the fighters. I take significant shield damage from my Mace attempt from the Gothri gun fire, but I stick with one of the cats and destroy his fighter. I go after a second Gothri, and that pursuit gives me the time I need to let those forward and aft shields recharge. Both are stronger after I take down my second target. I go after and nail a third Gothri, and those strong shields of the Morningstar completely absorb a missile hit from him. The final Gothri makes an effective use of a chaff pod, which makes my missile shot go off at close range to cause some frontal armor damage. This pilot is quite good by using his rear gun to keep my forward shields low on strength. Unfortunately for him, he’s not good enough and I send him to the big litter box in the sky. I let my shields recharge before heading off to the next nav point. Good thing those shields are charged, since there is a Kamekh with two Dorkathi transports. The missiles of the Kamekh force Maniac to retreat, but I nail him and focus on the transports. The first Dorkathi is a bit of a pain to destroy, but the second one is easily destroyed with gun barrages to the rear. I head back for the Concordia, and make my landing approach with two-thirds of my fuel gone. Before landing, Major Edmond asks if I was successful in finding Minx. I tell the Major that Minx must have gambled on the jump drive working since I did not see her. To show how well-planned her escape was, the Kilrathi had organized that resistance we met along with the bomb sabotage she used to get away on the Concordia. I explain that there was heavy Kilrathi resistance at almost every nav point, and I’m allowed to land.
Canewdon 11
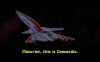
I meet up with Paladin, who has more news for me. Scorpion was an agent that Paladin sent to infiltrate the Mandarins. Scorpion’s mission started sixteen months ago, and Paladin thought that Scorpion might be dead due to not hearing from him for over a year. With Scorpion’s assistance with a transmission from Ayer’s Rock, we’ve been able to locate that Mandarin base. Paladin wants me to come along to do recon work on Ayer’s Rock, and will use Scorpion’s transmissions to keep track of the base. Paladin says that he needs two more officers for this mission, and I know that Maniac and Talon are the best candidates. I meet up with Maniac in the observation room, and he’s feeling depressed. He laments the loss of his squadron with the death of Crossbones, Talon being unable to ever fly a fighter again, and finding that Minx is a traitor. With the Kilrathi now having the Morningstar, Maniac thinks his career is finished. I tell him that I understand the feelings he is going thru, but the fight is not over yet. I give him the news that he will be a part of Paladin’s Special Operations division, and that we’ve found the Mandarin Ayer’s Rock base. I tell Maniac that Minx may have taken the Morningstar there, and we’ll be heading there next. Maniac and I see Angel in her office, and she gives us the orders from Confed High Command. We’re both to rendezvous with Paladin, where he will give us further orders. Maniac is enthused to get going, and we launch from the Concordia. There are some Kilrathi along the way to stop us from meeting Paladin. The first group are two Gothris, and those shields of the Morningstar again save me from an enemy missile. I nail one of the Gothris and go after the other one. I take down the other Gothri, but not before I take frontal armor damage. I make another Mace misfire by trying to tag one of the transports and miss. Maniac ices all three Dorkathi transports, and I feel a bit embarrassed I did not get a transport. We continue along our way, and there are some Drakhri lurking in an asteroid field. I pulverize two of the fighters fairly easily. I pick up a third Drakhri target, and then Maniac decides to attempt to shoot thru me. Fortunately, my shields are able to absorb that hit but I’m bobbing and weaving madly to get Maniac and anybody else off my tail. I successfully shake any pursuers, and then target and tag the third Drakhri. A fourth Drakhri goes down with few troubles. That final Drakhri decides to put in the fight of his life. Maniac lends an unintentional friendly assist by again tagging my rear shields. The Kilrathi pilot deploys a chaff pod, which does some shield damage due to a missile detonation nearby. Maniac is STILL trying to help the Drakhri kill me by blasting me from behind. I eliminate that fighter and we both continue onwards. One more obstacle remains, which is an asteroid field. My safe approach of using piloting with no afterburners gets Maniac and me thru the field with no damage. At our rendezvous with Paladin, I get a surprise. Paladin is using the Gamal Gan Kilrathi transport we captured a while ago as a refitted ship renamed as the Grimalkin. Paladin’s plan is to take this ship to Ayer’s Rock since it’s less conspicuous then the Bonnie Heather. The Grimalkin has fuel, munitions, repair capabilities, and electronic screening to mask our Morningstars. Confed really did great work on this refit in such a short time, and both Maniac and I land.
Canewdon 12
Maniac and I see Paladin in the communications room, and his plan is to jump to Ayer’s Rock. Talon’s along to help by manning this room during our missions, and he says that he wants to help us in recovering the Morningstar. Talon also wants revenge for what happened to Crossbones, and he mourns his lost friend. Paladin says there will be plenty of time later to remember lost friends, and my thoughts go back briefly to Spirit. Paladin wants both Maniac and I to relaunch as soon as the Morningstars are refueled, so it looks like we have some work to do. Once spaceborne, Paladin says that he has our course programmed and that Maniac and I will do escort duty for the Grimalkin to reach the jump point. Maniac thinks that it would be a bad idea for us to do separate jumps due to the Morningstar’s problems with its jump drive. Paladin agrees to this point, so we’ll redock at the jump point just to make sure everybody gets to Ayer’s Rock. I tell Paladin that I definitely want to see Ayer’s Rock, and I hope that ‘Jazz’ is at the Mandarin base. Our first enemy encounter are some Strakha stealth fighters, so these should be easy fodder for our fighters. I take down an approaching fighter and bail Maniac out from a Strakha trying to punch holes in his Morningstar’s rear. Our next Kilrathi encounter has four Jalkehis against two Morningstars. I launch and detonate my Mace, and one Jalkehi is damaged enough for Maniac to finish him easily. I target and take down a Jalkehi approaching on my first pass. I pick on another Jalkehi to go after, and his fighter goes down to my gun barrages. Maniac mops up the last Jalkehi, and we go to the next nav point. There are some Gothri here, and one attempts to kill me outright with some close gun barrages. You need to do better then that cat! I make him my target and nail his fighter. Paladin makes things interesting by laying down flak barrages to discourage the cats. I am pummeling a second Gothri, and he taunts me. No wonder he’s a tough cat to kill since he’s Drakhri! Maniac finishes that troublesome pilot, and I pick the lone Gothri left. I do some weaving when I hear some shots go off that are not mine, and I can’t tell if Maniac or I got the kill for that fighter. I tell Paladin that the jump point is secure, and it looks like five kills for me. Maniac must have done the final blow to that last Gothri, and Paladin wants us to land so that we can jump to Ayer’s Rock. The Grimalkin makes the jump, so we’re going to soon see what kind of reception we’ll be receiving.
P.S. - It's pretty fitting to be ending Wing Commander 2 after the July 4th holidays, and I will be doing one kill at least with that Mace on the final four missions. The trigger for the Mace detonation is the space bar by the way. Happy Holidays to all, and I wish everybody a 'Big Bang' in more ways then one!


") I probably will go back and catch up from where I left out in WC1.
I probably will go back and catch up from where I left out in WC1.
")