Special Operations 1
In the dark depths of space, an ominous voice says, ‘I will return, HUMAN!!!’
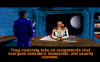
Prince Thrakath orders Khasra to lead an assault on Ghorah Khar. Khasra says that such an assault would be suicide. Thrakath demands to know if Khasra is questioning his orders, and Khasra boldly says that he is not only questioning the orders but also wondering why the Prince is still in charge of the battle fleet. Thrakath is astounded that Khasra would dare to insult him. Khasra points out that the Prince was responsible for the failure at K’Tithrak Mang and should have died for the loss of the base there. Prince Thrakath states his belief that the Emperor still favors him due to not attempting to personally assassinate him. The Prince then gives Khasra a choice between obeying his orders or dying as a traitor.
I meet Admiral Tolywn in his office, and he tells me the good news that I’ve been promoted back to my original rank of Colonel before Jazz’s sabotage. I’ve also been requested to join the Special Operations division. Special Operations has a reputation of taking assignments that are considered impossible and usually succeeding. There are still Kilrathi forces to deal with, but after taking care of them Paladin will be the person giving me instructions on my Special Operations assignment. Paladin is the chief field officer of the Special Operations division. Tolwyn expresses his expectations that I’ll follow Paladin’s orders better than his. As a cover for my Special Operations assignment, all personnel except Hobbes, Angel, and Tolwyn will be informed that I’ve been sent on an extended R&R.
Pembroke 1
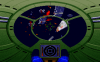
I meet Angel in the briefing room, and she tells all of the pilots that with our victory in K’Tithrak Mang the Confederation controls the Enigma sector. With our victory, however, comes the need for vigilance since the Pembroke system we are currently in is a jump nexus between Enigma and Vega sectors. The only way for the Kilrathi to win here is to either take or destroy Pembroke station and block Confed troop movements. In an effort to prevent this, a thorough rotation of patrols will be undertaken. Stingray and I will take the lead patrol. Angel advises us both to use our best judgment when engaging the Kilrathi, but not to get too cocky. She emphasizes that we can’t afford to lose any pilots, and Stingray assures Angel that he’ll help me come back in one piece. For this mission, we’ll be assigned to Super Ferrets with new control systems and two heat seeker missiles. On our first enemy encounter, there are three Drakhri Sarthas. It’s a pretty simple matter of ‘scoot and shoot’, and I take out two of the enemy fighters while Stingray scores a kill. The next wave of Kilrathi are even easier. Just two standard Sarthas, which are wiped out with little effort from the mass drivers of my Ferret. The next nav point is where all the action is! Four stealth fighters are flying escort for a Kamekh. Due to the cloaking ability, the stealth fighters certainly make survival more challenging. I weave around to avoid any stray Kilrathi from getting any easy missile shot at me. I manage to take out two of the cloaked fighters. My aft shields and armor get wiped out, and it looks like Stingray tagged me! This is NOT helping, but I concentrate on any other fighters. Stingray tags a Kilrathi, and now it looks like it’s just the Kamekh. I hear stray stealth fighter attacks, but I don’t see the fighter or any shots so he’s either on my six and a bad shot or attempting to take out Stingray. Due to the fragile Ferret shields, I go full throttle against the Kamekh. My first run gets a very satisfying series of explosions, but that cat does not want to go down yet. On my second pass, I let that Kamekh have a full barrage of guns again and it goes up in a ball of flame. The final stealth fighter decides to reveal itself(nice Kamekh defense there, NOT!) but is blown to bits by my guns. I autopilot back to the Concordia, and wonder how those techs will react. I land and am informed that Angel wants to see me. I meet Angel in her office and tell her that there is certainly clean-up work to do here. I explain that the real action on this mission was the third nav point with the Kamekh. Stingray says we’re a hot team, though I certainly hope he uses a bit more discretion on his target selections. Angel tells us both that she’ll take this to Tactical for analysis. She agrees that there is still a good deal of work to do here in this system.
Pembroke 2
I meet Sparks in the hangar bay, and she likes how my restored rank looks. She says that things look to be a bit calm, and that she’s going to enjoy the peace and quiet. She’s also liking her opportunity to work on the Super Ferrets, and I silently wonder if they are her favorite fighter. She tells me the news that Confed has lost contact with the TCS Tsiolkovsky in the Rigel system for the last several days. Sparks expresses her hopes that I’ll still be on the Concordia when we reach Rigel since veteran pilots would have the best chance in such an unknown situation. She also asks me if I have received news of my next assignment, and believes that it might be an assignment as a commander of a fighter squadron. I tell her that Confed will certainly think of some way to keep me busy. I then meet up with Stingray in the barracks, and he’s still quite excited on how hot that previous mission was. He’s certainly feeling more upbeat due to the continuous good things happening. With the Kilrathi on the run, Jazz’s court-martial next week, and my improved attitude since being exonerated of the Tiger’s Claw destruction, Stingray wonders where I’ll be going for my R&R. I tell him that my plans are to visit Earth for a few weeks and that I need the time to relax after everything that happened. Stingray thinks it must be tough for an older flyer like me to fly so many combat missions, and that I should leave the action to the younger pilots. I tell him that I’ll let him have his fun for a while. In the briefing room, Angel points out that almost every patrol encountered the Kilrathi. Due to the larger than expected enemy presence here, a transmission with jump coordinates was detected from an enemy patrol to a much larger strike fleet. A patrol will be sent to all jump points in the area to intercept any Kilrathi. The mission assignment that Stingray and I receive will flank the Kilrathi if they appear at our first nav point. After takeoff in our Ferrets, Stingray and I head for the first nav point. Nothing interesting here except two Dralthi Drakhri, which are quite quickly dealt with. Our next encounter is quite the sight with enemy Grikaths. Using my afterburners a few times to keep moving against my targeted Grikath, I keep pummeling him with mass drivers and take out one. Stingray helps out and takes down a Grikath by himself. I’m still pursuing a second Grikath, and I decide to use one of the Ferret’s heat seekers. It looked like the Grikath successfully decoyed that missile away. That Grikath decides to make a frontal pass, and my guns take him out. A missile shot from one of the enemy fighters wipes out my front shields and armor. Looks like the Grikaths are now focusing on Stingray, and I pursue my third one. That one goes down in a barrage of gunfire. I notice another far away in my radar scope and then all of a sudden, I see one that Stingray has engaged. I take a number of shots to distract the Grikath, and I’m a bit surprised I don’t return Stingray’s favor on the first mission by hitting him. Some of the other Grikath shots hits my side, and I lose part of the port armor. Another hit to my rear shields and armor, so that other Grikath must now be on my six! I shake him loose from my tail and wipe out the Grikath that I was concentrating on. I use my second heat seeker on the final Grikath, but another decoy renders the missile harmless. I swing around to the Grikath’s side and blast that fighter to bits. I still notice two targets on my scope and go to full throttle to check them out. Furball! There are two Fralthras, and there is NO way I can take them out without torpedoes. I afterburn away from the Fralthras, and fortunately Stingray decides to follow my example. I autopilot back to the Concordia, and request priority communication during my landing approach. I tell the Concordia the situation with those Fralthras heading for Pembroke Station at full speed. The Concordia asks for confirmation of this, and I tell them again that there are two Fralthras heading for Pembroke Station. The Concordia initiates battle stations, and requests my camera data for the strike against the Fralthras. After transmission of the data, and a recount of the kill score for this mission I land.
Pembroke 3
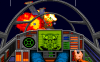
I meet up with Stingray in the hangar, and ask if he’s ok. Stingray is a bit surprised at the Fralthras we ran into and thinks that half the Kilrathi fleet is out there to welcome us. I say that I’ve learned to expect the unexpected, and we both hear a call for all pilots to enter the briefing room. Stingray makes a bet that we’re not done flying for today, which should be an easy bet to cash in since I fully expect that we’ll be flying to deal with those Fralthras. In the briefing room, Angel explains that those ships are heading for Pembroke station. The Concordia is positioning itself to attack to keep the Fralthras from reaching the station. We will launch to take care of any fighters, and go off to Pembroke station to prevent any attack on it. Upon takeoff in Sabres, Angel establishes communication with me and tells me to be careful on this mission. I tell her that I will be careful, and Concordia warns us that the Fralthra have been sighted. I notice that I have Doomsday as a wingmate, so it’s three fighters versus whatever the Kilrathi will throw at us. There are new fighters that we are dogfighting with. They seem to be similar to the Jalkehi in terms of both front and rear guns. The armor of those enemy fighters does not seem as impressive as that of the Jalkehi, and together we eliminate three of them. I take damage to my fighter from flak, and get out of range. I watch as the Concordia unleashes a barrage of anti matter guns on the Fralthra. It takes three hits, and the Concordia opens fire again. A huge energy ball from the Concordia envelops and destroys the Fralthra. Our wing heads to Pembroke station. On our way there is a minefield, but I easily afterburn thru it without a scratch. Upon arrival at the station, there are three Grikaths looking to ice it. I take out one, but then both Stingray and Doomsday decide to get really aggressive and are shooting like crazy at the two remaining fighters. Deciding not to become a friendly fire casualty, I use a few missiles though it looked from my view that the Grikaths evaded both missile shots. Fortunately, the gunnery of both Stingray and Doomsday is accurate enough to destroy those Grikaths. I head back thru the minefield, and autopilot back to the Concordia. Upon landing, I head to Angel’s office with Stingray and Doomsday. I tell her of our successful elimination of the fighters and the defense of Pembroke against a wing of Grikaths. I also inform Angel of the new fighters we ran into, and she says that these are new Kilrathi heavy fighters called Gothri.
Pembroke 4
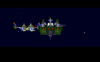
In the barracks, Stingray, Doomsday, Hobbes and myself play some cards. Doomsday practically begs for a good hand, and Stingray asks when I’ll be leaving for my R&R. I tell him that the R&R will start once we reach Rigel. Doomsday asks Hobbes if he is going on leave, but Hobbes tells Doomsday that Admiral Tolwyn requested his presence. The Admiral definitely needs Hobbes to consult with to make sense of recent Kilrathi developments. After completing that, Hobbes will be reassigned to Ghorah Khar. Stingray relays the news about three more planets rebelling against the Kilrathi Empire, and wonders if there will be any cats left to fight soon if this rebellion keeps spreading. In the briefing room, Angel relays the distressing news that we have lost contact with the Rigel supply depot. Free Trader vessels entering the area have also not been heard from. The new mission will be to jump in with the Concordia, find out what is going on, and take whatever action is needed. In order to ensure a successful jump into Rigel, I am to fly solo in a Broadsword to clear the jump point and return. The Concordia will have an escort of other Broadswords. Also, due to personnel losses another pilot will be assigned as my rear gunner. Angel assigns herself as the chief gunnery officer(I’m guessing the rear turret here). Upon takeoff, I establish internal communication with Angel to make sure everything is ok with the gun stations. At the first nav point are two Jalkehis in a mine field. I do dispatch the first one with guns, but do take some armor damage from the mines. The second one runs into a mine, and is vaporized. I reach the jump point with no other resistance, and on the other side of the jump everything is clear too. I notice four fighters on my scope as ‘Unidentified’, but those sure look like Ferrets to me! One hit from my forward guns destroys a Ferret. I manage to take a chunk off a second and switch to the rear turrets. Those Ferrets come in on swooping passes from my rear, but one gets careless and I let him eat a barrage from the aft turret. A second thinks I won’t notice him just below that destroyed fighter, but I pick him off too. I switch to the front guns, but that last Ferret is too nimble to get a shot at. He tries coming in on my six, but I have the rear guns ready again. He makes a desperate attempt to get out of that devastating barrage, but his fighter goes up in a hefty chunk of debris. I head back to the Concordia, and during my approach I relay the news about my encounter with the Ferrets. The Concordia wants me to report this to the Admiral upon landing. I tell Tolwyn of this attack encounter by the Ferret squadron. Tolwyn tells me that he is not surprised at hearing this and that he had a report weeks ago about pilots onboard the TCS Gettysburg having a mutiny near N’Tanya. Tolwyn felt that these pilots had moved into the Rigel system due to the multiple incidents of loss communications. N’Tanya is one of the planets rebelling against the Kilrathi, so why would there be a mutiny there? There have also been efforts to locate the Gettysburg. I express my surprise at not hearing that an entire carrier contingent has gone rouge, but the Admiral tells me that is due to the very high security taken to contain the spread of this mutiny. I am given a direct order not to tell anyone about this except Angel. After our jump into Rigel, Tolwyn plans to deal with the mutineers.
P.S. - I'm looking forward to your reply Lorien! Fly well, frag furballs, and get ready for the next series of missions!